Paediatric Advance Life Support (PALS)
Received: 02-Oct-2023 / Manuscript No. tpctj-23-116314 / Editor assigned: 06-Sep-2023 / PreQC No. tpctj-23-116314(PQ) / Reviewed: 20-Oct-2023 / QC No. tpctj-23-116314(QC) / Revised: 27-Oct-2023 / Manuscript No. tpctj-23-116314(R) / Accepted Date: 31-Oct-2023 / Published Date: 31-Oct-2023 DOI: 10.4172/tpctj.1000209
Readers should be able to:
1. Distinguish between the components of a pediatric assessment.
2. Describe techniques for childhood assessment.
3. Explain the components of the pediatric evaluation triangle and why you formed a broad impression of the patient.
4. Summarize the purpose and components of the primary assessment.
5. Identify normal age group related vital signs.
6. Discuss the benefits of pulse oximetry and capnometry or capnography during patient assess- ment.
7. Make the distinction between central and peripheral pulses.
8. Summarize the purpose and components of the secondary assessment.
9. Discuss how to obtain a patient history using the SAMPLE mnemonic.
10. Describe the diagnostic test and lab results.
11. Recognize the value of collaboration during a resuscitation effort.
12. While working as the team leader of a resuscitation effort, discuss the key roles of team members.
Introduction
A methodical strategy to assessing an unwell or ill child is required, as is knowledge of growth and de- velopmental pathways, as well as a comprehension of the anatomic and physiologic variations between children and adults. Obtaining historical information and doing a physical examination differ based on the child’s age and appearance [1]. Patient care is delivered by a team of professionals regardless of the healthcare environment in which you work.
Rapid assessment: pediatric assessment triangle
When dealing with emergency situations, it is critical to do a quick visual examination of children and in- fants before gathering data and administering assistance. This visual assessment allows you to ensure that the surroundings is safe and to evaluate if the situation is life-threatening and requires immediate inter- vention. The Pediatric Assessment Triangle (PAT), which employs an A-B-C strategy (Appearance, Work of Breathing, Circulation) during the initial assessment, is considered as the cornerstone of emergency case assessment and care.
Appearance
The first step in PAT is to analyze the patient’s appearance and attentiveness (if the child or infant is inter- acting with the environment, parents, and caregiver, if he crying or speaking, and if he looks lethargic of flaccid, limps, or has poor muscle tone).
Work of Breathing
The patient’s work of breathing is evaluated in the second step of PAT by:
1. Observing any signs of increased respiratory efforts like using of accessory muscles, nasal flaing, and retractions.
2. Listening to any audible breath sounds such as wheezing, stridor, or grunting).
3. Respiratory rate (rapid, slow, or apneic).
Circulation
The last assessment part of PAT is the circulation. in this part, the healthcare provider will observe the signs of inadequate perfusion, mostly assess the mucus membranes and skin color (Flushing, Cyanosis, Pallor, or Mottling).
Pediatric resuscitation
Use the shout-tap-shout process to see if the patient is responsive. For a child, tap the shoulder, and for an infant, tap the bottom of the foot.
If the patient not responding:
1. Activate emergency mobile services (EMS), the rapid response team (RRT), or the Code team, and request a cardiac monitor, defibrillator, or automated external defibrillator (AED) .
2. Open airway using head tilt chin lift technique or jaw thrust technique.
3. Check pulse and breathing simultaneously (carotid for children; brachial for infants) for at least 5 seconds, but no more than 10.
4. If patient is pulseless and apneic, start basic life support.
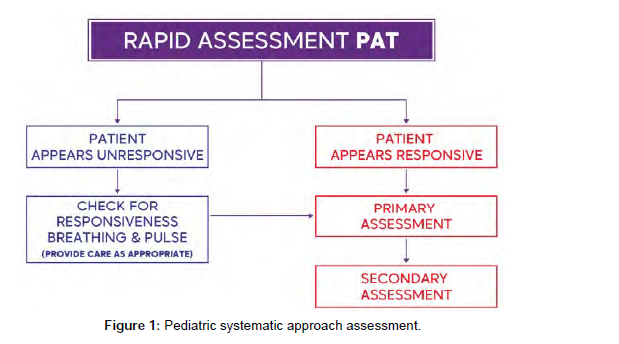
5. If the patient is breathing and has a pulse, proceed to primary and secondary examination, of- fer care as needed, and monitor and notice any changes while waiting for the resuscitation team
6. If the patient is apneic but still has a pulse, give bag-mask ventilation (BMV) and check the pulse every 2 minutes.
Primary assessment
Complete a primary assessment after the rapid assessment has been completed and you have determined that the patient is not experiencing a life-threatening emergency. This includes gathering physical and physiological data to help identify the underlying cause(s) of the patient’s emergency condition [2].
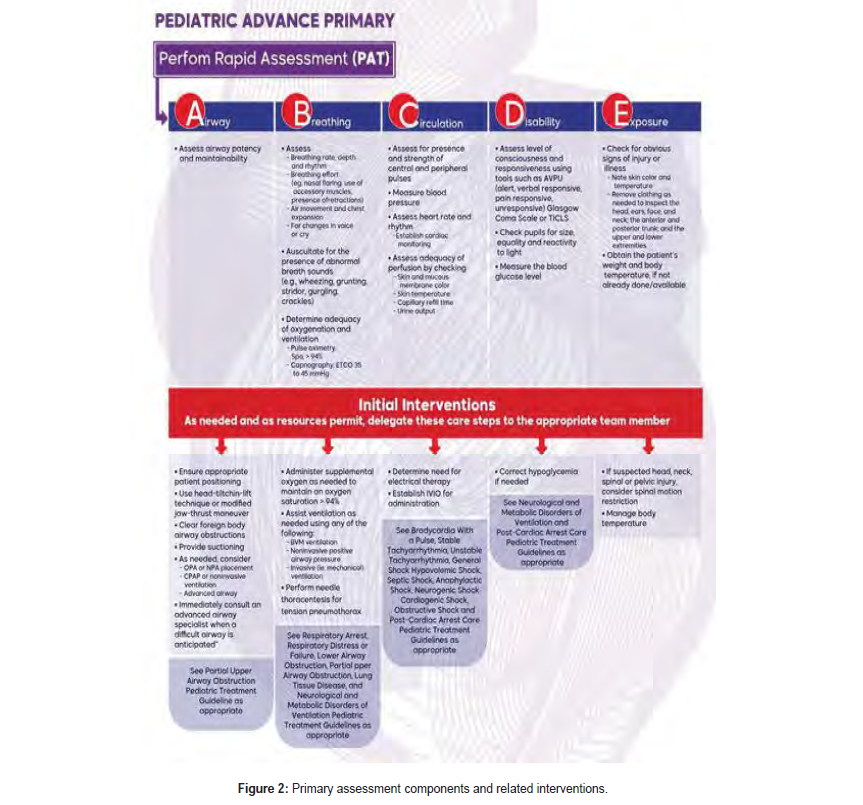
The primary assessment’s purpose is to identify potentially lifethreatening conditions and correct them as soon as possible to keep the patient’s condition from worsening. The primary assessment processes should be repeated until the patient is stabilized, transferred to a higher level of care, or both. Once Sequence for the Primary Assessment the Primary Assessment Sequence the A-B-C-D-E mnemonic is used in the primary assessment to emphasize the strategy to evaluating the kid or infant.
Airway: Determine the patency of the patient’s upper airway.
You will notice normal breathing and breath noises in the patient if the airway is patent. The following in- dications may be present if the airway is not patent: Respiratory discomfort or increased work of breathing (i .e., nasal flaring, use of accessory muscles, intercostal or suprasternal retractions) Stridor, grunting, and wheezing are all examples of abnormal breath noises. Patency must be restored and maintained immedi- ately if the patient’s airway is not open and clear. Simple interventions include moving the patient or conducting manual procedures to open the airway (e.g., head-tilt/chin-lift technique or modified jaw-thrust maneuver) can keep an occluded but sustainable airway open manually.
It is also critical to clear the airway by suctioning or removing any apparent foreign materials (do not do a blind finger sweep). To keep the airway open, a basic airway (oropharyngeal or nasopharyngeal airway) may be essential. When an airway is clogged and cannot be maintained with manual maneuvers, suctioning, or a basic air- way, CPAP, noninvasive ventilation, or an advanced airway must be used. If the child’s or infant’s airway is clogged and you suspect a foreign body is to blame, take the following steps: Encourage coughing to clear The airway if the child or newborn is choking but can cough, speaks, cry, or breathe (Figure 1).
Breathing: Examine the patient’s breathing to see if ventilation and oxygenation are adequate. In order to evaluate a child’s or infant’s respiration, look for:
Breathing rate, depth, and rhythm: Is the patient breathing slowly or quickly? Is it usual to have chest and abdominal movements?
Is the beat regular or irregular? Take note of the chest expansion and air movement. Is there an increase in work of breathing, such as nasal flaring, auxiliary muscle usage, and intercostal or suprasternal retractions?
Listen for breath sounds: Have you heard sounds like wheezing, grunting, stridor, gurgling, or crackling? Changes in voice or cry: Are there any changes in voice or cry (e.g., hoarseness, hot potato voice)?
Oxygen saturation: What is the patient’s oxygen saturation based on a pulse oximeter reading?
Supplemental oxygen should be given as needed to maintain an oxygen saturation of more than 94%. Support breathing if necessary by using a bag valve-mask (BVM) resuscitator to administer ventilations. If necessary, use noninvasive or invasive ventilation (Table 1).
| Age Group | Respiratory Rate (Breaths per Minute) | Awake Heart Rate (Beats per Minute) | Systolic Blood Pressure mmHg | Diastolic Blood Pressure mmHg |
|---|---|---|---|---|
| Newborn | 30-60 | 100-200 | 60-85 | 35-55 |
| Infant (1 to 12 months) |
30-50 | 100-180 | 70-100 | 35-60 |
| Toddler (1 to 2 years) |
24-40 | 90-140 | 85-105 | 40-65 |
| Preschooler (3 to 5 years) | 20-30 | 80-130 | 89-115 | 45-70 |
| School Age (6 to 12 years) | 16-26 | 70-120 | 94-120 | 55-80 |
| Adolescent (13 to 17 years) | 12-20 | 60-100 | 110-135 | 60-85 |
| Quick Assessment for Hypotension | Quick Assessment for Hypoglycemia | |
|---|---|---|
| Age Group | Systolic Blood Pressure mmHg | Plasma glucose threshold: • Neonates: < 45 mg/dL Infants, children and adolescents: < 60 mg/dL |
| Neonate | < 60 | |
| Infant | < 70 | |
| Toddler to School Age | < 70 + (age in years x 2) | |
| Adolescent | < 90 | |
Table 1:Normal vital signs by age groups.
Circulation: Check for adequate perfusion. Reduced perfusion can result in decreased oxygenation (hypoxia) of tissues and essential organs, as well as a reduction in nutrition supply. Checking the following things can help you assess the patient’s circulation:
Peripheral pulses: Pulses, both central and peripheral: Is it possible to feel the pulses? Are they strong and thready or weak and thready? Are there significant differences in the properties of central and peripheral pulses?
Blood pressure (BP) levels
Is there a drop in blood pressure (hypotension)? Rhythm and heart rate: Is your heart rate faster than usual (tachycardia)? Is your heart rate slowing down (bradycardia)? Is there an abnormal ECG rhythm during cardiac monitoring?
Is the patient’s skin and mucous membranes pale (or gray/dusky), mottled, or cyanotic (centrally and/or peripherally)? Is the color of the mucous membranes pink or pale?
Skin temperature
In a normothermia atmosphere, does the skin feel chilly to the touch? Is the capillary refill time excessive (more than 2 seconds)?
As needed, provide supportive care. Establish intravenous, intraosseous, or both intravenous and intraosseous access for the delivery of fluids, medicines, or both (Figure 2).
Disability
Quickly assess the neurological status of the child or infant during the disability evaluation. Is there a drop in level of consciousness? Is the patient perplexed? Is the patient becoming increasingly agitated or diffi- cult to awaken? Is there any seizure activity?
PERRL Pupillary Response (Pupils Equal, Round, Reactive to Light). Are the pupils well- defined? Dilated? Is the patient hypoglycemic, resulting in a change in level of consciousness?
The AVPU scale is as follows:
Awake: The patient is awake and engaged.
Patient solely reacts to verbal commands and does not respond to voice stimulation (e.g. shout- ing their name, talking or yelling).
Only painful stimuli can elicit a response from the patient (e.g. pinching the trapezius area or performing a sternalrub).
Unresponsive: The patient is unresponsive to all stimuli. During
Exposure: Check the patient’s body for visible symptoms of injury or disease, and take note of skin color and tem- perature as the final phase of the primary evaluation. If not already done/available, remove clothing as needed to assess the head, ears, face, and neck; the anterior and posterior trunk; and the upper and lower extremities; and body temperature.
Secondary assessment
When performing the secondary assessment, complete a more indepth history and perform a head- to-toe examination to identify any problems that were not identified during the primary assessment. The acronym ‘SAMPLE’ may be useful during history taking.
History taking (sample)
Adult and pediatric history taking are not the same and provide different obstacles. A parent or guardian frequently reports symptoms since they are unable to provide an accurate history of the child’s illness and worries. To bridge the gaps, excellent communication skills and strategies to develop a collaborative style to interact with children and their families are fundamental elements while taking history. Additionally, it is essential to devote particular attention to growth and developmental issues characteristic typical in childhood and be cognizant of the differences in disease presentation between children and adults.
Head to toe examination
The physical examination should be detailed and focused on the symptoms of the patient. The detailed physical examination is aimed at inspecting all parts of the body for deformities, ecchymosis, lacerations and abrasions, punctures and penetrating wounds, in addition to any tenderness, edema, or burns. If pos- sible, try to examine painful areas last and try to avoid moving the affected areas.
Based on the patient’s appearance, chief complaint, primary assessment findings, and the severity of the child’s sickness or injury, a specialized physical examination may be more suitable. Compare one side of the body to the other throughout the examination. Use the unaffected side as the typical finding for com- parison if a sickness or accident affects one side of the body (Table 2).
| History Focus Areas | Information to Gather |
|---|---|
| Signs and symptoms | Altered consciousness, respiratory difficulties, vomiting, diarrhea, fever, bleed- ing episodes |
| Allergies | Environmental, food, and medication |
| Medications | Recent drugs (including dosage and administration time) and any recent medication changes |
| Past medical/surgical history | Birth history, Immunization history Medical or surgical history |
| Last meal | Meal type and time of intake |
| Events | Time of onset Description of the symptoms leading to the current episode Treatments already administered |
Table 2: History taking using the mnemonic SAMPLE.
Head and neck
Inspect the skull and face and observe for symmetry and balance.
Evaluate the patient’s of motion range
Assess the kid’s head control and neck strength; the whole range of motion can be determined by asking the older child to move their head up and down and turn their head right and left as far as possible; the examiner should gently move the head of the infant to check for any signs of neck stiffness.
Assess the fontanels: The examiner uses the flat pads of their fingers to gently feel the head surface to determine the fontanels (open or closed). Additionally, they should check for any retraction or bulging of the fontanel.
Assess the eyes: It is essential to observe the eyes for symmetry and their position with respect to the nose. Examine the eyes for signs of redness or discharge and look for evidence of rubbing. In the older child, observe their ability to focus by asking them to follow a penlight as it is moved in specific directions. An infant will also fixate on and follow a penlight with their eyes. Evaluate pupillary response to light.
Assess the ears: Examine how the ears are positioned and aligned. Draw an imag nary line from the top of the pinna to the outside corners of the eye. Observe the child’s reactions during typical conversation to assess hearing. If a youngster speaks loudly, replies improperly, or is not audible, a hearing problem should be evaluated.
Assess the nose, mouth, and throat: Draw an imaginary line down the middle of the face to check for symmetry, then inspect behind the nostrils for any deformity, discharge, or bleeding. To examine the mouth and throat in the older child, the examiner should instruct them to hold their mouth as wide as possible and move their tongue to either side. In an infant or toddler, the examiner should use a wooden tongue blade and penlight to check the oral cavity and throat. Inspect the oral cavity for color and moisture and look for signs that might suggest an infection. Inspect the teeth for abnormalities, including the number and state of the child’s teeth. Any scents that could aid in determining the source of the patient’s ailment. On the breath of a child with diabetic ketoacidosis, for example, the pleasant or fruity odor of acetone may be noticed. An odor of bitter almonds may be detected in a child with cyanide oisoning [3].
Thorax and Lungs
Chest circumference is an important anthropometric parameter in monitoring child growth.
How to perform chest circumference: Using the nipple line as a guide, wrap the tape around the chest and note the measurement. With respiration, examine the size, shape, and movement of the chest. Also look for any retractions in the chest.
Adolescents: Look for signs of breast development in school-age children or adoles- cents.
Assess respiratory characteristics: Keep an eye on the child’s breathing rate, rhythm, and depth. Note any abnormal respiratory sounds such as stertor or stridor.
How to perform breath sound assessment: The examiner should auscultate the lung fields to assesses airflow through the tracheobronchial tree and report abnormal breath sounds such as rales, rhonchi, or wheezing.
Heart: The mitral valve sound, also known as the point of greatest impulse, is best heard in some newborns and children near the fourth intercostal space on the left midclavicular line.
Evaluating heart rate and rhythm. The examiner can evaluate the child’s heart rate by counting the beats for one full minute and pay attention to the heartbeat rhythm.
Assessment for cardiac abnormalities. Abnormal heart murmurs might indicate a congenital heart disease or other abnormality that warrants clinical investigation.
Evaluating cardiac function. To determine how well the heart functions, the examiner should examine the pulses in different parts of the body.
Abdomen: Slight abdominal protrusion is common in newborns and children.
Assess bowel sounds. The examiner should auscultate all nine regions of the abdomen with a warmed stethoscope while the child is quiet to assess bowel sounds.
Inspect the abdomen for distention, bruising, use of abdominal muscles during breathing, scars, feeding tubes, and stomas or pouches.
Gently palpate each abdominal quadrant for tenderness, guarding, rigidity, and masses. If the child complains of pain in a specific abdominal area, palpate that area last. Observe the child as you palpate.
Auscultate the presence or absence of bowel sounds in all quadrants. Gently palpate each ab- dominal quadrant for tenderness, guarding, rigidity, and masses. If the child complains of pain in a specific abdominal area, palpate that area last. Observe the child as you palpate.
Genital organ and rectum
Ethical standards should be followed when performing an examination of the genital organ and rectum in children. In the older child, the examiner should clearly explain the procedure before conducting the examination.
Inspection of the genital organand rectum: The examiner should inspect the genital organ and rectum while wearing gloves. Check the genital organ and perineal region for any lesions, irritation, or discharge.
Assess the testes: Testicular descent occurs at various stages throughout childhood. If a testis cannot be palpated, the examiner must initiate an evaluation for nonpalpable testis.
Back and limbs
The back and limbs should be examined for abnormalities.
Assess the back: The examiner should look for symmetry in the shoulder height and scap- ulae. Changes in proper alignment and other structural abnormalities should also be checked on the spine. The spine of a baby is C-shaped and flexible. As neonates develop motor abilities, secondary curvature in the cervical and lumbar spine form. The spine develops further as the youngster grows. The examiner should examine the back for pain, rashes, changes in skin color, swelling, and open wounds. Auscultate the posterior chest for normal and common abnormal breath sounds. In patients with suspected spine injury, make sure the head, neck and back are aligned during the examination.
Gait and posture analysis: Watch the child as they walk and check for any issues with their posture. Assess motor function in an upper extremity in an alert patient by instructing the child to “Squeeze my fingers in your hand.” To assess motor function in a lower extremity, instruct the child to “Push down on my fingers with your toes.”
Assess the extremities: Check for symmetry and any skin changes in the upper and lower limbs. During a physical examination, the child’s motions can be used to examine foot and an- kle alignment, muscle strength, and range of motion. Check.
Neurological assessment
• A pediatric neurological amination is the most challenging part of the physical examination.
• Assess the child’s responsiveness to stimuli using the AVPU mnemonic: Alert, Response to
• Voice, Response to Painful stimuli, and Unresponsive.
• Examine the child for signs of lethargy or irritability.
• Posture assessment: Full-term infants tend to keep their keep their fists clenched, upper limbs adducted and flexed at the elbows, and lower limbs abducted and flexed at the knees.
• Tone assessment: This can be done by examining the infant’s posture and activity while they are unattended, as well as handling the youngster. Pick up the baby and listen to their tone. Place the infant in the supine position, then gradually move them to a sitting posture while keeping an eye out for signs of head lag.
• Assess pupil reaction to light.
Diagnostic Test and Lab Results
The diagnostic tests performed are often limited to pulse oximetry, capnography, and point-of-care serum glucose levels. Additional tests and procedures are performed to reach a diagnosis or determine the extent of the patient’s injuries (Table 3).
| Test | Abnormal Result | Importance | Interventions |
|---|---|---|---|
| Arterial blood gas | Low arterial oxygen and pH abnormalities | Indicates adequate ventilation | Manage ventilation by increasing and decreasing the rate |
| Oxygen saturation | Venous oxygen saturation outside the 70-75% reference range | Indicates adequate venous oxygen saturation | Improve oxygenation and ventilation |
| Arterial lactate concentration | High lactate levels | A high lactate concentration is a sign of illness A decrease in lactate levels is suggestive of treatment efficacy | See Shock Sequence |
| Arterial and central venous pressur monitoring | High or low pressure | May indicate adequate or inadequate fluid resuscitation | See Shock Sequence |
| Chest radiography | Lung conditions and complications related to these conditions | Detection of respiratory problems Verification of endotracheal tube position | See Respiratory Sequence |
| Electrocardiogram | Heart arrhythmias | Detection of heart disease | Depends on arrhythmia type |
| Peak expiratory flow rate | Low peak expiratory flow rate | If the test is properly conducted, the findings may indicate an underlying respiratory problem | See Respiratory Sequence |
| Echocardiogram | Valvular heart disease Congenital heart anomalies | Detection of cardiomyopathy and contractile dysfunction | Depends on the diagnosis |
Table 3: Examples of diagnostic tests that are used to assess problems with the cardiorespiratory system.
Teams and teamwork
Teamwork is important when providing patient care and is essential to patient safety. To be effective, team members must communicate, anticipate the needs of the team, coordinate their actions, and work coop- eratively. It is essential that all members of the team demonstrate respect for each other and communicate using a calm and confident tone [4 ,5 ].
Pediatric rapid response and resuscitation teams
Many hospitals have established strategies to improve patient outcomes by lowering the risk of cardiac arrest in unstable patients and lowering fatality rates when cardiopulmonary arrest occurs. These systems rely on fast response and resuscitation teams, which are made up of highly trained and skilled personnel. To achieve the best potential outcomes for each patient, healthcare providers on rapid response and re- suscitation teams must collaborate in a coordinated effort. A group of people with clearly defined tasks and duties working toward a common objective is referred to as a team.
The fast response team’s mission is to intervene promptly and efficiently to address the warning symptoms of impending cardiac arrest in order to avoid the arrest [6].
The resuscitation team’s purpose is to give pediatric advanced life support care to a youngster in respiratory or cardiac arrest as rapidly as possible. Patients in respiratory distress or shock in children may decompensate quickly, leading to respiratory and cardiac collapse. Highly trained teams are currently in place in critical care settings such as the pediatric intensive care unit (PICU) or the emergency department (ED), and pediatric advanced life support treatment will be deployed soon. Patients outside of these situ- ations, owever, are also at danger of respiratory or cardiac arrest. As a result, all healthcare workers should be taught to spot early indicators of clinical deterioration in patients and to know how to swiftly launch an emergency response.
In most hospitals, the Rapid Response Team (RRT) is separate from the resuscitation team. In some facilities, RRT members may initiate resuscitation before the code team arrives if RRT members have received training in pediatric advanced life support.
Skills and best practices
Every team leader and member must demonstrate crucial abilities such as communication, critical think- ing, and problem solving in order to obtain the greatest potential results. Implementing effective and efficient teamwork, as well as demonstrating these vital core abilities, enables the team to respond quickly and effectively, improving patient outcomes.
Communication
When caring for a kid who is experiencing signs and symptoms of shock or a pediatric respiratory or cardi- ac emergency, communication is crucial. You must communicate with your colleagues, as well as the pa- tient and his or her family. Nonverbal messages given through body language, such as gestures and facial expressions, are also included in communication.
There are four important components to communication
Message: The content of the communication must be expressed clearly so that everyone involved un- derstands exactly what the message is.
Receiver: The person for whom the message is intended.
Feedback: The receiver’s confirmation that the message has been received and understood; an essential element of closed-loop communication.
Communicating with the Team
Clear and effective communication among team members is the foundation of effective teamwork. A se- lected team leader oversees the actions of the other team members when a team is working to provide care [7,8].
Effective communication
1. Be audible.
2. Clear messages
3. “Close the loop”
When receiving information
By repeating the task back to the sender, you can indicate that you received the message and that you understand it. Recognize the task’s beginning and completion. Avoid speaking over others and talk clearly in a calm tone of voice.
Healthcare Team and Family Communication
Communicate with family after the death of a patient
Despite the fact that quick reaction teams have become more common in pediatrics, there is no convinc- ing evidence that they boost survival rates. As a healthcare practitioner, you would be required to inform a patient’s family of their death. Even for healthcare professionals, dealing with death is challenging. In this situation:
1. Deliver the news in a straightforward manner and include information about upcoming activ- ities. Allow time for the family to process the facts. Allow time for the family to grieve; inquire whether they want you to contact or have you call anyone, such as other family members. Wait and respond to any inquiries the family might have.
Critical thinking
Critical thinking is the process of identifying the link between information and actions by thinking clearly and reasonably. When you utilize critical thinking, you are continually discovering new facts and situations, logically responding to the knowledge to determine your best next actions, and anticipating how those actions will affect the patient. In healthcare, critical thinking is an important skill, especially in pediatric advanced life support circumstances (Table 4).
| Disorder | Upper airway obstruction | Lower airway obstruction | Lung tissue disease | Central respiratory disorders |
|---|---|---|---|---|
| Signs and Symptoms | Tachypnea | Tachypnea | Tachypnea | Variable |
| Stridor (typically inspiratory) | Barking cough Hoarseness Wheezing (typically expiratory) Prolonged expiratory phase | Grunting Crackles Decreased breath sounds | Normal | |
| Decreased airway movement | Decreased airway movement | Decreased airway movement | Variable | |
| Tachycardia (early); bradycardia (late) | ||||
| Pallor, cool skin (early); cyanosis (late) | ||||
| Anxiety, agitation (early); lethargy, unresponsiveness (late) | ||||
| Signs and Symptoms of Respiratory Distress and Respiratory Failure | ||||
| Respiratory Distress | Respiratory Failure |
|---|---|
| Airway open and maintainable | Airway not maintainable |
| Tachypnea | Bradypnea to apnea |
| Work of breathing (nasal flaring/retractions) | Increased effort progresses to decreased effort and then to apnea |
| Good air movement | Poor to absent air movement |
| Tachycardia | Bradycardia |
| Pallor | Cyanosis |
| Anxiety, agitation | Lethargy to unresponsiveness |
Table 4: Recognizing Respiratory Emergencies Flowchart.
The following refers to when you use critical thinking:
1. Make a quick assessment and decide on a line of action. Based on the patient’s health, work promptly to fill responsibility gaps in the team. Reassess the situation and adjust patient care as needed.
Problem solving
Problem solving is the capacity to use readily available resources to solve problems that are difficult or complex. Several reasons, such as a shortage of resources, might cause pandemonium during an emergency.
A device like an automated external defibrillator (AED) could not be easily available, or it might have a low battery. A parent may feel dissatisfied with the situation and try to interfere with care. Utilize any available resources, such as equipment, other team members, or other healthcare facility personnel.
Practicing and debriefing
Effective high-performance teams maintain their skills and expertise by practicing together on a regular basis. In addition, following each resuscitation incident, effective high-performance teams hold debriefing sessions. The goal of the debriefing session is to examine the decisions made and actions taken more
closely in order to discover chances for improvement at the system, team, and individual levels.
Roles and responsibilites
Every team member must be efficient in performing their roles as part of the resuscitation team, members
should bear in mind that it is imperative for them to adhere by the following standards:
1. They should understand their role.
2. Knowing their limitation.
Team leader
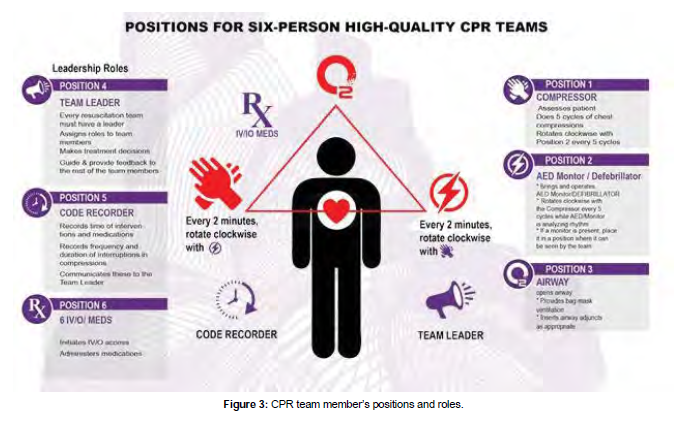
The main roles of a team leader are: assigning team member’s roles and responsibilities, making a decision regarding patient health, ensuring that his team members perform their duties as expected and correctingteam member’s actions if needed based on his / her proficiency in knowledge, skills, and leadership capabilities (Figure 3).
Team members
They are competent and knowledgeable in their roles.
Six-person high-performing resuscitation team
1. Team leader
2. Compressor
3. Airway manager
4. AED/defibrillator/CPR coach
5. I.V/I.O provider 6 -time recorder
Learning objectives
Readers should be able to:
• Define the terms respiratory distress, respiratory failure, and respiratory arrest.
• Describe how to deal with respiratory distress, respiratory failure, and respiratory arrest in an emergency.
• Explain the pathogenesis, symptoms, and emergency care for croup, foreign body aspiration, and anaphylactic patients.
• Go through the pathophysiology, signs and symptoms, and emergency management for asthma and bronchiolitis patients.
• Explain the etiology, pathophysiology, sign and symptom patterns, and emergency management for patients with lung tissue disease and central respiratory illnesses.
• Respiratory emergencies continue to be a leading source of morbidity and mortality in children around the world. The patient’s outcome could be greatly improved by prevention, early detection, and proper rapid care of various respiratory disorders.
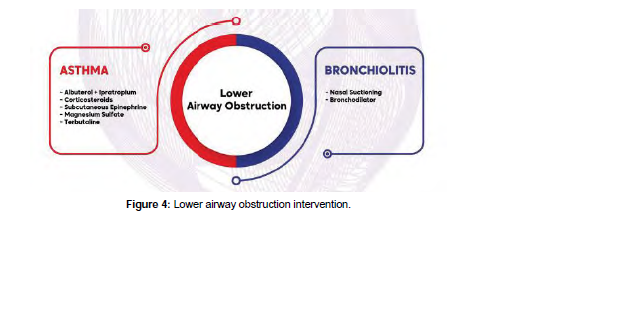
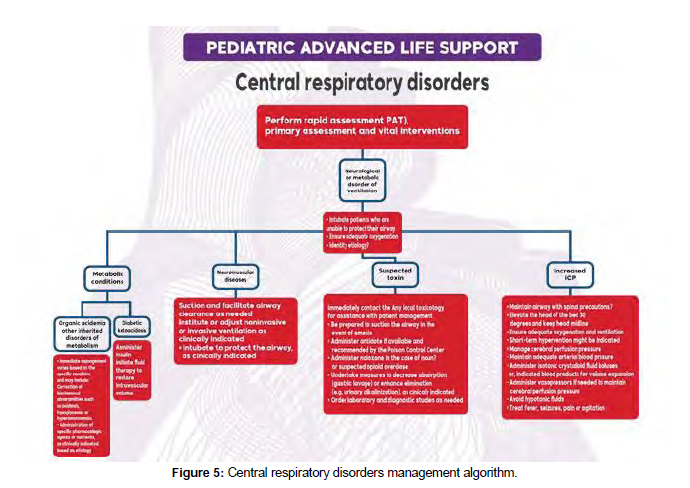
Though some specific disease processes may require special intervention, still, the main management guidelines for respiratory pathologies could be categorized into upper airway pathology, lower airway disease, lung pathology, or disordered control of breathing (Figure 4). While some patients may have a com- bination of two or more of such pathologies, still, these categories could help early recognition and fast intervention pathways for the treating team.
Definition of respiratory distress and respiratory failure
Respiratory distress is defined as a clinical state characterized by an increased respiratory rate (tachypnea) and respiratory efforts (increased work of breathing). Respiratory distress manifests as altered breathing pat- tern (tachypnea, slow respiratory rate, or weak respirations), forceful breathing efforts, obstructed breaths, or chest retractions.
In this pathophysiological state, the child attempts to maintain adequate oxygenation and gas exchange despite a respiratory pathology. However, if the child gets fatigued or the respiratory function deteriorates further and adequate gas exchange cannot be maintained, the child progresses to respiratory failure, which is defined as a paO2 50 mmHg (inadequate ventilation).
Upper airway disorders
Pathophysiology: Understanding the distinctions between adult and pediatric upper airway anatomy is critical for under- standing pathophysiology. In comparison to adults, children have larger heads and occiputs, resulting in hyperflexion of the airway when lying flat and supine. They also have a larger tongue and smaller jaw.
The pediatric larynx is funnel-shaped, the cricoid is C4 at birth, descending to C6 at age ten, and pediatric supraglottic cartilages are softer and more distensible than adult supraglottic cartilages, leading to dy- namic collapse at times. From birth to the first several months of life, babies are forced to breathe via their noses.
Children consume more oxygen at rest than adults in terms of lower airway physiology, as their resting metabolic demand is 2 to 3 times that of an adult. They also have a decreased functional residual capacity, which means hypoxemia and hypercarbia occur quicker during apnea.
Poseuille’s Law states that even a tiny reduction in the diameter of a child’s airway can be fatal. Edema, ste- nosis, a foreign body, or even mucous can cause this. Alveoli are mature in babies from 36 weeks onwards, but they continue to develop with septation and microvascular maturation from birth until roughly 8 years old. As a result, the surface area for gas exchange is less in pediatric patients [9].
Symptoms and signs
Upper airway blockage in children is a rather common cause of respiratory discomfort and failure. The nasal cavity, pharynx, and larynx are all parts of the upper airway. Infection (such as croup), airway edema (anaphylaxis), and foreign body airway obstruction are the three most common causes of upper airway blockage.
Other factors can also have an impact on upper airway patency. These could be caused by structural factors such as enlarged tonsils or adenoids, or by impaired upper airway control caused by a reduced level of consciousness.
A change in the sound of the child’s voice or cry, a barking cough, hoarseness of voice, or stridor are some key signs that will help you discover upper airway obstruction, along with other indicators of respiratory distress.
Upper airway obstruction symptoms are normally more visible during inspiration, as opposed to lower air- way obstruction symptoms, which are usually more noticeable during expiration. Marked chest retractions, significantly reduced or missing breath sounds, declining respiratory effort, weariness, and head-bobbing with each breath are all dangerous indicators of impending upper airway obstruction.
Diagnostics tests and procedures
Tests to confirm the etiology of upper airway pathology in children are usually postponed until the child’s airway patency is secured, to prevent any further airway compromise with agitation during blood sampling or other diagnostic procedures.
After the patient’s airway is stabilized, investigations may include general workups, such as CBC and renal profile, or more specific tests, such as respiratory viral screening with immune fluorescence or PCR testing for specific viral etiologies (Influenza, Parainfluenza, and respiratory syncytial virus). Radiological imaging could show the extent of upper airway compromise, but the risk: benefit ratio must be considered.
before sending the patient to the radiology department, especially since the initial management depends more on the clinical picture. If a foreign body is a potential cause for the upper airway compromise, early involvement with airway experts is warranted, in case surgical airway is needed while arranging for con- firmatory radiological imaging or endoscopy (usually rigid bronchoscopy could be both diagnostic and therapeutic in some of these children.
Emergency care of upper airway obstruction
Management of croup: Croup is a common viral respiratory illness affecting 3% of children six months to three years of age. It is managed based on its severity level, though a scoring system is not necessary, the most widely studied and commonly used is the Westley Croup Score.
In mild croup, usual symptoms are a hoarse, bark-like, brassy cough, without stridor at rest, and mild re- tractions. Intervention for mild crop consist of oral steroid (dexamethasone) and observation
The symptoms of moderate croup include inspiratory stridor and retractions at rest. The patient is usually calm but may have frequent barking or hoarse cough. Interventions for moderate croup include racemic epinephrine nebulizer and oral dexamethasone, with reassessment. Oxygen should be administered to children with hypoxemia.
In severe croup, the kid will have significant agitation or lethargy as the hypoxia worsens. Interventions are identical to those used for moderate croup, and the kid should not eat or drink anything.
Also, consider using heliox, which is a helium-oxygen mixture that helps to lower air flow resistance and so reduces the child’s work of breathing. Because of the child’s growing hypoxemia and hypercarbia, many of the early symptoms may not be as noticeable if the youngster is on the verge of respiratory failure.
The barking cough may sound weaker, the stridor may become less apparent, and retractions may become less obvious as lethargy worsens. The loss of awareness should inform the treating team that approaching respiratory failure needs to be addressed immediately.
Another red flag is a drop in oxygen saturation of fewer than 94 % despite the use of supplemental oxygen. High concentration oxygen (high FiO2) using a non-rebreathing mask or, if insufficient, assisted ventila- tion with BMV or non-invasive ventilation (NIV), if needed, for oxygen saturation of 94% is used to treat approaching respiratory failure. Airway experts for potentially difficult endotracheal intubation should be consulted ahead of time, and a surgical airway (tracheostomy) should be considered if necessary. It’s also a good idea to start with IV or IM dexamethasone and nebulized racemic epinephrine.
Management of anaphylaxis with airway edema
Following the initial basic therapies for respiratory distress and failure, the following particular interven- tions for anaphylactic management are used. Consider IM epinephrine, IV antihistamine (such diphenhy- dramine), and IV corticosteroid therapy.
As needed, administer albuterol nebulization to individuals with bronchospasm. Airway experts should be consulted early, as with any upper airway impairment, to prepare for the likelihood of endotracheal intubation if respiratory failure occurs. For patients with anaphylaxis and hypotensive shock, give fluid IV bolus with normal saline 20 mL/ kg. If hypotension persists despite the IM epinephrine and fluid bolus, consider IV epinephrine with age-appropriate dosing as a continuous infusion. Continue to utilize the Evaluate-Identify-Intervene sequence until the patient is stabilized.
Management of foreign-body airway obstruction
Following the general guidelines for the infant or child who is choking, the following interventions are employed for the management of Foreign-Body Airway Obstruction after the initial general interventions for respiratory distress and failure, as described above.
If the infant or toddler is choking but can cough and make sounds, the airway obstruction is partial, and the child should be closely monitored and given time to cough the obstruction away. Until the Foreign-Body is removed from the airway, careful surveillance is required. These interventions must be used if the infant is cognizant and has a total obstruction, as shown by the inability to cough, cry, or make noise:
1. Infants under one year: Make five back slaps and five chest thrusts.
2. Give abdominal thrusts to children under the age of one.
3. Start CPR with chest compressions if the infant or youngster becomes unresponsive.
Note that in this setting, you must provide chest compressions even if the unresponsive child has a pulse. The aim of these chest compressions is to provide positive intrathoracic pressure that can expel the For- eign-Body Airway Obstruction. After the chest compressions cycle, the mouth should be checked for the foreign body. If the foreign body is seen, remove it under direct vision, but do not make a blind finger sweep.
Lower airway disease
Lower airway obstruction may occur at the levels of the trachea, bronchi or bronchioles. Conditions of pediatric lower airway include bronchiolitis and asthma. It is characterized by wheezing and hyperinflated lungs, together with other signs of respiratory distress. Common causes in infants and children include bronchiolitis, asthma, and foreign body inhalation.
Pathophysiology
Bronchiolitis is most common in babies and toddlers (2 months to 2 years of age ). Infection with the respiratory syncytial virus (RSV) is the most common cause. The diagnosis is mostly clinical, with investi- gations playing a minor role. In asthma, interactions between environmental triggers and genetic factors result in airway inflammation, narrowing and excessive mucus production, which limits airflow and leads to functional and structural changes in the airways in the form of bronchospasm, mucosal edema, and mucus plugs.
Signs and symptoms
Bronchiolitis in infants present with a low-grade fever, a dry and persistent cough, difficulty feeding, and rapid or noisy breathing (wheezing).
In an acute asthma episode, symptoms vary in severity. Infants and young children suffering a severe ep- isode may display the following: breathless during rest, feeding refusal, sitting upright or tripod position, talk in words (not sentences), and maybe agitated. With impending respiratory arrest, the patient becomes confused and drowsy. However, adolescents may not exhibit these symptoms until they are in complete respiratory failure.
During a severe asthma attack, the following findings are common: respiratory rate is often greater than 30.
breaths per minute, accessory respiratory muscles are usually used, chest retractions, heart rate is greater than 120 beats per minute, loud biphasic (both expiratory and inspiratory) wheezing can be heard, pulsus paradoxus is common (20-40 mm Hg), oxygen saturation on room air is less than 91 %. In status asthmat- ics with impending respiratory arrest, findings include paradoxical thoracoabdominal movement occurs, absent wheezing (i.e., silent chest by auscultation), with severe hypoxemia leading to bradycardia.
Diagnostic test and procedures: Diagnosis is usually made on clinical basis. A chest X-ray reveals hyper inflated lungs and prominent bronchial markings; radiography may also reveal parenchymal lung disease, pneumonia, atelectasis, congenital anomaly, or a foreign body.
Screening for viral triggers for the asthma attack or bronchiolitis could help establish the pathogen, such as immunofluorescence for RSV in nasopharyngeal aspirates.
Specific emergency management: Bronchiolitis treatment with nasal suctioning, humidified oxygen and other supportive measures are the mainstays of management. A trial of inhaled racemic epinephrine or systemic steroids may be considered for non-responders. Asthma is managed with albuterol/salbutamol and ipratropium nebulization, oral corticosteroids or IV depending on the severity, and magnesium sulfate IV. In severe cases, salbutamol IV could be used in the acute care areas (ER or PICU). Noninvasive Ventilation (CPAP or NIV with bi-level settings) could help patients with severe lower airway disease, till other modalities of treatment reverse the small airway disease pathology. Early consultation and administration of CPAP / NIV with a CPAP / NIV professional is recommended, since this may prevent the need for endotracheal intubation in these patients.
Lung tissue disease
Lung tissue disease refers to conditions that affect the alveoli and interstitium of the lungs, influencing gas exchange via the alveolarpulmonary capillary interface. They also have a negative impact on lung compli- ance. Infectious and aspiration pneumonia are two common diseases in children and newborns.
Pathophysiology
Pneumonia is an infection, aspiration, or toxic agent-induced inflammation of the lung parenchyma. Bacte- ria, viruses, mycoplasma, and fungi can all cause infectious pneumonia. Pneumonia can affect one or more lobes of the lungs (lobar pneumonia) or the alveolar walls (alveolar pneumonia) (interstitial pneumonia ).
Aspiration pneumonia is caused by foreign, nongaseous material contaminating the lower respiratory tract, such as saliva, gastric contents, aspirated food, or chemicals (e.g. hydrocarbons). Bleeding, necrosis, surfactant impairment, and pulmonary edema result from the injury to the lung tissue, all of which might compromise lung compliance or create ventilation problems.
Pulmonary edema can be either noncardiogenic or cardiogenic in nature (i.e. arising from heart disease or dysfunction).
Excessive blood flow to the lungs or increased pressure in the pulmonary veins causes fluid transudate and alveolar edema in cardiogenic edema, which can compromise lung compliance or create breathing problems.
Noncardiogenic edema is a side effect of a variety of lung disorders, such as aspiration pneumonia. Exu- date of fluid into the alveoli and interstitial spaces comes from diffuse injury to lung capillaries and alveoli. Whatever the source, pulmonary edema reduces lung compliance and can induce obstruction of the lungs’ smaller airways.
Signs and symptoms
Pneumonia may present with fever, cough, decreased breath sounds, hypoxia, malaise, nasal flaring, chest pain, retractions, shortness of breath, and tachypnea.
For pulmonary edema, signs and symptoms include crackles, a moist cough, tachypnea, labored breath- ing, tachycardia, and anxiety or confusion that is associated with poor oxygenation. The sputum is may be frothy white or blood-tinged.
Diagnostic test and procedures
CXR…this test can give pictures of the structures inside your child’s chest, such as the heart, lungs, and blood vessels and can help rule out other lung diseases cause the child’s symptoms.
A high-resolution CT scan (HRCT). An HRCT scan uses X-rays to create detailed pictures of the child’s lungs and can show the location, extent, and severity of lung disease.
Lung function tests: These tests measure how much air child can breathe in and out, how fast he or she can breathe air out, and how well child’s lungs deliver oxygen to the blood. Lung function tests can assess the severity of lung disease. Infants and young children may need to have these tests at a center that has special equipment for children.
Specific emergency management
1. Perform child’s initial assessment and take focused history.
2. Put the child in a comfortable position, usually sitting up.
3. Connect ECG monitor, pulse oximeter and provide supplemental oxygen, as needed Make a first examination and get a detailed history.
4. For pneumonia patients if complaining from wheezes, we can give inhaled albuterol and clear secretions if present. Blood culture is done and antibiotics are given in case of suspected bac- terial pneumonia. Antipyretics are given for fever.
5. For patients with pulmonary edema, the management depends on source of the problem. For cardiogenic pulmonary edema, a diuretic helps with fluid removal, Giving vasopressor is important to improve BP If the patient’s condition worsens to respiratory distress or failure, we need to consider assisted ventilation (invasive or noninvasive).
General airway management
Management of respiratory emergencies may require procedures like opening the airways, airway suc- tioning, using an airway adjunct, giving supplemental oxygen or performing BMV (please confirm) (Figure 5).
General respiratory management interventions
Any pediatric respiratory illness should be treated with a variety of therapies aimed at stabilizing the pa- tient’s state. Other specialized therapies are employed to reverse and treat the underlying pathology when oxygenation and ventilation are stabilized, as will be addressed further. These general interventions are carried out as part of the “Evaluate, Identify, and Intervene” process for managing the airway, breathing, and circulation, as detailed below.
' Opening the airway
In an unresponsive youngster, the tongue might restrict the airway. The decrease of muscular tone in the neck and base of the tongue might also restrict the airway if the unconscious patient is supine. Snoring respirations are a symptom of airway blockage caused by tongue and soft tissue displacement if the child is breathing normally.
The upper airway blockage caused by the tongue in an apneic kid may go undiagnosed until ventilation is attempted. Because the tongue is linked to the mandible, the head tilt–chin lift or jaw-thrust moves the patient’s jaw forward, lifting the tongue away from the posterior pharynx.
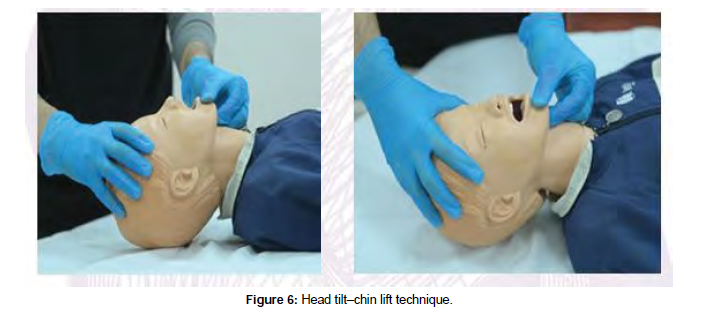
Head tilt–chin lifts
The preferred procedure for opening the airway of an unconscious child without a suspected cervical spine injury is the head tilt–chin lift. Place the youngster in a supine posture to perform the head tilt–chin lift procedure.
Apply firm backward pressure with the palm of your hand on the patient’s forehead to gently tilt the child’s head back into the neutral or slightly extended head position. Place the fingertips of your other hand be- neath the bony section of the child’s chin and gently raise the chin forward to open the airway (Figure 6).
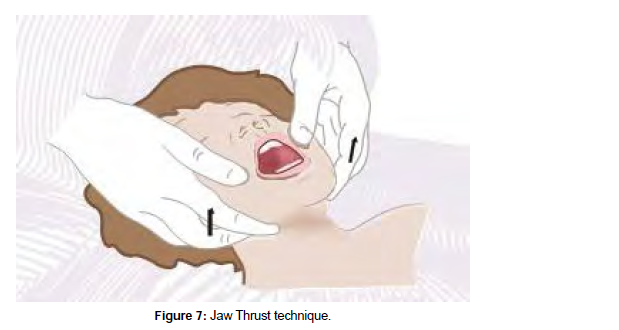
Jaw thrust
The jaw push is a manual maneuver used to access the airway of a patient who has a suspected cervical spine injury and is unable to extend his or her neck. Place the youngster in the supine posture to begin this procedure.
Grab the angles of the victim’s lower jaw with the tips of both hands’ index or middle fingers, one on each side of the child’s head, and lift, moving the mandible outward and upward, while keeping the child’s head in the neutral position (Figure 7).
Suctioning
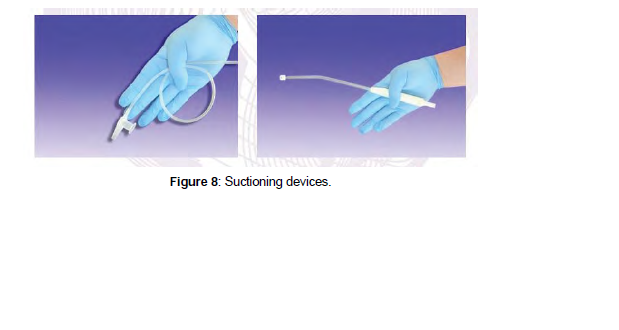
Suctioning is the medical procedure used to remove secretions from the child’s nose (nasopharynx), mouth (oropharynx), or trachea. Indications for suctioning are signs of secretions in the airway, such as a wet cough, bubbling of mucus or mouth drooling.
Soft suction catheter: A flexible, long, narrow piece of plastic called a soft suction catheter is used to suck thin secretions. The catheter can be introduced by an oral or nasal airway, an endotracheal tube (ETT), or a tracheostomy tube. Before using the soft suction catheter, power on the suction device and ensure that suitable mechanical suction is present.
When preparing to suction through an ETT or tracheostomy tube, select a suction catheter with a diameter that is about one-half that of the tube. This will help to ensure that the ETT is not blocked or dislodged during the suctioning procedure. Measure from the tip of the nose or corner of the mouth to the bottom of the earlobe or angle of the mandible to determine the optimum catheter insertion depth for nasopharyn- geal suctioning. In infants and early children, this measurement is usually 4 to 8 cm. In older youngsters, it is 8 to 12 cm. A side opening is located at the proximal end of most suction catheters that would be cov- ered with the thumb to produce the suction effect.
Initially, gently insert the suction catheter without applying suction. Then to apply suction, cover the port on the catheter hub with your non-dominant thumb while gently withdrawing the catheter. Rotate the catheter between your other dominant thumb and forefinger as you withdraw the catheter (Table 5).
| Head Tilt-Chin Lift | Jaw Thrust without Neck Extension | ||
|---|---|---|---|
| Indications | 1. Unresponsive pa tient who does not have 2. Unresponsive patient who is unable to protect his or her own airway |
1. 2. | Unresponsive patient with possible cervical spine in a mechanism for cervical spine injury Unresponsive patient who is unable to protect his or protect his or her own airway her own airway |
| Advantages | 1. Simple procedure 2. Noninvasive 3. Requires no special equipment |
1. 2. 3. |
Noninvasive Requires no special equipment May be used with cervical collar in place |
| Disadvantages | 1. Head tilt hazardous to patients with cervical spine injury 2. Neck hyperextension can cause an airway obstruction 3. Does not protect the lower air- way from aspiration |
1. 2. 3. |
Difficult to maintain Requires second rescuer for bag-mask ventilation Does not protect the lower airway against |
Table 5: Opening airway techniques.
Rigid suction catheter: The rigid suction catheters, also known as“tonsil tip” or Yanker suction catheters, are made of harder plastic and angled to aid in the removal of thick secretions and particulate materials from the oropharynx. A rigid suction catheter typically has one large and several smaller holes at the distal end to facilitate suctioning of blood and secretions.
Power on the suction device and ensure appropriate mechanical suction is present. Before applying suc- tion, gently place the tip of the rigid suction catheter in the patient’s mouth along one side until it reaches the posterior pharynx. Gradually withdraw the catheter while applying suction with your thumb, sweep- ing from side to side across the oropharynx to clear the airway. Oxygenate the child before repeating the procedure (Figure 8).
Airway adjuncts: Nasopharyngeal and oropharyngeal tubes are airway adjuncts that hold the tongue away from the rear of the pharynx, preserving an open airway. When employing any airway adjunct, the child’s airway must first be opened using one of the previously stated manual airway opening methods. Insert the needed airway adjunct after the child’s airway has been opened, and maintain proper head posture while the device is in place.
Oropharyngeal airway
The oropharyngeal airway (OPA), also known as an oral airway, is a rounded plastic tube. The body of the OPA curves over the unconscious child’s tongue, keeping it away from the posterior pharynx. Because OPA insertion could induce vomiting, it is contraindicated in responsive or semi-responsive children with intact gag reflex.
The OPA’s outer flat surface (flange) rests on the child’s lips, while the distal tip lies between the back of the throat and the base of the tongue, preventing the device from obstructing the airway, and air travels through and around the device. OPA does not protect the lower airway from aspiration because it does not isolate the trachea from the pharynx. OPAs come in a variety of sizes with different lengths and internal diameters.
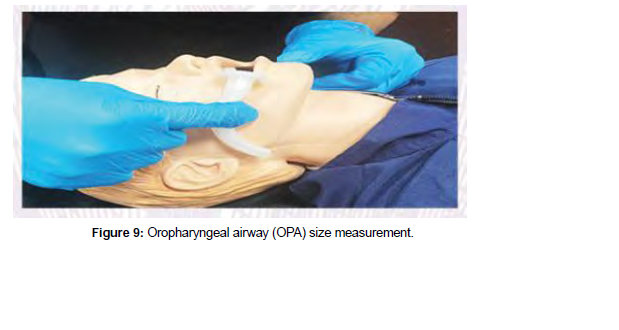
The size of an OPA is determined by the distance (in millimeters) between the flange and the tip. By hold- ing the device against the side of the child’s face and selecting the OPA that stretches from the corner of the mouth to the angle of the jaw, the proper OPA size can be determined. Selecting OPA proper size is crucial because insertion of an improperly sized OPA could conversely obstruct the airway. If the OPA is too long, it may press the epiglottis against the laryngeal opening, and if it is too short, the OPA will not bypass the tongue and the airway obstruction by the tongue will not be relieved.
Before inserting OPA, use personal protective equipment (PPE),open the airway by the above-mentioned maneuvers, and ensure that the mouth and pharynx are clear of secretions. Open the child’s mouth and gently insert the OPA with the curve downward and the tip towards the base of the tongue after selecting the appropriate size. Keep inserting the OPA over the tongue until the flange of the OPA rests against the child’s li. A tongue depressor could be used to depress the tongue and facilitate the OPA insertion (Figure 9).
Nasopharyngeal airway
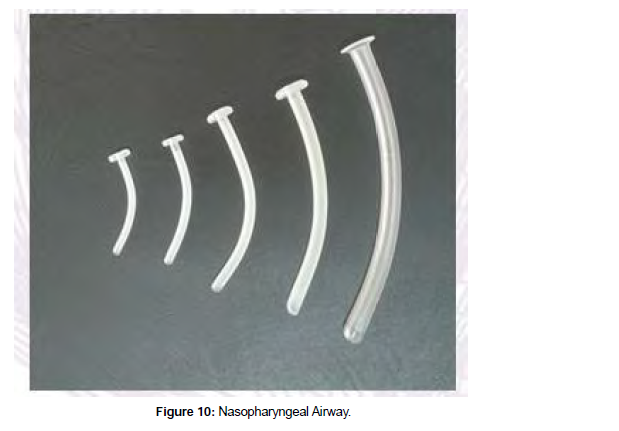
A nasopharyngeal airway (NPA), also known as a nasal airway, is a soft latex, rubber, or polyethylene tube used to keep the tongue from touching the posterior pharynx. Place the NPA in one nostril and progress it to the back of the throat, just below the base of the tongue and above the epiglottis, with the proximal external tip resting at the nostril opening.
As mentioned for the OPA, the use of NPA does not protect the child’s lower airway from aspiration and it also requires maintaining proper head position to keep the airway patent.
NPAs are also available in a variety of length and internal diameter (ID). By holding it against the side of the child’s face and picking an NPA that stretches from the nostril to the earlobe, the proper NPA size can be determined.
When utilizing a bag-mask system, if the NPA is too long, it may cause a gag reflex or enter the esophagus, thereby causing stomach distention and hypoventilation. If NPA is too short, it will not extend past the tongue, preventing the tongue from contacting the rear of the pharynx.
Before inserting NPA, use PPE and open the airway by the airway opening maneuvers. The nasal cavity is delicate and rich in vascular, so gentle instrument placement is warranted. During NPA insertion, do not force the tube because it could cause abrasions or lacerations of the delicate nasal mucosa that could lead to significant bleeding, raising the risk of aspiration.
After selecting NPA of the proper size, ensure that its distal tip is adequately lubricated with a water-solu- ble lubricant to facilitate insertion and minimize irritation to the nasal passage.
Hold the NPA device at its flange tip like a pencil and slowly insert it into the child’s nostril with the tip bevel pointing toward the nasal septum. Because of the NPA design, this is most easily accomplished by placing the nasal airway into the child’s right nostril. If the left nostril is chosen, insert the NPA with the device tuned upside down until the distal tip is inserted beyond the nasal turbinate. Advance the NPA until the flange reaches the outside of the nostril, following the natural curvature of the nasal cavity. Do not point the bevel of the airway upward during insertion. If any resistance is experienced, gently rotate the NPA between your fingers back and forth to ease penetration. If resistance persists, remove the NPA, reapply the lubricant, and try the other nostril again.
While most conscious and semi-conscious children may tolerate the NPA, in a few sensitive patients, the gag reflex may be activated, resulting in coughing, laryngospasm, or vomiting (Figure 10).
Furthermore, mucus, fluids, blood, or vomitus could readily plug small diameter NPAs. To keep the NPA clear of secretions, suctioning and irrigation may be required (Table 6).
| Oropharyngeal Airway | Nasopharyngeal Airway | |
|---|---|---|
| Indications | 1. To aid in maintaining an open airway in an unresponsive patient who is not intubated 2. To aid in maintaining an open airway in an unresponsive patient with no gag reflex who is being ventilated with a bag-mask or other positive-pressure device May be used as a bite block after insertion of an endotracheal tube or orogastric tube |
1. To aid in maintaining an open airway when use of an oral airway is contraindicated or impossible (eg., jaw fractures, clenched jaws or teeth, soft tissue trauma to the tongue) 2. May be useful in patients who require frequent suction- ing (decreases tissue trauma, bleeding) |
| Contraindications | 1. Patient with an intact gag reflex 2. Jaw fractures 3. Significant soft tissue injury to the tongue or pharynx |
1. Patient intolerance 2. Nasal obstruction 3. History of nasal facial surgery 4. Significant mid-face trauma 5. Presence of cerebrospinal fluid drainage from the nose 6. Moderate to severe head trauma 7. Known or suspected basilar skull fracture 8. Suspected foreign body aspiration |
| Advantages | 1. Positions the tongue away from the back of the throat 2. Enables suctioning of the pharynx 3. Can be inserted quickly |
1. Reasonably well tolerated in the patient with an intact gag reflex 2. Does not require the mouth to be open 3. Can be inserted quickly |
| Disadvantages | 1. Improper insertion technique may result in damage to the teeth, soft tissue injury to the mouth, or both 2. Does not protect the lower airway from aspi- ration 3. May induce vomiting if used in a patient with a gag reflex 4. Can easily be dislodged |
1. Improper insertion technique may result in severe epistaxis or adenoid bleeding that may be difficult to control 2. Does not protect the lower airway from aspiration 3. Difficult to suction through |
| Sizing | Select an airway that extends from the corner of the mouth to the angle of the lower jaw or to the earlobe | Select an airway that extends from the tip of the nose to the earlobe |
Table 6: Differences between OPA and NPA.
Oxygen delivery system: Low-flow oxygen delivery systems, such as a nasal cannula or a simple face mask, provide oxygen at a low- er flow rate than the child’s maximum inspiratory flow rate. The inspired oxygen (FiO2) is mixed and diluted with room air. Therefore, the FiO2 that reaches the child’s airway is affected by the relationships among oxygen flow rate, the child’s respiratory flow efforts, and the child’s breathing pattern.
A high-flow oxygen delivery system, on the other hand, will deliver a specific oxygen concentration (FiO2) at a flow rate that surpasses the child’s inspiratory flow need, ensuring that the FiO2 is unaffected by the child’s inspiratory flow and breathing pattern.
Nasal cannula: A nasal cannula is a low-flow oxygen delivery device that is commonly used in infants or children who require only low levels of supplemental FiO2. It consists of a flexible plastic tubing with two soft prongs. The tube is attached to the child’s face after the prongs are put into the child’s nares. Oxygen flows from the nasal cannula into the child’s nasopharynx, which acts as an anatomic oxygen reservoir. The flow rate
used with this device ranges from 0.25 to 4 L/minute, which could provide FiO2 of 22% to 60%.
Simple face mask: Another low-flow oxygen delivery system is a basic face mask, which consists of a flexible plastic reservoir that fits over the child’s nose and mouth. Small holes on both sides of the mask allow for unrestricted passage of both inspired and expired air, while the mask’s internal volume creates a reservoir effect. The oxygen flow rates used with this device range from 6 to 10 L/minute, which can provide FiO2 of 35% to 60%. Because the amount of air that mixes with supplemental oxygen is dependent on the patient’s res
piratory flow rate and breathing pattern, the child’s actual FiO2 will vary.
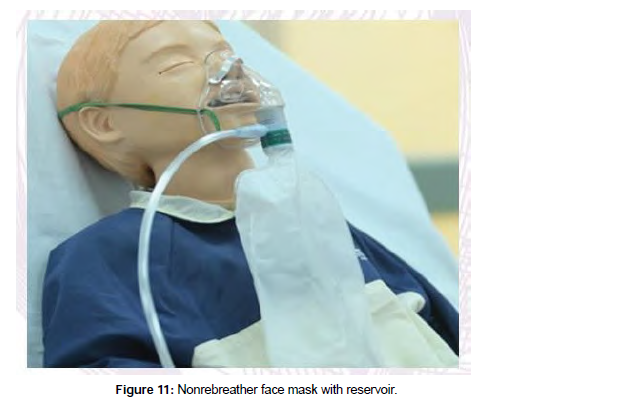
Nonrebreather face mask: A nonrebreather face mask, also known as a nonrebreathing mask, is a high-flow oxygen delivery system that prevents mixing of the child’s exhaled air with the supplemental 100% oxygen the oxygen content is not diluted due to the one-way valve between the mask and its reservoir bag.
When the youngster breathes in, the one-way valve draws pure oxygen from the reservoir bag into the mask. Exhaled air exits through an open side port on the mask as the child breaths out, but the oneway valve prevents the child’s exhaled air from entering the reservoir bag (“nonrebreather”). This process ensures a supply of almost 100% FiO2 to the patient with minimal dilution from the room air or child’s exhaled breath.
A nonrebreather face mask can deliver FiO2 of up to 90-95% at a flow rate of 10 to 15 L/minute. Titrate the oxygen flow rate after placing the mask on the infant so that the bag does not totally deflate when the child inhales (Figure 11).
Bag mask ventilation: If the child’s ventilatory attempts are insufficient, pushing air into the lungs may be used to help breathing (i.e. with positive pressure ventilation). Positive-pressure ventilation can be achieved using a variety of methods, including bag-mask ventilation (BMV).
A self-inflating bag, a one-way valve that prevents exhaled air from entering the bag, an oxygen inlet, an adapter that may be coupled to a mask or an advanced airway, and a transparent mask that is attached to the bag make up the bag-mask device. When the mask is used, a bag-valve-mask device is used, and when the mask is not used, such as when ventilating a child with an advanced airway in place, it is called a bag device.
The resuscitation bag-mask device should have a pop-off valve that can be disengaged during the procedure. While pop-off valves are included in pediatric devices to prevent lungs hyperinflation and barotrauma, some conditions necessitate a greater ventilatory with no pop-off valve to guarantee that the youngster receives adequate ventilation during resuscitation. If the pop-off valve needs to be disabled, follow the manufacturer’s instructions.
Bag-mask devices come in a variety of sizes as well. Choose a device with enough volume for the child’s size. For newborns and young children, use a pediatric bag (450-500 mL). To obtain appropriate chest rise in older children and teenagers, an adult bag size (1,000 mL or more) may be required. A larger bag can be used to ventilate the infant if the right BMV technique is utilized: compressing the bag until the child’s chest rises, then releasing the bag.
A bag-mask device used without supplemental oxygen will only deliver FiO2 21% (room air). BMV should be connected to an oxygen source /regulator.
The oxygen flow rate should be 10-15 L/minute for the pediatric bag and at least 15 L/minute for the adult bag.
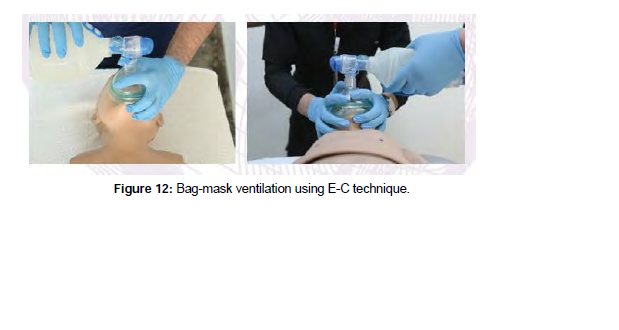
The oxygen reservoir attached to the bag collects an amount of 100% oxygen that is equal to the volume of the bag. After squeezing the bag, it self-reinflates, drawing 100% oxygen from the reservoir into the bag. A pediatric bag-mask device with supplemental oxygen at a flow rate of 10 to 15 L/minute will supply FiO2 of 60% to 95%, whereas an adult bag-mask device with supplemental oxygen at a flow rate of 15 L/ minute will deliver FiO2 of 90% to 100% to the child (Figure 12).
Technique
Position yourself at the top of the child’s head, wearing PPE. To achieve adequate ‘BMV’ the patient should be attached to a heart monitor, pulse oximeter, and, if accessible, a capnometer. Because of the relatively large occiput in infants and toddlers, and if trauma to the cervical spine is not suspected, it may be nec- essary to place a small layer of padding under the shoulders to align the airway and optimize ventilation. Conversely, children older than 2 years may require padding under the occiput.
Choose the appropriate bag size for ventilation based on the child’s size. Ensure the bag has the oxygen reservoir connected. Set the connected oxygen flow meter to the appropriate flow. Maintain the open child’s airway using a head tilt– chin lift, or a jaw thrust without neck extension if neck trauma is suspected. If required, suction the child’s airway to clear secretions or vomitus. Consider using an oral airway if the youngster is unresponsive.
Place a mask over the child’s face that is the suitable size and covers the child’s mouth and nose.
A proper mask fits between the bridge of the nose and the groove between the lower lip and the chin. Air leaks from between the mask and the face as a result of the incorrectly sized mask, resulting in inadequate ventilation.
The inflatable cushion on many bag-mask devices can be inflated with the use of a syringe. Too much air in the cushion will make it stiff and prevents a tight seal between the child’s face and the mask, so assess the cushion’s firmness before applying the mask to face. If needed, inflate the cushion with air so that it becomes flexible enough to make a tight seal over the child’s mouth and nose. Place the mask’s thin end (apex) over the bridge of the nose and its larger end (base) in the groove between the lower lip and the chin. If your mask has a round cuff, center it over your lips to avoid squeezing your eyes.
The E-C technique is used to increase the seal between the mask and the face by placing fingers and hands for ‘BMV’ (Figure 12). Apply the mask to your face in a “C” shape with your thumb and index finger. To create an acceptable seal, gently press down on the mask. Make a“E” with the third, fourth, and fifth fingers along the bony section of the child’s jaw. With these fingers, lift the child’s jaw and draw the chin towards the mask, ensuring a good seal. With the other hand, slowly squeeze the bag so that each breath takes about 1 second.
When you detect a tiny chest rise, stop compressing the ventilation bag. Until spontaneous breathing re- covers or the patient is linked to a ventilator, ventilate at a rate of 1 breath every 2 to 3 seconds.
A two-rescuer approach is ideal for ‘BMV’: one rescuer holds the mask to the face, establishing a good seal and maintaining an open airway, while the other squeezes the bag with two hands, gently raising the chest with each squeeze.
Assess the effectiveness of the ‘BMV’ by:
1. Ensuring the mask forms the airtight seal on the child’s face throughout the process.
2. Ongoing evaluation of the lung compliance and any resistance to ventilation efforts.
3. Observing proper chest rise and fall during each ventilation cycle.
4. Checking the child’s mental status, heart rate, BP, and skin or mucous membrane color for improvement.
5. During BMV, listen for appropriate bilateral breath sounds.
Advanced airway
Advanced airways are classified to extraglottic airway devices and intraglottic airway devices. The endotracheal tube (ETT) is an example of and intraglottic airway.
Extraglottic airways are introduced blindly until they reach between the base of the tongue and the glot-tis, allowing for quick airway stabilization for oxygenation and ventilation. An example of an extraglottic airway is the laryngeal mask airway (LMA).
The endotracheal intubation is an advanced airway procedure to place ETT directly into the trachea. This procedure requires special training and practice to maintain skill competence. Endotracheal intubation indications include maintaining oxygenation, providing positive-pressure ventilation, and protecting the child’s lower airway from aspiration. Since the extraglottic airways (e.g. LMA) are relatively easy to insert, they should be immediately available during endotracheal intubation in case of a failed intubation attempt.
Before endotracheal intubation, it is essential that all necessary equipment is available and functional. The child should be preoxygenated with FiO2 100% for 3-5 minutes and attached to a pulse oximeter and car- diac monitor. Patent vascular access, either intravenous or intraosseous, should be secured. It is advisable to have several sizes of ETTs on hand. At a minimum, have ETT that is 0.5 mm smaller and 0.5 mm larger than the estimated tube size, and preferably a cuffed ETT should be used .
For establishing the right ETT size up to roughly 35 kg, lengthbased resuscitation tapes (e.g. Broselow Tape) are more accurate than age-based formula predictions. Use a 3.5-mm ID tube for newborns up to one year of age and a 4-mm ID tube for children between one and two years of age for the uncuffed ETT. The following formula can be used to estimate size after 2 years of age: Uncuffed tracheal tube ID (mm) = 4 + (age in years/4), cuffed tube ID (mm) = 3.5 + (age in years/4).
Confirming proper ett placement
After insertion of the ETT, confirm proper positioning of the tube in the airway; using both your clinical assessments and an exhaled CO2 (capnography) device. Initially, the physician performing the intubation can confirm correct placement of the ETT in the trachea by seeing the tube passing between the vocal cords.
Then, while using a bag device to provide ventilation, listen for bilateral breath sounds over the chest and no breath sounds over the stomach. If the ETT is not in the trachea, deflate the ETT cuff (if a cuffed tube was used), remove the ETT, and oxygenate the child again before reattempting endotracheal intubation.
If baseline breath sounds before intubation were bilaterally equal, then having diminished breath sounds on the left side after intubation could indicate that the ETT has entered the right main bronchus. Deflate the ETT cuff and auscultate the left side of the chest while slowly withdrawing the ETT until breath sounds are equal and chest expansion is symmetric, then reinflate the ETT cuff to correct the problem.
Confirm appropriate ETT position in the mid-trachea level with a CXR. After endotracheal intubation, use capnography to confirm proper ETT placement in the airway. Either waveform capnography or a colorimetric capnometer may be used. A colorimetric capnometer is positioned between the ETT and ventilation device. The child’s breath causes a chemical reaction in the detector.
The capnometer color is initially purple and should change to yellow upon exposure CO2 confirming air- way placement. A lack of CO2 presence (purple color) suggests ETT placement in the esophagus, espe- cially in patients with spontaneous circulation. Whatever CO2 monitoring method used, and as CO2 may inadvertently enter the stomach, wash out any remaining CO2 by ventilating the patient at least six times before obtaining a capnography reading.
After verifying proper ETT position, document the tube depth at the patient’s teeth and then secure the tube in place using ETT tubeholder or tape. The estimated tube depth can be found on the lengthbased resuscitation tape or can be estimated by multiplying ETT size by three. For example, if a 4-mm ETT was used, the centimeter marking that should appear at the patient’s lips is 12.
Dope
If sudden deterioration occurs in an intubated patient, the status of the child’s must promptly be reevalu- ated. Clinical signs of sudden deterioration may include:
• Asymmetric chest rise
• Decreased breath sounds on one side
• Bradycardia
• Decrease oxygen saturations
• Decreased end-tidal exhaled CO2
• Reduced lung compliance during ‘BMV’
• Jugular vein distention
• Tracheal deviation
The DOPE mnemonic (Displacement, Obstruction, Pneumothorax, Equipment) is advocated as a useful rapid tool for troubleshooting sudden deteriorations in the intubated child. The equipment to perform airway suctioning and a suitable bag-mask device must be within reach should unexpected complications occur (Table 7).
| S.N. | |
|---|---|
| 1 | Tube displacement (e.g., right main bronchus or esophageal intubation) or tube or ventilator circuit disconnection—reassess tube location and ventilator connections. Obstructed tube (e.g., secretions or blood obstructing air flow, kinked ETT)—suction, replace ETT if obstruction cannot be cleared. |
| 2 | Pneumothorax (e.g., tension pneumothorax)—needle decompression and thoracostomy. |
| 3 | Equipment failure (e.g., empty oxygen tank, disconnected ventilator tubing-, accidental change in ventilator settings, air leak around tube, pop-off valve activated, low battery)—inspect equip- ment and oxygen source. |
Table 7: DOPE.
Reassess the child’s condition after endotracheal intubation, including checking for symmetrical chest rise, skin color, and heart rate while ventilating with a bag-device.
If hypoxia, bradycardia or poor skin color persist after intubation, consider these potentail causes:
1. The ETT is too small for the airway, allowing significant air leak
2. The ETT cuff is underinflated
3. The bag device operator is delivering inadequate breath volumes
4. Child has a pneumothorax
5. The ETT is clogged with secretions or kinked
6. Esophageal intubation
7. Main bronchus intubation (usually right main bronchus)
8. There is malfunction in the bag device or the pop-off valve is not disabled
9. Oxygen source is disconnected
If the child is connected to a mechanical ventilator and you suspect a ventilator malfunction, and you are unable to quickly correct the issue, take the following steps:
• Disconnect the ventilator circuit from the ETT. Apply DOPE as described in below table. Reassess the ETT depth at the child’s teeth. On CXR, the ETT tip should be midway in the trachea. Con- nect a bag-mask device to the ETT and provide manual ventilation with supplemental oxygen, watching for equal chest rises and listening for equal breath sounds.
• If the child’s chest rise is minimal, ensure the bag-mask device is securely connected to the ETT.
• If the chest rise does not increase, assess the ETT for obstruction. Rapidly suction the ETT to relieve the obstruction. If the significant obstruction cannot promptly be removed, it may be necessary to remove the obstructed ETT, provide ‘BMV’ to re-oxygenate the child, and reintu- bate by a competent healthcare provider who is skilled in airway management.
Module three: how to recognize and approach a patient with shock
Learning objectives
Readers should be able to:
• Define shock and understand shock physiology in infants and children.
• Identify the difference between compensated and hypotensive shock.
• Explain the pathogenesis, symptoms, and signs of hypovolemic, distributive, cardiogenic, and obstructive shock in infants and children.
• Compare and contrast several types of distributive shocks.
• Understand the different types of obstructing shock.
• Explain how to treat hypovolemic, distributive, cardiogenic, and obstructive shock in infants and children in an emergency.
Recognition and evaluation of shock
Pathophysiology: It is fundamental to practitioners to understand the pathophysiology of shock. Clear understanding of shock pathophysiology will help the practitioner to recognize shock and understand its initial steps of management. Early recognition of shock and prompt intervention is key to better outcomes.
Definition
Shock is an acute state where oxygen delivery (DO2) does not meet tissue metabolic and oxygen requirements. If this state persists, it will result in severe multiorgan dysfunction and eventually death. It is vital to emphasize that hypotension is not included in the definition of shock, either from a pathophysi- ological or clinical standpoint.
DO2:
Understanding (DO2) is the cornerstone of understanding shock and its management. DO2 is the amount/ volume (millilitres) of O2 that is delivered to a specific organ (or the entire body) per unit of time (minutes).
The following equation describes the relationship of DO2 to cardiac output and oxygen content: Oxygen Delivery = Cardiac Output X Arterial Oxygen Content
DO2 (ml/min) = CO X CaO2 Remember,
CO = HR X SV and CaO2= (Hgb X SaO2 X 1.34) + (PaO2 X 0.003)
HR: Heart rate SaO2: Oxygen saturation
Hgb: Hemoglobin concentration PaO2: Partial pressure of arterial O2
SV: Stroke volume
Affected by:
Preload: volume of blood in ventricle prior to systole Afterload: the force that the heart is ejecting against Contractility: strength of ventricular contraction (Figure 13).
Oxygen demand: When assessing and controlling shock, we must examine and optimize the patient’s O2 demand. We can achieve this by avoiding / treating factors that increase demand and promote the factors that dose de- crease it. The following diagram summarizes these factors: (Figure 14).
Classification of shock by severity
Many mechanisms are available to compensate for the shock state.
The aim of these compensatory mechanisms is to maintain CO to the vital organs these include:
• Tachycardia: it is usually the first body response in an attempt to increase CO.
• Increased SVR: this occurs by increasing vascular tone in non-vital organs, which redirect blood flow to vital organs.
• Increased contractility: increased contractility results in increase in SV and CO.
• Increase venous tone: Increasing venous tone improves venous return to the right side of the heart and preload, which leads to higher SV and CO.
• Considering this compensatory mechanism and its effectiveness we could classify shock severity into:
Compensated shock
It is a shock state in which the patient displays clinical indications of shock yet maintains normal systolic BP (SBP). This is the result of adequate compensation. Recognition of patients in this state is critical to ensure rapid intervention and stop the progression to noncompensated shock.
Non-compensated (hypotensive)
• In the pediatric age group, hypotension is a late symptom of shock. It results from failure of the compensatory mechanisms in maintaining adequate CO. Recognition of patients in this state is critical to ensure rapid intervention and stop the progression to cardiac arrest.
• The following formula helps you to define hypotension in pediatric patients from the age of 1 to 10 years old:
• Lowest acceptable SBP = 70 mm Hg + (age in years X 2)
• For example, to know the minimal acceptable SBP for a 7-year-old child, we could use the formula as follows:
Minimal SBP = 70 + (7 X 2) = 70 + 14 = 84 mm Hg
Evaluation of patient with suspected shock
General signs of shock
These signs are a result of the compensatory mechanisms and are generally present in most shock stats regardless of it types (see below from some exceptions) (Table 8).
| Compensation | Goal | Clinical Sign |
|---|---|---|
| Increased heart Rate | Increase CO | Tachycardia |
| Increased SVR | Redirect CO from less vital organ (skin , kidney , intestine toward vital organs (heart and brain) | Delayed capillary refill time Cold and mottled skin Oliguria / anuria Vomiting |
| Autoregulation cerebral blood flow | Preserve CBF and CPP | Altered LOC, agitation , coma |
| Primary assessment | Hypovolemic | Distributive | Cardiogenic | Obstructive |
|---|---|---|---|---|
| Airway | Patent Unless LOC is altered | Patent Unless LOC is altered | Patent Unless LOC is altered | Patent Unless LOC is altered |
| Breathing | ↑ | ↑ | ↑ | ↑ |
| Circulation | Tachycardia Narrow pulse pres- sure Delayed capillary refill |
Tachycardia Or bradycardia Capillary refill: immediate or delayed Hypotension Wide or narrow pulse pressure |
Tachycardia Narrow pulse pres- sure Delayed capillary refill Pulmonary edema hepatomegaly |
Tachycardia Narrow pulse pres- sure Delayed capillary refill |
| Disability | LOC ↓ | LOC ↓ | LOC ↓ | LOC ↓ |
| Exposure | Dusky pale skin Cooled skin Signs of dehydration |
Warm and flushed skin | Cold , pale, mottled skin | Cold, pale, mottled skin |
| Preload | ↓ | ↓ Normal to | ↑ or ↓ | ↓ |
| Contractility | Initially normal | ↓ Normal to | ↓ | Normal |
| Afterload | ↑ | ↓ | ↑ | ↑ |
Table 8: General signs of shock.
Types of shock
We can divide shock types into 4 types based on the mechanism that causes shock:
Hypovolemic shock
A result of significant loss of intravascular volumes resulting in a significant decrease on preload and even- tually CO.
Examples:
• Fluid loss due to sever GI losses
• Bleeding (hemorrhagic shock)
• Third spacing
Distributive
Pathological sever vasodilation might affect arterial circulation and venous circulation. This results in sever hypotension and decreased perfusion pressure of vital organs. On the other hand, if the venous vascula- ture was involved, it will result in decreased venous return and preload.
Example:
Septic: please note that septic shock is a special type that might also include the hypovolemic component of shock and myocardial depression in addition to the distributive shock (Table 9).
distributive Shock |
||
|---|---|---|
| Anaphylactic Shock | Neurogenic Shock | Septic Shock |
| Decreased BP after exposure to allergen | Decreased LOC but airway maintained. Decreased BP with decreased HR High pulse rate - flushed, heated skin - lower body temperature |
Decreased LOC but airway maintained. Increased HR and/or hyperpnea. Increased work of breathing. Increased or decreased HR. Early bounding pulses but diminished if shock persists. Early normal or brisky CRT but will be delayed if shock persists. Decreased urine output. Increased or decreased temperature. Petechial or purpuric rashes. Warm, flushed skin. |
Table 9: Distributive shock types specific signs and symptoms
• Neurogenic
• Anaphylactic
Cardiogenic
This type of shock is the result of myocardium dysfunction and decreased contractility and CO. Although, most common etiology is systolic dysfunction, this type of shock could be a result of diastolic dysfunction or arrythmias (including bradycardia).
Obstructive
• It occurs when there is decreased CO secondary to the physical limitation of venous return and/or blood ejection from the heart.
• Pneumothorax
• Cardiac tamponade
• Coarctation of aorta
• Pulmonary embolism
• General Management of Shock
• There are two pathways of therapy that should be followed almost simultaneously.
• General supportive therapies that are almost used in all types of shock (this will be the focus of this section- see below)
• Cause specific therapies.
• General principles and goals of management of shock:
• Early identification of shock and prompt interventions are key in improving a patient’s outcome.
• All supportive measures are directed to:
• Restore/ improve oxygen delivery DO2.
• Decrease O2 demand
• Organ support
• Manage metabolic and electrolytes abnormalities • The direct cause of the shock should be treated if possible. For example, if a patient presents with an obstructive shock secondary to tamponade, the pericardial effusion must be drained, in addition to other supportive therapies (Table 10).
| Obstructive Shock | |||
|---|---|---|---|
| Cardiac Tamponade | Tension Pneumothorax | Pulmonary Embolism | Coarctation of Aorta |
| Pericardial rub Pulsus paradoxus Diminished pulses Narrowed pulse pressure Becks triad (decreased BP, neck vein distension, and muffled heart sound) |
Hyperresonance in affected lung Decreased breath sounds in affected lung Tracheal deviation to unaffected lung Chest pain Pulsus paradoxus |
Chest pain Hemoptysis Heart failure signs Decreased BP. DVT signs (swelling), pain, and erythema mostly in lower extremities. |
Femoral pulses that are reduced or absent Cyanosis - indications of shock - a difference in blood pressure, oxy- gen saturation, or pulse between the upper and lower limbs |
Table 10: Obstructive shock signs and symptoms.
Supportive measures
Location / position:
• Initial assessment and evaluation should be performed in the most supported/monitored area (e.g. resuscitation bed of an ER department).
• Allow a position of comfort if the patient is awake and stable.
• If unstable, supine position.
Monitoring and frequent assessment'
• It is critical to check individuals with shock on a regular basis, first to see how the shock is pro- gressing. Second, to assess patient response to the provided therapy (Figure 15).
• Non-invasive monitoring of VS: HR, BP, SpO2, RR and T.
• Level of consciousness and urine output are key to understand and assess end organ involve- ment.
Supplemental O2 and MV
• The aim of this intervention is to optimize O2 content.
• Apply 100% O2 non-breather mask.
• Consider (NIV). Indication might include mild/moderate respiratory distress in a patient able to maintain airway patency.
• Consider invasive mechanical ventilation. This would be indicated in patient with respiratory distress / failure to improve O2 delivery and decrease demand.
IV access
• Quick IV access is a fundamental step in managing patients with shock.
• If peripheral access was not easily available, IO access should be investigated.
Laboratory testing
• It helps to assess severity and etiology of shock.
• It helps to identify the degree of end organ involvement.
• It helps to identify metabolic and electrolytes derangements.
• Includes: CBC, blood gas, lactate level, full electrolytes panel, creatinine, BUN and glucose.
Fluid resuscitation
• Regardless of the specific type of shock, most patients with shock have a component to hypovolemia.
• Start by giving 20 mL/kg of isotonic crystalloid IVF over 5 to 10 minutes.
• You can repeat IVF boluses as needed to improve tissue perfusion / BP. The total amount of IVF is dictated by the degree of hypovolemia and the underlying etiology.
• If you suspect cardiogenic shock or myocardial dysfunction, you should provide IVF boluses as 5 – 10 mL/kg.
• In patients with hemorrhagic shock, transfuse PRBC once available.
Vasoactive medications
• When fluid resuscitation is deemed adequate and the patient is still unstable, vasoactive drugs and inotropes should be considered.
• The aim is to improve cardiac contractility and improve vascular tone to improve DO2 and CO.
• The choice of drug would depend on the desired effect based on the physiological derangement (Table 11).
| Vasoactive medications and mechanism by receptor target | ||||
|---|---|---|---|---|
| Vasoactive | α1 | ß1 | ß2 | D1 |
| Dopamine | Vasoconstriction | Inotropy. Chronotropy | Vasodilation | Renal Vasodilation |
| Norepinephrine | Vasoconstriction | Inotropy | ||
| Epinephrine | Vasoconstriction | Inotropy. Chronotropy | Vasodilation | |
| Dobutamine | Inotropy | Vasodilation | ||
Table 11: Vasoactive medications and mechanism by receptor target.
Specific management for types of shock
After the initial steps are taken, the following should be considered according to type of shock and underlying etiology of shock (Figure 16).
Hypovolemic
Non-hemorrhagic
• Start with 20 ml / kg of crystalloid isotonic IVF boluses over 5-10 minutes, this could be repeated according to degree of dehydration and clinical response, i.e. normalization of BP and improvement of tissue perfusion.
• Replace the estimated overall deficit over 24-48 hours with appropriate IVF and electrolytes according to patient condition.
• Replace ongoing losses if significant in amount.
Hemorrhagic
• Control bleeding.
• Transfuse PRBC as needed.
• IVF boluses could be used initially until PRBC is available.
• In cases of life threatening bleeding, O negative unmatched PRBC could be used.
Distributive
Septic
• Early administration of broad-spectrum antibiotics is key.
• If there are no signs of clinical improvement with first 40- 60 mL/Kg ( two to three boluses 20 L/Kg) consider inotropic support according to clinical examination:
• Cold extremity , delayed capillary refill and/or low BP , give Epinephrine
• Warm extremity, flash capillary refill and/or low BP (typically wide pulse pressure) , give norepinephrine (Figure 17).
Neurogenic
Positioning of the patient in supine position or Trendelenburg to improve venous return.If the shock is not improving with initial IVF boluses (fluid refractory shock). start vasopressors (nor- epinephrine) as indicated.
Anaphylactic
• If shock is suspected to be caused by anaphylaxis, the firstline treatment is intramuscular epinephrine.
• Repeated doses of IM epinephrine or IV infusion might be needed.
• If bronchospasm is present, administer salbutamol nebulization.
• Other therapies to consider: antihistamine and corticosteroids.
• It is important to eliminate ongoing exposure to the allergen.
Cardiogenic
• Cardiomegaly on CXR in a patient with shock and clinical signs of poor cardiac output is the hallmark of cardiogenic shock.
• Caution with fluid resuscitation is needed in this type of shock, as fluid might worsen hemody- namic state of the patient and clinical outcome.
• Start with a small amount of IVF boluses 5 to 10 mL/Kg and over a longer period of time 10-20 minutes.
• Frequent assessment for signs volume overload is important like clinical signs of pulmonary edema and hepatomegaly in infants.
• Bedside echography will be helpful to identify cardiogenic shock and its degree if expertise is available.
Choice of inotropic support and the need for diuresis will depend on the clinical status of the patient These will include but are not limited to:
• Epinephrine
• Dopamine
• Milrinone
Obstructive
Presentation of obstructive shock might mimic hypovolemia; therefore early recognition of the obstructive picture is a key.
Cardiac tamponade
• Identified by bedside echography.
• Fluid boluses might help to improve cardiac output temporally, until pericardiocentesis is performed.
• Bedside emergency pericardiocentesis may be performed in cases of impending cardi- ac arrest or actual arrest.
Tension pneumothorax
• Immediate needle decompression is needed when it is suspected followed by chest tube insertion.
• Ductal-dependent lesions:
• If ductal dependent lesion is suspected in a neonate like coarctation of aorta, prostaglandin E-1 should be started. • Prompt expert consultation and referral is important.
Pulmonary embolism
• It is rare and difficult to diagnose because signs may be unspecific (cyanosis, increased heart rate, cool and mottled skin, chest pain and low BP).
• Initial supportive care includes preserving airway, breathing, and circulation if perfusion is inadequate.
• Consult an expert to confirm the diagnosis by CT scan with contrast, echocardiography or angiography (Figure 18).
Module four: arrhythmias and cardiac arrest - identification and management
Learning objectives
1. Readers should be able to:
2. Identify the major classifications of cardiac rhythms in children and infants.
3. Recognize the several forms of bradycardias that can be seen in children and infants.
4. Discuss the basic emergency management for infants and children with symptomatic brady- cardia.
5. Determine whether a patient has asymptomatic bradycardia, symptomatic but stable brady- cardia, or symptomatic and unstable bradycardia.
6. Talk about the different types of tachycardia that you might see in a child.
7. Discuss the initial emergency management for infants and children with stable or unstable tachycardia.
8. Talk about the pharmacology of medications you are using to control tachycardia.
9. Determine whether a patient is asymptomatic but stable, or symptomatic and unstable due to tachycardia .
10. Discuss the dysrhythmias that can develop in children suffering from cardiopulmonary failure or cardiac arrest.
11. Go over the Emergency Management for a cardiopulmonary arrest.
12. Go through the drugs you will be using during a cardiopulmonary arrest.
13. Discuss defibrillation and the indications and energy levels that should be employed in this procedure.
14. Discuss synchronized cardioversion, including its indications and the energy levels required for this treatment.
Cardiac arrhythmia
Abnormal cardiac rhythms in children are a serious but uncommon condition. When a child develops an arrhythmia, it could be a primary arrhythmia or one triggered by an underlying illness or disease. While some arrhythmias cause a pulse to stop, others keep it running. The most common arrhythmias in children are sinus tachycardia, supraventricular tachycardia (SVT), and sinus bradycardia. Although cardiac arrhyth- mias can cause poor tissue perfusion, they are rarely deadly if detected early. In the treatment of cardiac arrhythmias in children, accurate assessment of the signs and symptoms of an arrhythmia, as well as fast detection of the abnormal rhythm, are critical.. In both toddlers and adults, a normal heartbeat originates in the sinoatrial node and follows normal conduction pathways. Normal sinus rhythm is the term for this (NSR) (Figure 19).
Arrhythmia refers to any heart rhythm or rate that is not NSR. Primary arrhythmias happen when the heart’s impulse generation or propagation is disrupted. These basic arrhythmias are frequently associated with a physically normal heart and represent an intrinsic impairment of electrical cardiac conduction. Secondary arrhythmias can be caused by structural heart problems (defects, inflammation, myopathy, and so on) or external stimuli (electrolyte abnormalities, hypoxia, acidosis, etc). The common causes of cardiac arrhyth- mias in children are listed below:
• Congenital heart defects.
• Cardiopulmonary bypass or cardiac surgery
• Cardiomyopathy.
• Cardiac tumors.
• Inflammatory heart conditions (e.g., Kawasaki disease, myocarditis).
• Pulmonary hypertension.
• Electrolyte imbalances (potassium, magnesium, or calcium).
• Metabolic and respiratory acidosis.
• Hypoxia.
• Hypotension.
• Toxins
• Medications (e.g., vasoactive agents, digoxin, etc.)
Arrhythmias can be categorized based on their rate for ease of examination (i.e., too slow or too fast). Bradyarrhythmias are irregular heart rhythms characterized by a sluggish heart rate. Tachyarrhythmias are arrhythmias with a rapid and aberrant rhythm. This broad classification can be further subdivided depend- ing on whether or not perfusion is harmed (unstable / stable). The most common pediatric arrhythmias and which will be discussed in this chapter are the following:
Bradyarrhythmias
• Sinus bradycardia
• AV block (atrioventricular block)
Tachyarrhythmias
• Sinus tachycardia
• (SVT)
• Ventricular tachycardia
• Atrial flutter (VT)
Assessing the pediatric patient with cardiac arrhythmia
When a juvenile patient has a cardiac arrhythmia, prompt assessment, diagnosis, and treatment can assist prevent hemodynamic instability, which can progress to shock, heart failure, or cardiac arrest if left un- treated (Figure 20).
Determine whether an aberrant heart rate (too fast, too slow, or irregular) exists before determining the precise rhythm. The required procedures to rectify the problem and preserve the patient’s cardiopulmo- nary stability will be determined by recognizing the particular anomaly. Identify any possibly reversible causes of the arrhythmia so that they can be addressed during treatment.
Children's Typical heart rates differ based on the age of children. with infants and younger children often having a faster heartbeat than older children. Table 12 below demonstrates the normal heart rate range for each age group and how it changes as the child grows older.
Age Group |
Heart Rate |
|---|---|
| < 1 year | 101-160/ minute |
| years after 1-2 | 100-150/min |
| years after 2-5 | 90-140/min |
| years after 5-12 | 80-120/min |
| > 12 years | 60-100/min |
Table 12: Normal heart rate range for each age group.
When looking at the rhythm strip on the heart monitor, you can perform a preliminary rhythm assessment. However, because certain arrhythmias can be missed, a comprehensive 12-lead electrocardiogram (ECG) analysis is performed for reliable assessment of children with suspected arrhythmias. Recognizing and treating arrhythmias requires the ability to produce and interpret a 12-lead ECG (Figure 21).
Normal sinus rhythm
In normal sinus rhythm, you will find:
• Heart rate for a child of the same age.
• Atrial and ventricular beats that are regular.
• P waves appear before each QRS complex, followed by a QRS.
• In leads II and aVF, there is a positive (upright) P wave.
Identifying abnormal cardiac rhythm: Determine whether the heart rate is too slow (bradycardia) or too fast (tachycardia) to recognize and diag- nose an arrhythmia (tachycardia). Common bradycardias in children include sinus bradycardia, the third most common arrhythmia in children, and various kinds of atrioventricular (AV) block. Based on the geom- etry of the QRS complex, tachycardias are classed as narrow complex or wide complex.
Narrow-complex tachycardias are the most prevalent arrhythmias in youngsters (i.e. sinus tachycardia and supraventricular tachycardia ). Wide-complex tachycardias in children include ventricular tachycardia (VT; in this case, with a pulse) and supraventricular tachycardia (SVT) with aberrant intraventricular conduction.
Bradycardia
Bradycardia is a condition in which a child’s heart rate is slower than what is deemed normal for his or her age. Children and newborns with bradycardia should be discovered and assessed, but not all bradycar- dia requires medical treatment. When bradycardia is symptomatic and impairs cardiovascular function, intervention is essential. This usually indicates the heart is beating too slowly to keep BP and peripheral perfusion stable, resulting in shock and inadequate tissue perfusion (prolonged capillary refill,decreased urine output and change in mental status).
Sinus Bradycardia
Sinus bradycardia has a rhythm that is similar to sinus rhythm but is slower than the age-appropriate heart rate range. Some people, such as adolescent athletes, may experience sinus bradycardia as a natural occur- rence. Sinus bradycardia is induced by external sources in the majority of cases (i.e., secondary bradycar- diaIn children, hypoxia is the most common cause of secondary sinus bradycardia. Other factors include hypovolemia, hypoglycemia, increased intracranial pressure, and medications. Sinus bradycardia can also occur after a congenital heart abnormality has been corrected. A primary cardiac origin of pathologic sinus bradycardia in children, on the other hand, is extremely rare.
Causes
• Causes of sinus bradycardia include:
• Vagal stimulation
• Hypotension
• Hypoxia
• Excess hydrogen ions (i .e., acidosis)
• Hypokalemia or hyperkalemi
• Hypothermia
• Toxins (including prescription medications [i.e., betablockers, calcium channel blockers, opioids, digoxin ] or recreational drugs)
• Hypothyroidism
• Malnutrition (including anorexia nervosa)
• Increased intracranial pressure.
• Conditions affecting the heart, including: congenital heart abnormalities.
• Cardiac surgery, myocarditis.
Electrocardiographic findings
On an (ECG), sinus bradycardia rhythm looks similar to sinus rhythm, with the exception that the heart rate is slower than normal (Figure 22).
Signs and symptoms
There may be no indications or symptoms of sinus bradycardia. Sinus bradycardia, on the other hand, has a considerable impact on cardiac output, resulting in hemodynamic instability. The following table lists the signs and symptoms of unstable bradycardia (Table 13).
| Ariway Nothing has changed. Breathing Slow, shallow breathing is known As tachypnea. Cyanosis \sCir- culation Hypotension, slowed pulses, prolonged Capillary refill, cold extremities, and mottled skin are all symptoms of hypotension. Disability Consciousness level has dropped Exposure Extremely coolAirway |
Table 13: Primary assessment findings in unstable bradycardia.
Atrioventricular block
Atrioventricular block is the cessation of impulse transmission from the atria to the ventricles, which can be partial or full.
Causes
• Causes of atrioventricular block include:
• Hypervagal tone (a normal finding in children)
• Electrolyte abnormalities
• Cardiac surgery
• Medications
• Inflammatory heart conditions (myocarditis, rheumatic carditis, Lyme disease).
• Myocardial infarction.
• Congenital complete heart block
Classification
The three types of AV blocks are first-degree, second-degree (type I and type II), and third-degree AV blocks. Depending on the cause, AV block might be temporary or permanent. High-grade AV blockages, such as second- and third-degree type II and III, almost always require intervention.
First-degree av block
In first-degree AV blockage, the AV node or bundle of His is characterized by delayed conduction. Al- though the impulse is delayed, it reaches the ventricles, resulting in a prolonged PR interval but a regular ventricular beat (Figure 23). First-degree AV block has little symptoms in children.
First-degree AV block can occur in healthy children and wellconditioned sportsmen (due to high vagal tone). It can, however, be a sign of conduction system failure or a transitory manifestation of electrolyte imbalances, myocarditis, myocardial infarction, AV node postsurgical injury, rheumatic fever, Lyme disease, or pharmaceutical toxicity (e.g., digoxin, calcium channel or -blockers).
Second-degree av block, type i (mobitz 1)
Intermittent P wave conduction characterizes a second-degree AV block. With second-degree AV block, not all impulses reach the ventricles, resulting in an irregular R-R interval (regularly irregular) heart rhythm.
The next impulse is blocked after increasing extension in AV block type I (also known as Mobitz type I or Wenckebach block). After the blocked impulse, the AV node resets (the PR interval returns to normal), and the sequence repeats.
This type of block, similar to first-degree AV block, may be widespread in children. Pathologic reasons include congenital heart disease, cardiac surgery, myocarditis, drug toxicity, and Lyme disease. Type I sec-ond-degree AV block has few symptoms (Figure 24).
Second-degree av block, type ii (mobitz 2)
In second-degree AV block type II, the block occurs in the His bundle (Mobitz type II ). Like with second degree AV block type I, some atrial impulses are delivered through to the ventricles while others are not; however, the impulses are not progressively delayed and the PR interval remains constant (Figure 25). The impulses that are blocked could be random or follow a pattern (e.g., 2:1, 3:1 or 4:1). In high-grade second-degree AV block type II (i.e., 3:1, 4:1, which means that two or more consecutive P waves do not conduct), the ratio is greater than 2:1.) (Figure 26).
Palpitations indicating inadequate perfusion may be experienced by patients with Type II second degree block. Some folks may not have any symptoms. Depending on the type of cancer, the clinical presentation varies. based on the blocked to conducting impulse ratio (how low the ventricular rate is).
Third-degree (complete) av block
With total AV block, no impulses are transported to the ventricles. In this condition, pacemaker cells in the ventricle (AV junction, or ventricular myocardium) act as chamber pacemakers and provide an escape rhythm. The atria and ventricles are controlled by distinct pacemakers that contract at their own intrinsic rates (60 to 100 beats per minute for the atria and 30 to 45 beats per minute for the ventricles). AV dissoci- ation is the medical term for this problem. This block can be displayed above or below the AV node (Figure 27).
In rare circumstances, third-degree AV block can be congenital (i.e. the child is born with it). Third-degree AV block is caused by acquired variables such as cardiac surgery or cardiac catheter interventions, hypoxia, severe electrolyte imbalance, myocarditis, and medicines, and is significantly more common.
If the escape ventricular rhythm originates above the bifurcation of the bundle of His, the heart rate is faster and more reliable, so symptoms may be mild (such as fatigue, orthostatic hypotension and activity intolerance). If the escape rhythm originates in the ventricle, the heart rate will be slower and less reliable, and symptoms of reduced cardiac output may be more severe (such as syncope or cardiac arrest).
Emergency care
• Assess the patient and take a detailed medical history. If necessary, seek the advice of an expert. Because hypoxia is the most prevalent cause of symptomatic bradycardia in children, the first line of treatment is an airway and breathing assessment and support, as well as the administration of supplemental oxygen. Start using pulse oximetry, as well as cardiac and BP monitoring.
• If the child’s breathing is satisfactory, provide supplemental oxygen in a non-aggressive man- ner. Assist ventilation with an appropriate-sized bag-mask device and supplemental oxygen if breathing is inadequate (shallow, sluggish, or gasping breathing). Choose a cardiac monitor with defibrillation and transcutaneous pacing capability if one is available.
• Determine the heart’s rhythm. Establish vascular access and get a 12-lead ECG; however, do not postpone continuing emergency care in order to obtain the 12-lead ECG.
• Hypoxia, elevated vagal tone, acidosis, abrupt elevation of intracranial pressure, hypothermia, hyperkalemia, or drugs such as calcium channel blockers (e.g., verapamil, diltiazem), digoxin, clonidine, opioids, and beta blockers are all possibly reversible causes of bradycardia (e.g., at- enolol, propranolol).
• If the child’s heart rate is fewer than 60 beats per minute and there are signs of poor perfusion (e.g., rapid changes in mental state, hypotension, delayed capillary refill, abnormal skin color) despite oxygenation and ventilation, start chest compressions and ventilations. After two min- utes, reassess the patient to see if the bradycardia and indications of hemodynamic compromise are still present.
If the bradycardia persists despite oxygenation and breathing, provide epinephrine IV/IO (Table 14). If bradycardia persists, a continuous infusion should be considered.
Trade name |
Adrenalin |
|---|---|
| Classification | Catecholamine, sympathomimetic, vasopressor |
| Mechanism of action | Stimulates alpha and beta adrenergic receptors |
| Dosage | • | 0.01 mg/kg (0.1 mL/kg of 1:10,000 solution) IV/IO bolus every 3 to 5 minutes; maximum IV/IO dose 1 mg (de Caen et al ., 2015) |
| • | If vascular access is unavailable and the patient is intubated, epinephrine can be administered through an ET tube at a dose of 0.1 mg/kg (0.1 mL/kg of 1:1,000 solution), with a maximum ET dose of 2. (de Caen et al., 2015) |
|
Table 14: Epinephrine.
If the bradycardia is caused by elevated vagal tone, primary AV block, or cholinergic medication toxicity, atropine should be given (Table 14).
If your bradycardia is not responding to other treatments, you might want to consider pacing. Children who suffer AV conduction blockages following cardiovascular surgery are most likely to require pacing. Pacing may be required in patients who have had their hearts denervated after a heart transplant (Table 15).
| Classification | Anticholinergic, parasympatholytic, antimuscarinic, parasympathetic antagonist, parasympathetic blocker |
|---|---|
| Mechanism of action | • Anticholinergic drugs, such as atropine, disrupt acetylcholine’s effects at muscarinic receptor sites in the parasympathetic division of the autonomic nervous system. The degree to which the end organ is governed by the parasympathetic nervous system determines the actions of atropine in various organs. • By speeding the SA node discharge rate and inhibiting the vagus nerves, atropine im- proves AV conduction and raises heart rate (positive chronotropic action). |
| Indications | Symptomatic bradycardia |
Table 15: Atropine sulfate.
Dosage
• IV/IO: 0.02 mg/kg IV/IO push, may repeat once if needed. Minimum single dose
• Minimum single dose 0.1 mg
• Maximum single dose 0.5 mg ET: 0.04 to 0.06 mg/Kg (Figure 28).
Tachyarrhythmias
Tachycardia is described as a heart rate that is higher than the upper limit of what is considered nor- mal for one’s age. Tachycardias account for the majority of arrhythmias in children, with sinus tachycardia accounting for around half of those cases. SVT is the most common symptomatic arrhythmia in children, accounting for roughly 10% of all arrhythmias. The breadth of the QRS complex determines whether a tachycardia is narrow or wide:
Sinustachycardia, SVT, or atrial flutter are examples of narrow complex tachycardia (0.09 second). VT, SVT with abnormal conduction are examples of wide complex tachycardia (>0.09 second).
Narrow-complex tachycardias sinus tachycardia
Sinus tachycardia is the same as sinus rhythm, except that the child’s heart rate is faster than typical for his or her age. It is a typical physiological response when the body is under stress, such as from a fever, anxiety, or pain. It could also be a defensive response to pathologic stressors including hypoxia, hypo- volemia, anemia, shock, or heart or lung disease. Other causes of sinus tachycardia include hyperthyroidism and medicines (both prescribed and illicit ) (Figure 29).
Causes of Sinus Tachycardia
• Vigorous physical activity
• Anxiety
• Pain
• Infection and fever
• Tissue hypoxia
• Hypovolemia (caused by fluid or blood loss)
• Anemia
• Shock
• Congestive heart failure/heart disease
• Medications (e.g., catecholamines)
• Illicit drugs (primarily stimulants)
• Pulmonary embolism
• Tension pneumothorax
• Pericardial tamponade
Note: These and other causes (that result in increased metabolic tissue demand) should be ruled out be- fore determining that a child’s faster heart rate constitutes a pathologic condition.
Electrocardiographic findings
The ECG in sinus tachycardia (Figure 30) is morphologically similar to that of NSR. P waves and QRS com- plexes occur in a 1:1 ratio, with each narrow QRS complex preceded by a normal P wave. Despite being excessive for their age, the heart rate in sinus tachycardia is typically 180 beats per minute in children and 220 beats per minute in newborns.
The majority of patients with sinus tachycardia have no symptoms, and when they do, it is usually related to the underlying clinical disease. The condition is often detected by chance during a physical examination or when a cardiac monitor shows a high heart rate in certain patients. A racing heart, palpitations, short- ness of breath, or light-headedness may occur in a small number of patients. There is no specific treatment for sinus tachycardia. Treatment should focus on the underlying cause rather than the symptom (e.g. fluid resuscitation for hypovolemia, analgesia for pain, pericardiocentesis for cardiac tamponade, etc.).
Supraventricular tachycardia
Atrial tachycardia, atrial flutter, atrial fibrillation, and other tachycardias that start above the ventricles (i.e., above the bifurcation of the bundle of His) are all examples of supraventricular heartbeat (SVT). The most common kinds of SVT in children are re-entrant tachycardias, which entail an abnormal conduction chan- nel between the atria and ventricles or within the AV node.
As a result, SVT and reentrant tachycardias are frequently used interchangeably. In many kinds of SVT, the presence of a “additional,” or accessory, channel for conduction between the atria and ventricles outside of the usual conduction pathway results in tachycardia. This auxiliary channel might be external (AV re-entry tachycardia) or internal (AV re-entry tachycardia) (AV nodal re-entrant tachycardia). These re-entrant ar- rhythmias respond well to adenosine and synchronized cardioversion.
The most frequent symptomatic tachyarrhythmia in children is SVT, which is defined as a rapid, regular heart rate of more than 180 beats per minute in older children and 220 beats per minute in babies. SVTs are most common in childrens whose hearts are anatomically normal.
Other factors to consider are
1. Toxicity of drugs (e.g., stimulants, salicylates, tricyclic antidepressants).
2. Deficiency in electrolytes
3. Hypoxia is a term used to describe a lack of oxygen in the body
4. Acidosis is a condition in which the body is acidic.
5. Hypoglycemia is a condition in which blood sugar levels are low.
6. Indwelling central venous catheters (those with protruding tips)
7. Congenital heart disease (CHD) is a type of congenital cardiac defect.
8. Following heart surgery
9. Inflammatory heart disease is a condition in which the heart becomes inflamed (e.g myocarditis, rheu- matic carditis, etc.)
Electrocardiographic findings
Narrow QRS complexes are the most common ECG finding, usually with nonexistent or hardly discernible P waves (Figure 31).
Signs and symptoms
SVT is distinguished by its rapid onset, rapid termination, and variable duration. SVT leaves the ventricles with insufficient time to refill before contracting again. SVT that lasts only a few minutes is usually well tolerated and does not cause symptoms of hemodynamic compromise. SVT, on the other hand, can cause cardiac output to be compromised and heart failure to develop. This explains the agerelated differences in SVT presentation.
Palpitations and/or chest pain are common complaints in older children, and they usually occur early since they can vocalize their symptoms. Infants with SVT, on the other hand, may show nonspecific symptoms including irritability, lethargy, poor feeding, pallor, and sweating while feeding. Because newborns are unable to express problems, these symptoms are frequently signs of congestive heart failure arising from a prolonged (>24-hour) duration of SVT (Table 16).
| Feature | Sinus Tachycardia | Supraventricular Tachycardi |
|---|---|---|
| Heart rate | Infant <220/min Child < 180/min |
Infant > 220/min Child > 180/min |
| Onset and termination | Gradual | Abrupt, sudden |
| Rate variability | Variable with stimulant | Fixed, constant |
| P waves | Present | Absent |
Table 16: Differentiating sinus tachycardia from SVT.
Wide-complex tachycardias
Ventricular tachycardia: VT is a wide–QRS complex tachycardia that occurs when the new pacemaker is a ventricular focus below the bundle of His. This rhythm is unusual in the pediatric population. A high ventricular rate significantly reduces ventricular filling, stroke volume, and cardiac output, and can only be sustained for a short period of time before the patient becomes hemodynamically unstable.
VT can quickly proceed to ventricular fibrillation (VF), which can lead to cardiac arrest. VT can be caused by a single (monomorphic) or multiple (polymorphic) ectopic foci in the ventricles. This distinction is im- portant because it changes the electrocardiographic appearance and may impact how VT is treated in a particular context. While extracardiac causes of supraventricular tachyarrhythmias are frequent, VT usually occurs in the presence of heart disease or injury (heart surgery, myocarditis , cardiomyopathy, etc). VT can be caused by drugs (such as antidepressants or stimulants), hypoxia, or electrolyte abnormalities (includ- ing hypocalcemia, hypomagnesemia and hypokalemia ).
Torsades de pointes is a kind of polymorphic VT that is characterized by a prolonged QT interval, whether inherited or acquired (i .e., due to drugs or electrolyte abnormalities such as hypomagnesemia or hypokalemia) (Table 17).
| Airway | There have been no modifications. |
|---|---|
| Breathing | If congestive heart failure develops, you may experience tachypnea, increased work of breathing, and basal crackles. |
| Circulation | A delayed capillary refill can cause tachycardia, palpitations, chest discomfort, diaphoresis, hypotension, reduced pulses, delayed capillary refill, flushing (early), pallor (late), chilly extremities, mottling, or cyanosis. |
| Disability | Irritability, lightheadedness, and a reduced level of consciousness are all symptoms of poor nutrition. |
| Exposure | Extremities that is cool. |
Table 17: Primary assessment findings in unstable supraventricular tachycardia.
Electrocardiographic findings
On the monitor, VT is usually visible. A 12-lead ECG may be required in rare circumstances to further identi- fy the rhythm. The QRS complexes in VT are large. Because the P wave is buried in the large QRS complex, it is usually absent or difficult to detect. The ventricular rate in VT ranges from 120 to >200 beats per minute (monomorphic VT), depending on the child’s age and the arrhythmia etiology. QRS complexes with a fairly homogeneous shape describe monomorphic VT (Figure 32).
In polymorphic VT, the structure and pace of QRS complexes fluctuate. Torsades de pointes (“twisting of the points”) is a type of polymorphic VT in which the QRS complexes bend upward and then downward, with their amplitudes dropping and increasing, then lowering again. It has the appearance of a “party streamer.” (Figure 33).
Signs and symptoms of unstable VT with a pulse are shown in Table 18.
| Airway | Patency may or may not be present |
|---|---|
| Breathing | Difficulty breathing or no breathing |
| Circulation | Chest pain, hypotension, slowed pulses, diaphoresis, flushing (early), pallor (late), chilly extremities, and mottled skin are all symptoms of a heart attack. |
| Disability | Consciousness loss or a reduction in consciousness |
| Exposure | Cool extremities |
Table 18: Primary assessment findings in unstable ventricular tachycardia with a pulse.
Emergency care
Care for a child or infant with stable tachycardia with a pulse: When caring for a child with tachycardia and a preserved pulse, the severity of the patient’s signs and symptoms, as well as the duration of the QRS complex, are critical aspects to consider (i.e., narrow versus wide).
If there is no sign of hemodynamic instability as a result of the tachycardia, the patient is deemed stable. The next stages in this scenario are to analyze the ECG data to determine whether the arrhythmia is restricted or widespread, and then to administer appropriate medication.
A patient who displays signs and symptoms of hemodynamic instability despite receiving early airway, breathing, and circulation care is at risk of dying and requires immediate life-saving treatment.
The treatment of a child with steady tachycardia and a pulse is mostly dictated by the rhythm, which can be detected initially by the width of the QRS complex.
Stable narrow-complex tachycardia
The initial step in caring for a child with a narrow-complex tachycardia with a pulse and acceptable perfusion is to support the airway, breathing, and circulation as needed. The next step is to determine the particular rhythm (i.e., sinus tachycardia or SVT), as treatment will vary based on this.
Sinus tachycardia: Because tachycardia is usually a compensatory response aimed at maintaining cardiac output and tissue perfusion, specialized arrhythmia treatment for sinus tachycardia is uncommon and may even be harmful. As a result, if an ECG reveals sinus tachycardia, treatment should concentrate on the underlying cause of the arrhythmia.
Stable svt
The most common first-line treatment for stable SVT is vagal maneuvers, which try to reduce conduction through the AV node (Figure 34). Blowing through a clogged straw, coughing in older children, and ap- plying ice to the face in infants are all examples.
When vagal methods fail, pharmacologic adenosine treatment is initiated with a rapid bolus approach and continuous ECG monitoring for confirmation.Before sinus rhythm returns, there is usually a little pause (Figure 35). Because adenosine has a short half-life, it should be given quickly through a large bore IV cannula (jugular or brachial) and followed by a rapid flush of saline. A three-way stopcock is the best way to accomplish this
Stable wide-complex tachycardia
The underlying rhythm has an impact on how a youngster with a wide-complex tachycardia and a pulse receives treatment. Pharmacologic cardioversion and reversible cause treatment are usually the first-line interventions for stable VT with a pulse. Synchronized electrical cardioversion is a second-line or alternate therapy for VT with a pulse unless the patient becomes unstable. For immediate or long-term therapy al- ternatives, it is vital to seek the counsel of a cardiologist.
Pharmacologic treatment with adenosine may be indicated in cooperation with a pediatric cardiologist in the case of a regular monomorphic wide-complex tachycardia (possible SVT with aberrant conduction).
Identifying and treating reversible causes, as well as additional pharmaceuticalor synchronized electrical cardioversion, may be necessary ifearly treatments fail. To help with the initial care, a cardiologist should be consulted. In addition, long-term treatment requires the involvement of a cardiologist.
Care for a child with unstable tachycardia with a pulse
A patient who develops signs and symptoms of hemodynamic instability (e.g., insufficient perfusion, weak pulses, decreasing level of consciousness, plummeting BP) is unstable and requires immediate lifesaving therapy. Treatment for unstable tachycardia with a pulse varies according to the duration of the QRS com- plex and the individual rhythm, just as it does for stable tachycardia. Focus on restoring normal cardiac conduction (i.e., NSR) as soon as feasible to avoid additional hemodynamic decompensation or cardiac arrest.
Unstable narrow-complex tachycardia with a pulse
Apart from immediate lifesaving treatments to support the airway, breathing, and circulation, the man- agement of unstable narrowcomplex tachycardia varies based on the actual rhythm.
Unstable Sinus Tachycardia
The purpose of treatment for unstable sinus tachycardia is to address the underlying cause rather than suppress the irregular rhythm, which is typically a compensatory response designed to maintain or aug- ment cardiac output.
Unstable svt
Early on, electrical synchronized cardioversion is commonly utilized to change the rhythm and restore cardiac output. It is reasonable to attempt adenosine first if quick administration is possible (IV/IO access is ready and the medicine is available). If adenosine cannot be administered quickly, do not delay synchro- nized cardioversion.
Unstable wide-complex tachycardia with a pulse
When indicators of hemodynamic compromise are evident, synchronized electrical cardiover- sion is the first-line treatment for unstable wide-complex tachycardias, such as VT and SVT with aberrant conduction.If synchronized cardioversion fails to restore sinus rhythm, a pediat- ric cardiologist should be consulted. Antiarrhythmics may be required (Figures 36 and 37).
Shockable Cardiac Arrest
Introduction
A child or infant suffering from cardiac arrest is in great risk. It is crucial to assess for and recognize cardiac arrest in children and infants, as well as to provide timely resuscitation. Any time spent delivering CPR diminishes the odds of the child or infant surviving cardiac arrest.
The absence of a central pulse suggests cardiac arrest, which is defined as the cessation of mechanical heart action. Sudden cardiac arrest in children and babies is uncommon due to a main arrhythmia such as ventricular tachycardia or fibrillation. A worsening of a respiratory emergency or shock is the most com- mon cause of cardiac arrest in children. Recognizing the signs and symptoms of common causes of cardiac arrest might help you intervene before you collapse.
Cardiac arrest should be avoided whenever possible, as only about half of children who have cardiac arrest in the hospital live to be discharged.
1. Three variables can assist you in surviving a cardiac arrest:
2. Early diagnosis and treatment of respiratory crises and shock
3. Early detection of cardiac arrest and simultaneous provision
of ventilatory (bag-mask breathing) and circulatory (CPR) assistance 4. Identify and treat reversible cardiac arrest causes (Table 19)
| Condition | Possible Causes | Peri-Arrest Signs and Symptoms | |
|---|---|---|---|
| Hypovolemia | Bleeding, fluid losses or shifts out of the intravascu- lar space |
■■ | Hypotension, oliguria, cyanosis, tachypnea, con- fusion, decreased level of consciousness |
| Hydrogen ion excess (acidosis) | Airway obstruction, lung disease, hypoventilation or apnea | ■■ | Tachypnea, bradypnea or apnea, increased work of breathing (e.g.,accessory muscle use, nasal flaring, grunting), stridor or wheezing, altered mental status ranging from irritability to unconsciousness, cyanosis |
| Hyperkalemia (serum po- tassium >5.5 mEq/L) |
Shock, diabetic ketoacido- sis, hypoventilation, renal failure | ■■ | Metabolic acidosis: coma, hyperventilation/ hyperpnea, cardiac dysfunction, ventricular ar- rhythmia Respiratory acidosis: tachycardia, tachypnea, hypertension, headache, confusion, drowsiness, stupor |
| Hypokalemia (serum po- tassium <3.5 mEq/L) |
Missed dialysis, renal failure, hypoaldosteronism (as in congenital adrenal hyperplasia) |
■■ | Muscle weakness, flaccid paralysis, nausea, irreg- ular heart rate/pulse; often asymptomatic |
| Hypokalemia (serum po- tassium <3.5 mEq/L) |
Gastrointestinal or urinary losses, malnutrition, hyper- aldosteronism (as in Cushing syndrome) |
■■ | Muscle weakness, cramps or spasms, paralysis hypoventilation, hypotension, confusion, pares- thesia, drowsiness |
| Hypothermia (body tem- perature <35° C) |
Traumatic injury with largevolume fluid resuscita- tion, coldwater drowning, exposure |
■■ | Shivering (if temperature >31° C), bradycardia, bradypnea, nonreactive pupils, confusion, leth- argy, coma |
| Hyperglycemia | Diabetic ketoacidosis | ■■ | Nausea; vomiting;increased thirst and urina- tion; lethargy; somnolence; coma; hypotension; tachycardia;rapid, deep respirations (Kussmaul breathing); fruity breath (due to exhaled ace- (tone |
| Hypovolemia | Bleeding, fluid losses or shifts out of the intravascu- lar space |
■■ | Hypotension, oliguria, cyanosis, tachypnea, con- fusion, decreased level of consciousness |
| Hypoxemia | Airway obstruction, lung disease, hypoventilation or apnea | ■■ | Tachypnea, bradypnea or apnea, increased work of breathing (e.g.,accessory muscle use, nasal flaring, grunting), stridor or wheezing, altered mental status ranging from irritability to unconsciousness, cyanosis |
| Hydrogen ion excess (acidosis) |
Shock, diabetic ketoacido- sis, hypoventilation, renal failure |
■■ | Metabolic acidosis: coma, hyperventilation/ hyperpnea, cardiac dysfunction, ventricular ar- rhythmia |
| Hypoglycemia | Insufficient intake, too much insulin | ■■ | Tachycardia, tachypnea, altered mental status ranging from irritability to coma, diaphoresis, hypothermia, pallor, seizures |
Table 19: Reversible causes of cardiac arrest (H’s and T’s)
Recognizing cardiac arrest
Unresponsiveness, apnea (or merelyagonal breaths), and no discernible central pulses are all symptoms of cardiac arrest (e.g., carotid, femoral, or in infants, brachial ).
If a pulse cannot be felt in 10 seconds, an unresponsive, apneic patient is likely to be in cardiac arrest, and CPR should be started as soon as possible after calling for aid (Figure 38).
Rapid assessment
Perform a quick examination using the Pediatric Assessment Triangle:
• Look: examine the patient’s appearance as well as his or her level of response.
• Work of breathing: use visual and auditory tests to assess the patient’s work and breathing quality. Examine for a lack of or insufficient breathing effort.
• Check for pallor (or a gray/dusky hue), cyanosis, mottling, or flushing on the skin and mucous membranes. Examine for severe, life-threatening bleeding as well.
Use the shout-tap-shout method to determine a patient’s level of consciousness if they appear unrespon- sive.
If there is no response, call for help straight away and alert your facility’s resuscitation team. Obtain equip- ment for emergency airway management and cardiopulmonary resuscitation.
At the same time, check for respiration and a carotid pulse in youngsters or a brachial pulse in neonates. Check for at least 5 seconds, but no more than 10.
If there is no breathing or pulse, provide immediate basic life support (BLS) care, including CPR (compres- sions and ventilations). If the patient is not lying down on a hard surface, place a CPR board beneath the patient and/or place the bed or crib in the CPR position in CPR-ready beds or cribs.
After the resuscitation team arrives, the team leader assigns critical responsibilities to team members (compressor, AED/ defibrillator operator, airway manager/ventilator, data manager, drug administrator).
Primary assessment and initial basic life support interventions
Because the toddler or infant is in cardiac arrest, a traditional ABCDE initial assessment is not possible or warranted. Instead, perform a modified primary evaluation and provide immediate basic life support (BLS) without interrupting CPR. Some of the most important actions are as follows
Ensure that high-quality CPR is delivered and keep track of CPR quality metrics, both qualitative and quanti- tative.
• Attach the defibrillator or AED to the cardiac monitor.
• Determine the rhythm of the arrest and administer shocks if necessary.
• High-flow, high-concentration supplementary oxygen can help with ventilation.
• Create a vascular access point.
• As needed, prepare to deliver fluids, medicines, or both.
Obtain the weight of the patient. If a patient’s weight is unknown or cannot be assessed quickly and eas- ily, estimate the patient’s weight using a length-based resuscitation (e.g. Broselow) tape. Predetermined defibrillation and medicine doses are also provided on the tape, which correspond to the color block cor- responding to the patient’s length.
Secondary assessment
The secondary examination of a kid or infant in cardiac arrest (performed if resources permit) focuses on find- ing the cause of cardiac arrest by taking a complete history and performing laboratory and diagnostic testing to rule out any underlying causes (H,s and T,s ).
To compile the focused history, data from family members or doctors who were care for the patient at the time of the arrest can be used. To remember the SAMPLE, use the following mnemonic: Signs and symptoms
Signs and symptoms
• Allergies
• Medications
• Past medical history
• Last intake and output (I&Os)
• Events
Recognizing cardiac arrest rhythms
The most prevalent heart rhythms underlying both out-of-hospital and in-hospital cardiac arrest in children are asystole and pulseless electrical activity (PEA). This is the case in more than 60 % to 80 % of cases.
1. Only 10% to 20% of both out-of-hospital and in-hospital cardiac arrests occur in children with shockable rhythms (VF) and pulseless ventricular tachycardia [ pVT]). Always consider the reversible H,s and T,s as potential causes of cardiac arrest rhythms.
Asystole
There is no electrical activity in asystole, hence the heart does not contract. It usually happens in the presence of acute hypoxia and metabolic acidosis, and as a last rhythm after resuscitation efforts have failed.
ECG findings
On an ECG, asystole appears as a flat line (Figure 39). There are no P waves or QRS complexes to be found. Perform the following steps to ensure that the look of the flat line is genuinely asystole:
• Make sure the patient and monitor do not have any loose wires or connections.
• Look at other leads on the monitor to make sure they all have the same flat line rhythm.
• To rule out fine VF, increase the voltage (sensitivity) of the ECG tracing (which is a shockable rhythm).
Pulseless electrical activity
PEA (pulseless electrical activity) is a term for rhythms that appear to be orderly on an ECG (e.g., the QRS complexes appear to be the same) but are unable to create a pulse, as the name implies. The heart’s con-duction system is functional in PEA, but the myocardium is contracting excessively slowly or not at all, resulting in a lack of cardiac output. Reversible H,s and T,s are the most common causes of H,s and T,s.
ECG findings
PEA includes any ordered rhythm that is ordinarily associated with a pulse (e.g., normal sinus rhythm); as a result, ECG findings will differ. The QRS complex might be small, normal, or wide, and the rate can be slow, normal, or fast (Figure 40). wil, be no correlation between the ECG rhythm and a felt pulse. Figure shows an example of PEA; the ECG shows a sinus rhythm, but there is no felt pulse.
Ventricular fibrillation
(VF) occurs when the ventricles depolarize irregularly, quickly, and inefficiently. The ventricles fail to adequately discharge blood from the heart because they fibrillate instead of contracting. It may be fatal if this rhythm is not altered quickly. VF is relatively uncommon in children and neonates. Medications, tricyclic antidepressant overdose, renal failure with hyperkalemia, or commotio cordis (heart concussion) caused by a violent strike to the heart are all common causes. VF can arise as the heart reperfuses after being resuscitated from other rhythms, such as asystole or PEA.
ECG findings
On ECG, there are no visible P waves, QRS complexes, or T waves, and VF is erratic (Figure 41). The ampli- tude of the waveforms perceived might range from coarse to fine. The waveforms may vary from coarse to fine as VF advances, eventually disappearing (asystole).
Pulseless ventricular tachycardia
During ventricular tachycardia, the ventricles do not contract sufficiently to sustain adequate cardiac output, resulting in pVT.. pVT that persists has the potential to evolve to VF. In children and newborns, pVT can be caused by congenital heart illness, myocarditis, long QT syndrome, drug toxicity, hypoxemia, hypokalemia, and hypomagnesemia.
ECG findings
The QRS is usually quite wide and has a steady pace. A single ectopic foci in the ventricles (monomorphic) or numerous ectopic foci in the ventricles (polymorphic) can induce pVT (polymorphic). Monomorphic pVT QRS complexes are frequently uniform in shape, whereas polymorphic VT QRS complexes vary in shape and rate (Figure 42).
Caring for the pediatric patient in cardiac arrest
The first steps in treating a child or infant in cardiac arrest are the same, regardless of the underlying heart rhythm or etiology. In situations of in-hospital cardiac arrest, CPR should be performed as soon as the pedi-atric advanced life support team arrives (Figure 43).
The following actions were taken right away to help the pediatric patient who was in cardiac arrest:
• Ensure that high-quality CPR is delivered.
• Maintain appropriate breathing by managing the airway. If not already done, connect the car- diac monitor/defibrillator or AED and ascertain the arrest rhythym.
• Prepare yourself for defibrillation.
• Create a vascular access point.
• Make sure you’re ready to start administering pharmaceutical therapy.
• Recognize and address reversible causes.
• Keep an eye out for evidence of spontaneous circulation returning (ROSC).
Is the rhythm shockable (VF and pVT) or nonshockable (asystole) during the assessment and treatment of a patient in cardiac arrest? What was the reason for the patient’s cardiac arrest?
The early measures in the care of a patient in cardiac arrest should be carried either simultaneously or in rapid succession wherever possible to speed the start of chest compressions, limit breaks in CPR, and ulti- mately deliver more definite therapies.Airway management and vascular access, for example, can be addressed at the same time when a pediat- ric advanced life support team has been formed, as long as chest compressions, defibrillation, and ventila- tions are not disrupted (Figure).
Figure | Immediate care for a juvenile child in cardiac arrest entails doing high-quality CPR, maintaining airway control, and providing enough ventilations.
While medicine administration and reversible cause treatment are important, they are not the highest priorities. When high-quality CPR and (if necessary) defibrillation have been established, they are used.
Ensure the delivery of high-quality cpr
Immediately begin high-quality CPR with chest compressions after confirming that there is no pulse (or if unable to feel one within 10 seconds ). Choose an age-appropriate compression rate and depth, as shown in Table 20.
| Infant (Birth Through Age 1) | Child (Age 1 Through Onset of Puberty) | Adolescent (Post-Onset of Puberty) | |
|---|---|---|---|
| Compression rate | 100 to 120 per minute | 100 to 120 per minute | 100 to 120 per minute |
| Compression depth | About 1½ inches or one-third the anteri- or-posterior diameter of the chest | About 2 inches or one-third the anterior-posterior diameter of the chest | At least 2 inches |
Table 20: Age-based compression rate and depth.
• As part of high-quality CPR, make sure to do the following:
• Between compressions, allow for full chest recoil.
• Evaluate the effectiveness of chest compressions while they are being performed using at least one of the following methods:
• A perceptible pulse should accompany each compression.
• In patients with indwelling arterial catheters, the existence of an arterial waveform
• In an intubated patient who can be monitored by capnometry, an end-tidal carbon dioxide (ETCO2) level between 15 and 20 mmHg.
• Only stop chest compressions for life-saving interventions (such defibrillation) or to check for a perfusing heart rhythm.
• Providers performing chest compressions should be rotated every 2 minutes to avoid provider tiredness, which could affect compression quality.
Manage the airway and provide effective ventilations
To open the airway, use manual procedures and airway adjuncts as needed. Give two breaths using bag valve-mask (BVM) ventilation with 100% oxygen for every 15 compressions until an advanced airway can be established with little CPR disturbance (2 breaths for every 30 compressions for one provider). Allow for calm, effortless breathing that lasts around 1 second and elevates the chest. Overventilating a patient can reduce venous return to the heart and blood flow to the heart muscle, so be careful.
High-quality CPR, shocks (if the rhythm is shockable), and, if possible, diagnosing and addressing the un- derlying cause are all priority therapy for a patient in cardiac arrest.If the airway and sufficient ventilations can be maintained without it, consider delaying the insertion of an advanced airway (i.e., ETT). The clinical judgment of the team leader and decision-making should be employed while evaluating the installation of an advanced airway. Careful planning and organization of equipment and team members is necessary to maintain high-quality CPR and, more importantly, limit chest compression interruptions. If an advanced airway has been established, ventilate at a rate of 1 ventilation every 6 to 8 seconds (8 to 10 breaths/ minute). Keep in mind that when using an advanced airway, chest compressions should be given continu- ously without ceasing to perform ventilations.
Attach the cardiac monitor/defibrillator or aed
If not already done, connect the patient to a cardiac monitor/ defibrillator or AED as soon as possible to avoid any interruptions in CPR. Determine whether or not the cardiac rhythm is shockable (VF or pVT) or not (no VF or pVT) (asystole or PEA).
Heart rhythms are compatible with a shockable rhythm based on the following ECG data:
• pVT: ventricular rate ranging from just over NSR to >200 beats per minute, with wide QRS com- plexes with uniform or variable shape.
• Torsades de pointes are enlarged QRS complexes that appear to bounce around an axis, dimin- ishing and expanding before shrinking again (party streamer shape)
• Cardiac rhythms are consistent with a non-shockable rhythm based on the following ECG findings.
• A aflat line with no discernible P waves or QRS complexes indicates asystole.
• PEA is a rhythm that is commonly associated with no pulse (e.g., NSR)
• Make sure you are defibrillation-ready.
• A defibrillator should be available immediately in any incidence of cardiac arrest. A team mem- ber who is familiar with the defibrillator should use it. The defibrillation preparation process includes choosing the suitable pad size for the patient and establishing the proper mode and energy dose on the defibrillator.
• Defibrillate the patient as soon as possible when a shockable rhythm (VF or pVT) is confirmed. Defibrillation dosages for pediatric patients are as follows:
• The first shock is 2 J/kg.
• The second shock is 4 J/kg.
• Shocks that follow: 4–10 J/kg maximum, or adult dosage.
• Continue chest compressions until defibrillation is accomplished and in between attempts at defibrillation.
• If a defibrillator is not readily available or you are not permitted to use one, utilize
• Because every AED is different, make sure to follow your facility’s protocols as well as the man- ufacturer’s instructions for the AED you have.
Establish vascular access
Establish vascular access (IV or IO) as quickly as feasible without interrupting CPR if it has not already been done. Medication administration, fluid administration (if needed), and blood collection for laborato- ry studies all require vascular access.
Prepare to administer medications
The type and timing of medications administered during cardiac arrest will vary depending on the un- derlying cardiac rhythm and, in certain cases, the underlying reason. IV, IO, and ET lines can all be used to administer medications. The drugs epinephrine, amiodarone, and lidocaine are used to treat the shocka- ble rhythms VF and pVT. Another medicine used to treat the shockable rhythms VF and pVT is magnesium sulfate (torsades de pointes only ). Nonshockable rhythms such as asystole and PEA are treated with epi- nephrine. Make sure some often used medications (epinephrine, amiodarone, and lidocaine, for example) are on hand and in the resuscitation team’s crash cart.
Medications are usually dosed based on weight in children
If a child’s weight is unknown or cannot be assessed quickly and easily, use a length-based resuscitation (e.g. Broselow) tape to approximate the child’s weight. Predetermined medicine doses are also delivered via the tape, with the color block matching the length of the patient.
In cardiac arrest, all IV/IO drugs should be administered through quick IV/IO push during compressions, followed by a 5- to 10-mL normal saline fluid bolus.
This is done to ensure that the IV/IO line is free of any medications and that the medication is delivered into the central circulation quickly. Ensure that all medication is removed from the IV/IO line and that it is immediately transported into the central circulation.
See Learn More: International Liaison Committee on Resuscitation Updates in Pharmacology for Cardiac Arrest.
Monitor for signs of return of spontaneous circulation
The goal of treatment for a youngster who has gone into cardiac arrest is to get their blood flowing again (ROSC). Keep a close eye on the patient for signs of ROSC, such as a palpable core pulse and an ordered rhythm on the cardiac monitor/defibrillator.Clinical signs of perfusion include a rapid increase in ETCO2, noticeable BP, and improved skin color.
Patient movement, normal breathing or coughing, and the arterial pulse waveform on an ana-line when no compressions are provided are all additional symptoms.
Non-shockable Cardiac Arrest
Specific care for shockable and nonshockable rhythms
VF, also known as pVT, necessitates extra care. If you find a shockable beat, shock it as quickly as feasible. Maintain chest compressions until defibrillation is achieved, and CPR should be continued immediately after and in between shocks.
After every 2 minutes of CPR (with minimal breaks to chest compressions), reassess the rhythm to deter- mine next steps:
If the rhythm is still shockable (VF, pVT), restart CPR, shock the patient, and then restart CPR. If the rhythm is nonshockable and unstructured (asystole), start CPR again very once and follow the guidelines in the section Care for Nonshockable Rhythms: PEA/ Asystole. Attempt to palpate a central pulse if the beat is nonshockable and organized:
• If a distinct central pulse cannot be palpated, immediately resume CPR and follow the instruc- tions in the section Care for Nonshockable Rhythms: PEA/Asystole. If a definitive central pulse is palpated, provide post–cardiac arrest treatment.
• If defibrillation attempts are ineffective, start pharmaceutical therapy. If needed, provide epi- nephrine after two shocks and then every 3 to 5 minutes for the rest of theresuscitation. After delivering two shocks, consider inserting an advanced airway. After giving three shocks, if nec- essary, provide amiodarone or lidocaine.
• Throughout resuscitation, keep in mind and address reversible causes of cardiac arrest (i.e., the H,s and T,s).
• Keep an eye out for indications of ROSC in a rhythm that transitions from pVT to VT with a pulse or from PEA to a perfusing beat. It is vital not to make the mistake of failing to detect ROSC and doing unnecessary procedures after the patient has reached it.
Nonshockable rhythms care
Asystole is a term for electrical activity that is not pulsing. The goal of nonshockable rhythm management is to provide continuous highquality CPR.
Every 3 to 5 minutes, inject epinephrine.
Reassess the rhythm after every 2 minutes of CPR (with minimizing interruptions to chest compressions) to decide future steps:
1. Follow Care for Shockable Rhythms: VF or pVT if the rhythm is shockable.
2. If the rhythm is nonshockable and disorganized (asystole), immediately resume CPR and follow the instructions in Care for Nonshockable Rhythms: PEA/Asystole.
Attempt to palpate a central pulse if the beat is nonshockable and organized:
• If a distinct central pulse cannot be palpated, immediately resume CPR and follow the instructions in Care for Nonshockable Rhythms: PEA/asystole.
• Provide post–cardiac arrest care if a definitive central pulse is palpated. Consider using a more sophisticated airway.
• Throughout resuscitation, keep in mind and address reversible causes of cardiac arrest (i.e., the H,s and T,s).
Terminating the resuscitation effort
The team leader may opt to end the resuscitation effort if it appears doubtful that ROSC will be accomplished. When deciding whether or not to continue the resuscitation effort, many factors are taken into account, including the amount of time that has passed since CPR was started and the first defibrillation was given.
The patient’s health before to cardiac arrest, as well as any comorbidity.
The initial rhythm of cardiac arrest.
The time it takes to resuscitate someone.
Physiologic data, such as an ETCO2 level of less than 10 mmHg after 20 minutes of excellent CPR.
The longer a patient is in cardiac arrest, the worse the chances of survival (or to survive with neurological function intact). In some circumstances (such as drug overdose, hypokalemia, hypothermia, or pulmonary embolism), it may be acceptable to prolong the resuscitation attempt, apply specialized therapy, or both to buy time to address the underlying cause of cardiac arrest.
In pediatric resuscitation, extracorporeal membrane oxygenation (ECMO)-also known as extracorporeal cardiopulmonary resuscitation (ECPR)-is one such specialist intervention that provides continuous me- chanical ventilation and circulatory support (Figure 44).
Post–cardiac Arrest Care
Overview of post–cardiac arrest care
The treatment of a youngster who has experienced a cardiac arrest entails more than just resuming normal circulation (ROSC). The time following cardiac arrest may be marked by a variety of pathophysiologic abnormalities originating from the halt and restoration of circulation. The consequences of these abnormalities (post–cardiac arrest syndrome) affect survival and neurological prognosis. The primary goal of post-cardiac arrest therapy is to minimize neuronal damage as much as possible, leading to a better neurologic outcome.
Post–cardiac arrest syndrome
The post–cardiac arrest syndrome includes both the ischemia injury that occurs during cardiac arrest and the reperfusion injury that occurs following ROSC. PCAS is made up of three parts: post–cardiac arrest brain injury, post–cardiac arrest myocardial dysfunction, and a systemic response to ischemia/reperfusion. PCAS might be made more challenging by the persistence of the pathologic disease that caused the car- diac arrest in the first place. In post-cardiac arrest treatment, the components of PCAS are addressed. The maintenance of neurologic function is the primary goal and focus of post–cardiac arrest care. To achieve this goal, other important activities including as oxygenation, ventilation, and circulation are altered.
Neuroprotective treatments are a crucial aspect of recovery after a cardiac arrest. They include glucose control and techniques for decreasing brain metabolic demand (e.g., seizure control, targeted tempera- ture management, sedation). Prognosis assessments become more trustworthy and have a larger empha- sis 72 hours after cardiac arrest.
Assessing the Pediatric Patient Post–cardiac Arrest
Primary assessment
The following are the primary assessments that apply to the management of oxygenation and ventilation, circulation, and neurologic function after cardiac arrest.
Airway
Assess the airway to detect patency and reflexes in patients who are spontaneously ventilating and those who are receiving assisted ventilation.
Is it necessary to utilize an advanced airway because the airway is unmaintainable?
Recheck patency and adjust alignment. If you have an advanced airway (look for bilateral chest rise and breath sounds with manual breaths, presence of exhaled CO2 on capnometry), do Suction as needed.
If an advanced airway is in place, keep an eye on the patient for signs of worsening.
• The pneumonic DOPE might help you recall the most typical reasons of hypoxia or worsening after intubation.
• Check for displacement (right mainstem) or dislodgement of the endotracheal tube.
• Obstruction:look for obstruction in the ETT (mucous plug, kink in ventilator tubing).
• Pneumothorax: get a radiograph to see if you have a pneumothorax.
• Unusual equipment failure: manually disconnect the patient from the ventilator and bag.
Breathing
Examine the patient’s breathing rate, effort, and pattern to see if he or she is breathing independently. If the patient is intubated and receiving assisted breathing, assess chest rise with manual breaths. Look for signs of respiratory distress (e.g.,increased respiratory rate, retractions, grunting).
O2 saturation can be monitored via pulse oximetry (aiming for values between 94-99 %) Check the CO2 levels in your blood gas. In both normal and cardiac arrest settings, blood CO2 levels affect blood flow to the brain. Low CO2 causes blood vessels to constrict, limiting blood supply to the brain and resulting in ischemic damage.
Hypocarbia has been associated to a poor neurologic outcome in adults following cardiac arrest, as well as hypoxic ischemic brain injury in infants.
If necessary, assist breathing using a BVM resuscitator and later mechanical ventilation for continuous ve- tilatory demand (depending on the patient’s condition).
Circulation
Assess the child’s or infant’s circulation to ensure normal tissue perfusion, assess cardiovascular function, and, in some cases, prescribe therapy.
If not already done, connect the youngster or infant to a cardiac monitor to monitor heart rate and rhythm. Arrhythmias should be monitored and treated as quickly as feasible, either with electrical or pharmacological methods.
Maintain a close eye on your BP. Because BP regulation is so crucial, an arterial catheter for continuous BP monitoring should be explored.
Take note of the color of your skin and mucous membranes (for cyanosis and mottling), your skin’s warmth, and your level of consciousness. Examine the peripheral nerves’ perfusion (e.g., capillary refill;palpate cen- tral and peripheral pulses ).
As a marker of systemic perfusion, all patients should have their urine output checked.
In the event of shock following cardiac arrest, a central venous catheter may make CVP and ScvO2 monitoring easier, as well as providing for recurring blood samples for laboratory examination. A central venous catheter should also be used to provide vasoactive medications. If a patient’s clinical condition requires more immediate treatment, these medications can be administered via an IO or even a peripheral line. Using volume expansion and inotropes as needed, aggressively address hemodynamic instability.
Disability
Assess the patient’s mental health and level of consciousness if he or she is breathing spontaneously.
Check blood glucose levels: the goal of post–cardiac arrest care should be to treat hypoglycemia and, if feasible, avoid hyperglycemia. After a cardiac arrest, hyperglycemia is prevalent and is linked to poor outcomes. As a result, hyperglycemia should be avoided, even if the best way to regulate glucose levels.
Following cardiac arrest has yet to be determined.
Examine the cervical spine for any signs or symptoms of damage. Examine for focused pupillary response (PERRL), as well as other neurologic or postural abnormalities.
Assess the patient’s sedation if he or she is having assisted ventilation.
Seizure activity should be monitored, and neuroprotective actions should be taken.
Neuroprotective measures
The fundamental goal of post-cardiac arrest care is to improve brain function. This summarizes neuroprotection strategies following cardiac arrest. The primary goal of treatment is to ensure enough perfusion, and thus appropriate delivery of oxygen and other nutrients to the brain, while reducing oxy- gen use and preventing additional brain injury.
Managing brain perfusion principles
Cerebral perfusion pressure (CPP) governs cerebral blood flow and is determined using the following formula:
CPP = Mean arterial pressure – Intracranial pressure
Exposure
The treatment of hyperthermia with vigour is unanimously advised. Following a hypoxic ischemic inci- dent, even a 1°C increase in temperature has been linked to an increased risk of mortality and impairment in newborns. Antipyretics or active cooling should be used to treat fever. Targeted temperature management.
Secondary assessment
Obtain a medical history and perform a focused physical assessment, including a neurologic exam.
Shows laboratory and diagnostic tests that should be considered as part of the secondary as- sessment of oxygenation, ventilation, and circulation and neurologic function after cardiac arrest.
Electrical Therapies
Electrical therapy
The operator must be knowledgeable with the type of device being used, the manufacturer’s suggested paddle/pad size and positioning,and the required energy levels for the dysrhythmia being treated before delivering electrical therapy to a patient.
Tachyarrhythmia Therapies
Defibrillation
Defibrillation is the treatment of a cardiac dysrhythmia by delivering an unsynchronized electrical current (energy delivery has no relation to the cardiac cycle) through the heart for a short period of time.
The positioning of paddles or pads on a patient’s chest, the interpretation of the patient’s cardiac rhythm by a qualified healthcare professional, and the healthcare professional’s decision to administer a shock, if needed, are all examples of manual defibrillation. The placement of pads on a patient’s chest and the interpretation of the patient’s cardiac rhythm by the AED’s computerized analytical system is referred to as (AED). A defibrillator is a device that gives an electrical shock to the heart to stop it from beating abnor- mally. The energy content of the electrical shocks used for defibrillation and cardioversion is measured in joules (J). It’s critical to choose the right energy level for the patient’s dysrhythmia while using electrical therapy to treat an irregular cardiac rhythm. Current is administered from the defibrillator to the patient through handheld paddles or self-adhesive monitoring/ defibrillator pads. The patient’s heart rhythm is also recorded and monitored using self-adhesive pads (Figure 45).
Paddle/pad size and position
Follow the manufacturer’s directions for paddle/pad size, selfadhesive pad placement, and handheld paddle placement. For patients weighing greater than 10 kg (22 pounds), adult paddles/pads should be utilized (about 1 year or older). For infants weighing less than 10 kg, use infant-sized paddles/pads (22 pounds). Adults and older children normally use the anterolateral pad position, whereas newborns and younger children prefer the anteroposterior pad position (Figure 46).
Synchronized cardioversion
A shock is “timed” or “programmed” for delivery during ventricular depolarization in synchronized cardi- oversion (QRS complex). When you push the “sync” button, the machine’s synchronization circuit looks for QRS complexes and administers the shock a few milliseconds after the QRS. The potential for current delivery during ventricular repolarization, which includes the vulnerable period of the T wave, is reduced when a shock is delivered during this portion of the cardiac cycle. When a QRS complex is recognized, the monitor shows a &”flag” or “sync marker” on the ECG display, which might be an oval, square, line, or high- lighted triangle, depending on the machine (Figure 47).
When the shock controls are engaged when the defibrillator is in “sync” mode, the machine will only discharge energy if both discharge buttons are pressed and the monitor indicates that a QRS complex has been detected.
Turn on the monitor/defibrillator and detect the rhythm on the cardiac monitor when doing synchronized cardioversion. Connect ECG electrodes to the patient’s ECG monitor. Make sure you have suction and emergency drugs on hand. Defibrillation gel or defibrillation gel pads must be used between the paddle electrode surface and the patient’s skin when utilizing regular paddles.
Place the multifunctional adhesive electrodes in the right position on the patient’s naked chest if you’re using them.
On the defibrillator, press the “sync” control.
Choose a lead with positive or negative QRS complex amplitude and no artifact. Choose the “paddles” lead if you’re utilizing adhesive electrodes.
Check to see if the machine is marking or flagging each QRS complex and if there are any artifacts. Each QRS complex should have a sense marker near the middle.
Adjust the ECG size or select another lead if sensation markers do not appear or appear in the wrong position (such as on a T wave).
If the patient is conscious and time allows, provide sedation as directed by the doctor, unless contraindications exist. Make sure the machine is in “sync” mode, then set the defibrillator to the appropriate energy level (0.5 to 1 J/kg) for the initial shock [10].
Re-check the ECG rhythm and charge the defibrillator. If the beat remains the same, shout “Clear!” and take a look around.
Ensure that everyone is clear of the patient, bed, and any associated equipment. While the system recognizes the following QRS complex, there may be a short delay. After the shock has been given, release the shock control.
Reassess both the ECG rhythm and the patient. If the tachycardia persists, double-check that the machine is in sync mode before giving another shock. For the second and subsequent tries, the energy dose could be increased to 2 J/kg if necessary.
Start cardiopulmonary resuscitation, turn off the sync control, and ready to defibrillate if the rhythm transitions to VF.
Brady arrhythmia therapy (transcutaneous pacing)
In the management of bradyarrhythmias with poor perfusion, oxygenation, ventilation, circulatory sup- port via CPR, and medication therapy remain priorities. For bradycardias that induce signs and symptoms of hemodynamic instability and are refractory to first-line therapy, immediate emergency transcutaneous pacing may be appropriate. When the bradycardia rhythm is total AV block, this is especially true.
Pacing procedure
Several important steps in the pacing procedure include preparing the patient and family, placing ECG and pacing electrodes, selecting the pacing mode, rate, and current, and assessing for capture. Pacing electrodes can be multi-functional (monitoring, defibrillation, and pacing) or single-function (monitoring, defibrillation, and pacing) (pacing only).
Preparation
Pacing electrodes for children under the age of ten kilograms should be utilized. The pacing electrodes should be firmly attached to clean, dry skin. The manufacturer’s recommendations for pacing electrode and cable placement should be followed. In children, the most common pacing electrode placement is anterior-posterior.
Selecting mode rate and current
Until the pacing mode is set and proper sensing (if demand pacing is selected), the pacing current should be kept at 0 milliamperes (mA). The current can then be increased until capture is found. Increase the cur-rent slowly in conscious patients while assessing for capture. If a patient is in cardiac arrest, swiftly raise the current and then reduce it to the threshold if capture is achieved. Pacing should be set at a high enough rate to ensure sufficient perfusion (Figure 48). Capture is the contraction of the myocardium, which is indicated by a perceptible pulse, an increase in BP, a better state of consciousness, and a change in skin color and temperature. It happens when a pacing stimulus causes ventricular depolarization, which is validated by ECG changes on the monitor
Skin burns, respiratory discomfort, and intense skeletal muscle spasms are among risks related with pediatric pacing. Support for breathing should be available. A skin examination should be performed on a regular basis (at least every 30 minutes). In a conscious patient, analgesia or sedative should always be utilized. In an intubated patient, neuromuscular blockers may be considered.
References
- Berg RA, Nadkarni VM, Clark AE (2016). Incidence and outcomes of cardiopulmonary resuscita- tion in PICUs. Crit Care Med 44:798-808.
- Brissaud O, Botte A, Cambonie G (2016). Experts’ recommendations for the management of car- diogenic shock in children. Ann Intensive Care 6:14.
- Fraser KN, Kou MM, Howell JM, Fullerton,KT, Sturek C (2014). Improper defibrillator pad usage by emergency medical care providers for children: an opportunity for reeducation. Am J Emerg Med 32: 953-957.
- Horeczko T, Enriquez B, McGrath NE, Gausche-Hill M, Lewis RJ (2013). The Pediatric Assessment Triangle: accuracy of its application by nurses in the triage of children. J Emerg Nurs 39:182.
- Marchese A, Langhan ML (2017). Management of airway obstruction and stridor in pediatric patients. Pediatr Emerg Med Pract 14:1-24.
- Mendelson J (2018). Emergency department management of pediatric shock. Emerg Med Clin North Am 36-427.
- Morgan C, Wheeler DS (2013). Obstructive shock. Open Pediatr Med Journal7:35- 37.
- Richards JB (2014). Wilcox SR. Diagnosis and management of shock in the emergency department. Emerg Med Pract 16:1-22.
- Shah S, Kaul A, Jadhav Y, Shiwarkar G (2020). Clinical outcome of severe sepsis and septic shock in critically ill children. Trop Doct. 50:186.
- Vereckei A (2014). Current algorithms for the diagnosis of wide QRS complex tachycardias. Curr Cardiol Rev. 10:262-276.
Indexed at, Google Scholar, Crossref
Indexed at, Google Scholar, Crossref
Indexed at, Google Scholar, Crossref
Indexed at, Google Scholar, Crossref
Indexed at, Google Scholar, Crossref
Indexed at, Google Scholar, Crossref
Citation: Alsohime F, Almazyad M, Shakour H, Temsah MH, Maghrabi K, et al.(2023) Paediatric Advance Life Support (PALS). Psych Clin Ther J 5: 209. DOI: 10.4172/tpctj.1000209
Copyright: © 2023 Alsohime F, et al. This is an open-access article distributedunder the terms of the Creative Commons Attribution License, which permitsunrestricted use, distribution, and reproduction in any medium, provided theoriginal author and source are credited.
Share This Article
Recommended Journals
Open Access Journals
Article Tools
Article Usage
- Total views: 1533
- [From(publication date): 0-2023 - Apr 02, 2025]
- Breakdown by view type
- HTML page views: 1301
- PDF downloads: 232
