Research Article Open Access
Harmonic Structure Design and Mechanical Properties of Pure Ni Compact
Ota M1, Shimojo K2, Okada S2, Vajpai SK1 and Ameyama K3*1 Research Organization of Science and Technology, Ritsumeikan University, Kusatsu, Shiga, 525-8577 Japan
2 Graduate School of Science and Engineering, Ritsumeikan University, Japan
3 Faculty of Science and Engineering, Ritsumeikan University, Japan
- *Corresponding Author:
- Kei Ameyama
Faculty of Science and Engineering
Ritsumeikan University, Japan
Tel: 077-561-5202
E-mail: ameyama@se.ritsumei.ac.jp
Received Date: May 9, 2014; Accepted Date: May 24, 2014; Published Date: Jun 5, 2014
Citation: Ota M, Shimojo K, Okada S, Vajpai SK, Ameyama K (2014) Harmonic Structure Design and Mechanical Properties of Pure Ni Compact. J Powder Metall Min 3:122. doi: 10.4172/2168-9806.1000122
Copyright: © 2014 Ota M, et al. This is an open-access article distributed under the terms of the Creative Commons Attribution License, which permits unrestricted use, distribution, and reproduction in any medium, provided the original author and source are credited.
Visit for more related articles at Journal of Powder Metallurgy & Mining
Abstract
Conventional material developments have emphasized ultrafine grain refinement and homogenization; however, “nano and homo” materials do not usually satisfy the need to be both strong and ductile, which are of course rather contradictory characteristics. On the other hand, "Harmonic Structure Materials Design" creates a "nano- and heterogeneous microstructure", and the harmonic structure materials can overcome that antinomy through its unique microstructure. The procedure to create the harmonic structure is accomplished by using one of the non-equilibrium powder metallurgy (PM) processes called the Severe Plastic Deformation (SPD) PM process. The harmonic structure materials consist of Ultra-Fine Grain (UFG) and coarse grain structures known as “shell” and “core”, respectively. They have a network structure of continuously connected shells, and simultaneously demonstrate both high strength and elongation, especially a large uniform elongation. In the present study, pure Ni powder is processed so as to produce the harmonic structure materials. The deformation mechanism is analyzed based on the strain hardening behavior.
Keywords
Microstructure; Severe plastic deformation; Strength; Ductility; Toughness
Introduction
Grain size is a quite important element that affects macroscopic mechanical properties, and thus the grain refinement strengthening of the materials is a major area of research, aimed at improving mechanical properties. The Severe Plastic Deformation (SPD) process [1] is an effective method of grain refinement. Mechanical Milling (MM) via ball milling [2-8] is a SPD-Powder Metallurgy (PM) process which can easily produce Ultra-Fine Grains (UFGs). However, materials with homogeneous UFG structure show limited ductility, along with high strength, due to their plastic instability. To improve such a trade-off relationship in strength and ductility, we proposed “harmonic microstructure” design which is a heterogeneous microstructure with bimodal grain size distribution and unique spatial distribution of coarse and fine grained areas. It has been demonstrated that the harmonic structure materials enable strengthening without any significant decrease in the ductility. The outstanding mechanical properties of the harmonic structure materials were found to be strongly influenced by the microstructural characteristics such as grain size, volume fraction, and size of the fine-grained areas [7,8]. However, deformation mechanism of harmonic structure, which results in such an interesting set of mechanical properties, has not been investigated in detail as yet.
In the present research, we focused on relationship between microstructure and mechanical properties of the harmonic structure designed pure Ni compact. The deformation mechanism of harmonic structure Nickel under quasi-static tensile loading conditions is also investigated and discussed.
Experimental Procedure
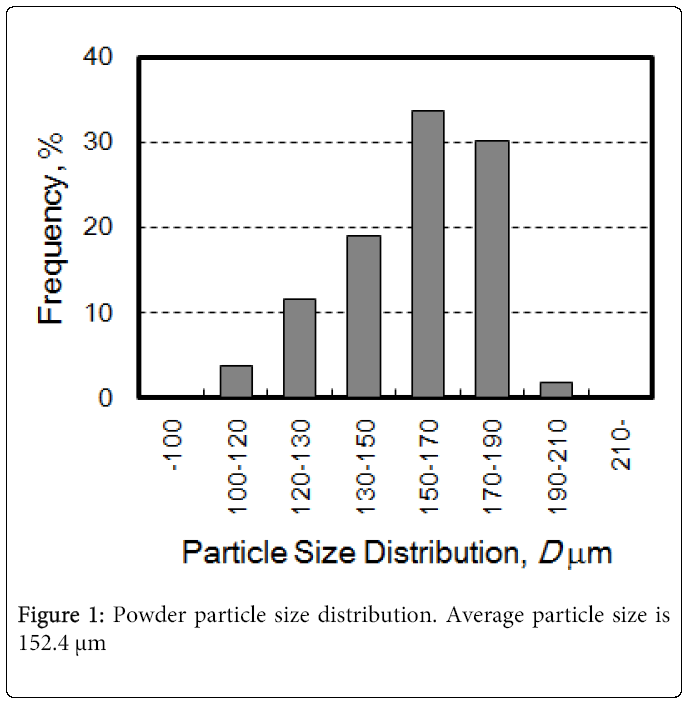
Pure Ni alloy powder (C: 0.03, Si: 0.05, Mn: 0.15, S: 0.01, Cu: 0.01, Fe: 0.39, Ni: bal. (mass %)), prepared by Plasma Rotating Electrode Process (PREP), was used in the present work. Figure 1 shows powder particle size distribution measured by a Shimadzu SALD-2300 laser diffraction particle size analyzer, and the mean powder particle size was 152.4 µm. The Powder was Mechanically Milled (MM) for various periods of time by a Fritsch P-5 planetary ball mill with 500 ml vials. The mechanical milling was carried out using SUJ2 steel balls in an Ar atmosphere at room temperature. The ball-to-powder weight ratio was 1.8: 1, and the rotation speed was 150 rpm. Prior to the milling process, commercially pure Ni powder (<45 µm) was milled to make a nickel-coating layer on the surface of both vial and balls, in order to avoid contamination caused by the milling media. Powders were sintered by Spark Plasma Sintering (SPS) process at 1073 K for 1.8 ks under the pressure of 100 MPa in vacuum.
The MM powders and sintered compacts were characterized by means of optical microscopy and SEM/EBSD. The mechanical properties of the materials were examined using hardness and tensile tests. The load of the micro-Vickers hardness test was 98.07 Mn. Tensile tests were carried out using a Shimadzu AGS-10kND tensile testing machine at an initial strain rate of 5.6×10⁻⁴ s-1. Tensile tests were performed on specimens with 3 mm gauge length, 1 mm gauge width, and 1 mm gauge thickness.
Strain Hardening Rate (SHR) evaluation was applied to analyze deformation behavior. The SHR, ds/de, was calculated by the moving average values of true stress and true strain,
Results and Discussion
Microstructure formation
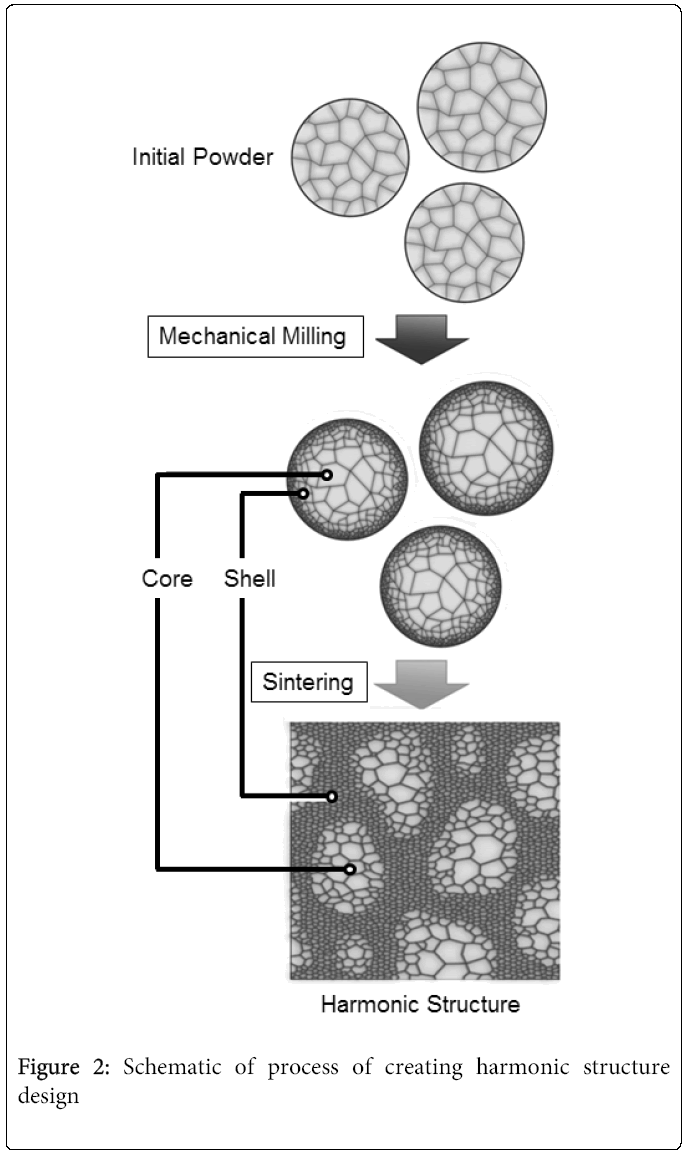
Figure 2 demonstrates the fabrication process of the harmonic structure materials. It can be noticed that the mechanical milling is used to create a peculiar bimodal grain structure in the milled powder, with a severely deformed powder surface region which is termed as “Shell” and an inner region which is termed as “Core”. It has also been demonstrated that the shell and core microstructure in the milled powder can be maintained even after sintering. As a result, the microstructure of the sintered materials consists of a shell-and-core bimodal microstructure. Because severe plastic deformation mainly concentrates to the shell region, a Nano-grained structure forms in the shell, while a coarse grain structure is retained in the core. The sintered materials with the shell and the core have a network structure of continuously connected strong fine-grained shell region, which we refer to as a harmonic structure.
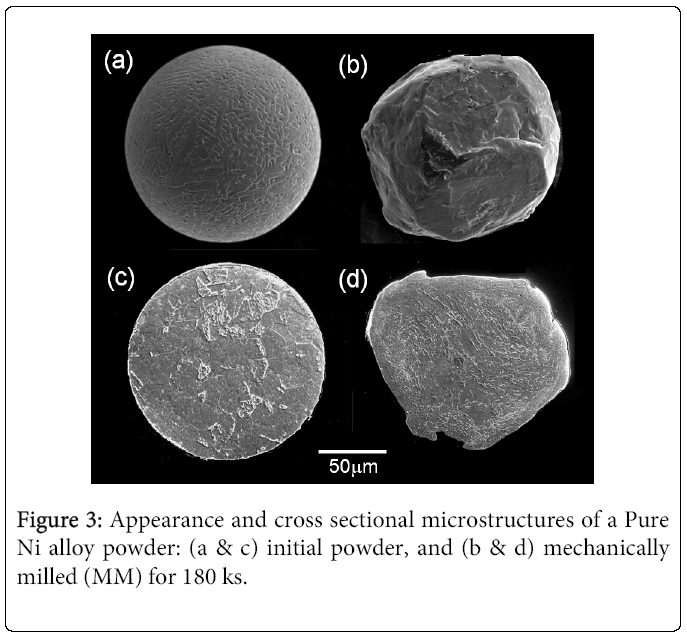
Figures 3 (a) – (d): show typical SEM micrographs of a pure Ni powder before and after Mechanical Milling (MM) for 180 ks. Figures 3(a) and 3(b) show the appearance of powders and Figures 3(c) and 3(d) show the cross sectional microstructure (etched) of powders, respectively. As can be seen, the MM process leads to an irregular shape on powder surface. However, it would be worth emphasizing that neither fragmentation nor cohesion of the powders occurred as a result of controlled mechanical milling.
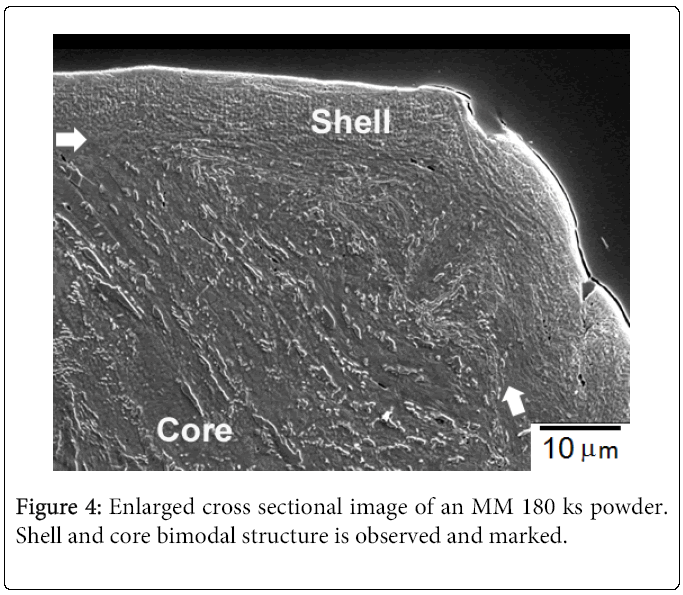
Figure 4 shows an enlarged image of the cross section of MM powder represented in Figure 3. It is noteworthy that a smooth layer, like a “shell”, was formed in the surface region surrounding the undeformed initial microstructure remained in the center of the powder (termed as “core”). The interface boundary is indicated by white arrows. Average Vickers hardness of the initial powder was 289 Hv. On the other hand, average hardness of the shell and core regions were 349 Hv and 294 Hv, respectively, in a 180 ks milled powder. The significantly higher hardness values of the shell region demonstrate that the shell is formed due to controlled severe plastic deformation of the powder particles, which was limited to the near surface region. The controlled milling leads to severe plastic deformation in the shell region, resulting in fine-grained structure with high hardness values. These results are in conformity with the results obtained in the case of pure titanium milled powders wherein the shell region was found to consist of a nanocrystalline structure [8]. Therefore, a shell-and-core bimodal structure was formed in the pure Ni powders via MM process wherein a fine-grained shell developed in the milled powders owing to the controlled severe plastic deformation near the surface of the powder particles.
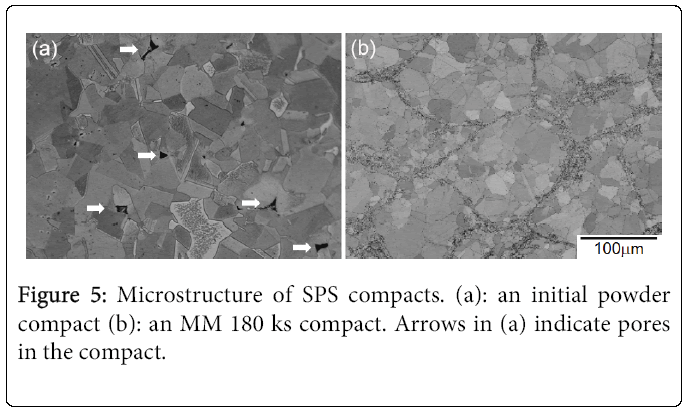
Subsequently, initial and milled powders were consolidated by spark plasma sintering. Figure 5 shows the microstructure of (a): an initial powder compact and (b): a MM 180 ks powder compact. It can be seen that the initial powder compact has a homogeneous grain structure with average grain size of 26.2 µm. On the other hand, the MM powder compact has a heterogeneous microstructure. As can be seen in Figure 5(a), many pores, indicated by arrows, were observed in the initial powder compact, while almost no pore was observed in the MM 180 ks compact. Such a difference in the relative density implies that enhanced sintering took place through a superplastic deformation of Nano grains formed in the surface region of the milled powder.
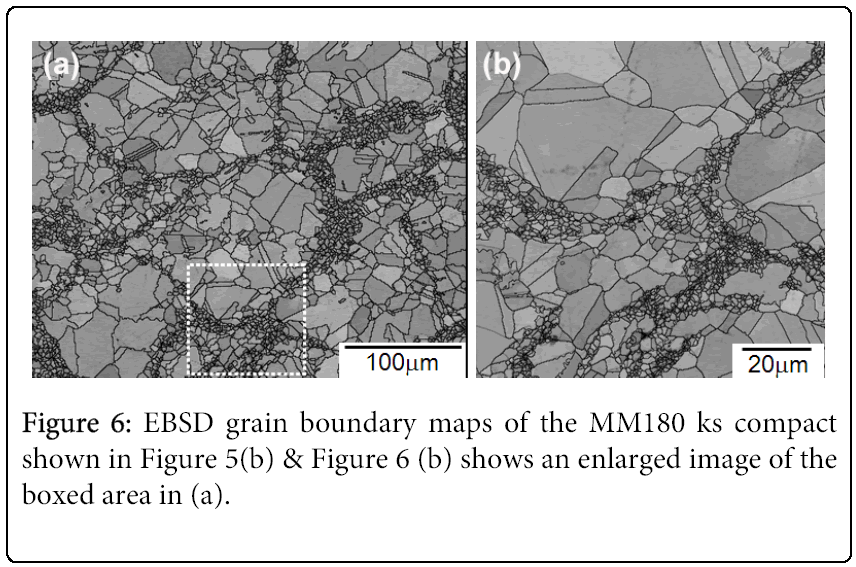
Figures 6(a) and (b) show EBSD image quality maps of grain boundary areas of the MM compact. Figure 6 (b) is an enlarged image of the white box area indicated in Figure 6(a). As seen in Figures 6 (a) and (b), a shell structure with ultra-fine equiaxed grains and a core structure with coarse homogeneous grains, which was also observed in the initial powder compact, were formed in the compact. It can also be noted that the shell region forms a three-dimensional network. In other words, a harmonic structure was successfully obtained in the Ni milled powder in a similar manner to the previous studies [8-14]. The average grain size of the shell and the core regions were 3.6 µm and 12.6 µm, respectively. In addition, area fraction of the shell was 21.4%.
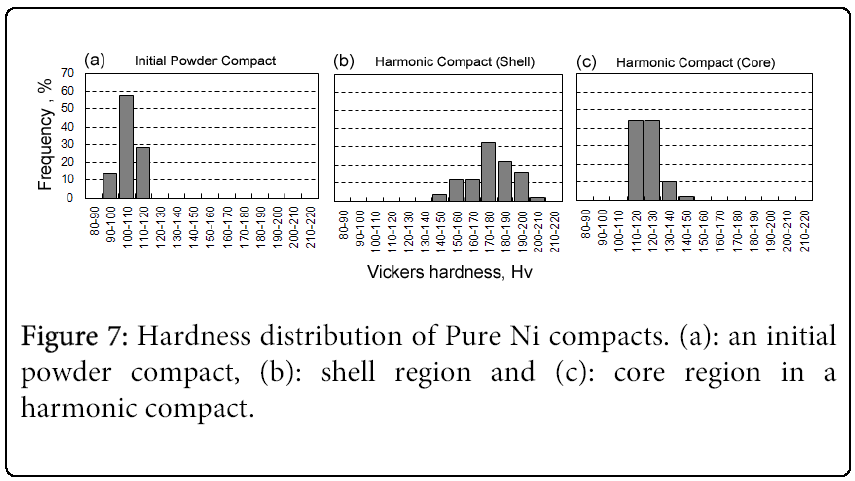
Figure 7 indicates the distribution of Vickers hardness of an initial powder compact and a harmonic structure compact (i.e., MM 180 ks powder compact). In the harmonic compact, hardness measurements were carried out separately in shell and core regions. The average hardness of the initial powder compact and the MM compact were Hv: 106 and Hv: 148, respectively. Moreover, the average hardness of shell was Hv: 175 and that of core was Hv: 121. It can be clearly noticed that the initial powder compact shows single peak hardness distribution, while the MM powder compact shows different hardness distribution in shell and core, because the shell region with an ultra-fine grain structure has higher strength than the core region.
Deformation behavior
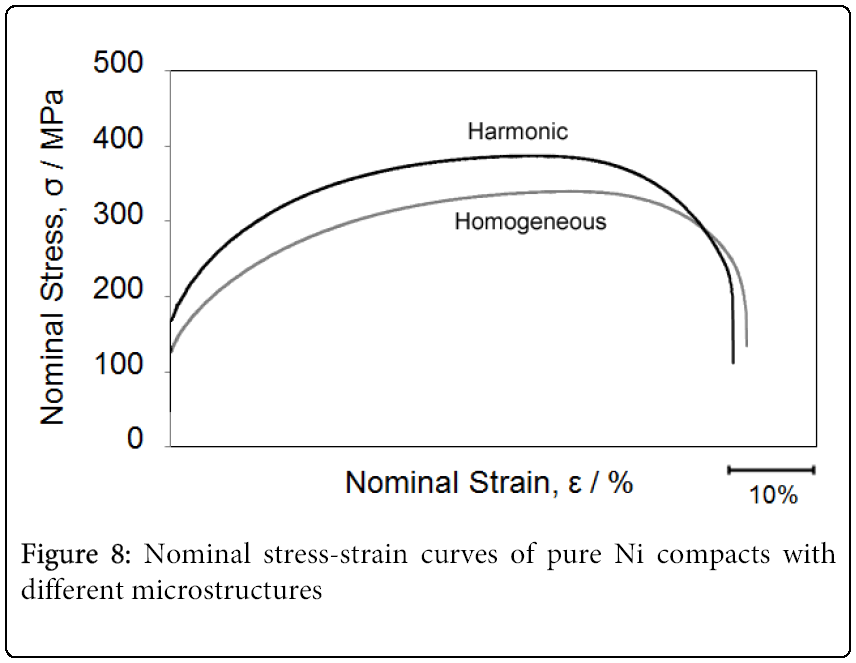
Figure 8 indicates the tensile test results of a harmonic structure compact (MM 180 ks compact) and homogeneous grain structure compact, which were described above. The average values of 0.2% proof stress, ultimate tensile stress, uniform elongation, and total elongation to fracture are also provided in Table 1. As indicated, the harmonic structure compact has higher 0.2% proof strength and UTS, compared to the homogeneous compact. Although the total and the uniform elongations slightly decreased in the harmonic structure compact, a remarkable high strengthening by harmonic structure resulted in 30% larger value of “stress x strain”, i.e., toughness, compared to the homogeneous compact. These results are typical characteristics of the harmonic structure materials [8-14]. It would be worth emphasizing that Dirras et al. [15] have also created harmonic bimodal microstructure in pure Ni using a mixture of microcrystalline and nanocrystalline powders as starting materials, wherein it has been demonstrated that such a peculiar topographical distribution of coarse and fine grain areas provides excellent combination of strength and ductility under not only quasi-static loading but also dynamic loading [15,16].
| 0.2% Proof Strength (Mpa) | UTS (Mpa) | Uniform Elongation (%) | Total Elongation (%) | |
|---|---|---|---|---|
| Harmonic | 171.9 | 387.2 | 41.7 | 61 |
| Homogeneo us | 132.3 | 339.9 | 45.9 | 62.4 |
Table 1: Mechanical properties of Pure Ni compacts indicated in Figure 8.
To reveal the deformation mechanism of these harmonic materials, SHR (strain hardening rate) curves were obtained from the true stress-true strain (s-s) curves of the compacts. Figure 9 indicates the SHR curves and the s-s curves of pure Ni compacts. In the figure, homogeneous-structure compact (an initial powder compact) is marked as “Homogeneous”. The strain hardening rate, ds/de, decreases with true strain, and the strain hardening continues under the condition of ds/de > s. Plastic instability occurs at condition of ds/de = s, and thus the necking of specimen starts. In these two materials, it is obvious that the SHR curve of "Harmonic" structure indicates higher strain hardening since the beginning of the deformation. Extraordinary is that the harmonic structure compact has high strength, s, and maintain ds/de > s condition till large strain. The same tendency in SHR and s-s curves was also observed in other harmonic structure materials. Such a unique deformation behavior implies that deformation mechanism of harmonic structure materials is different from that of homogeneous UFG materials, in which high strength but rapid plastic instability occurs.
The unusual deformation behavior such as a wide strain hardening range is attributed to a three-dimensional shell/core network structure. Moreover, it can be assumed that each shell-and-core unit plays very important role in the deformation. The strong ultra-fine-grained shell provides strengthening while the coarse-grained core provides accommodation to the plastic deformation and takes care of strain hardening. As a result, the deformation of those network units leads to a large uniform elongation.
Figure 10 demonstrates a schematic of deformation behavior of the harmonic structure materials. It is considered that yield takes place at first in the shells and, subsequently, strain hardening of the units occurs. The networked-unit deformation propagates to a large extent in the specimen, and it results in large uniform elongation.
Conclusion
Harmonic structure design was applied to a pure Ni powder by mechanical milling and SPS sintering processes. The following conclusion can be drawn on the basis of the present work:
A shell-and-core bimodal grain structure was formed in the powders after controlled mechanical milling. After sintering process of the milled powders, harmonic structured compacts were obtained.
In a harmonic compact, average shell grain size was 3.6 µm, average core grain size was 12.6 µm and the shell fraction was 21.4%.
Harmonic structure Ni compacts exhibited superior mechanical properties, such as UTS, proof strength and toughness, as compared to the homogeneous coarse-grained counterparts.
Unique deformation behavior of the harmonic structured material implies that the shell and core unit in the material plays very important role in facilitating an excellent combination of mechanical properties, especially in maintaining the wider strain hardening range.
Acknowledgements
This research was supported by the Japan Science and Technology Agency (JST) under Collaborative Research Based on Industrial Demand "Heterogeneous Structure Control: Towards Innovative Development of Metallic Structural Materials", and by the Grant-in-Aid for Scientific Research on Innovative Area, “Bulk Nanostructured Metals” through MEXT, Japan (contract No.22102004). These supports are gratefully appreciated.
References
- Valiev RZ, IslamgalievRK, Alexandrov IV (2000)Bulk Nano structured materials from severe plastic deformation.Prog Mater Sci 45:103-189.
- Benjamin JS (1970) Dispersion strengthened superalloys by mechanical alloying.Metall Trans 1: 2943-2951.
- Koch CC (1997) Synthesis of nanostructured materials by mechanical milling: Problems and Opportunities.Nanostruct Mater 9:13-22.
- Jang JSC, Koch CC (1990) The Hall-Petch Relationship in Nanocrystalline Iron Produced by Ball Milling.ScriptaMetallurgica24: 1599-1604.
- Umemoto M (2003)Nanocrystallization of Steels by Severe Plastic Deformation. Mater Trans 44: 1900-1911.
- Fujiwara H, Sekiguchi T,Ameyama K (2009) Mechanical properties of pure titanium and Ti-6Al-4V alloys with a new tailored nano/meso hybrid microstructure.Int J Mat Res 100: 796-799.
- Fujiwara H, Akada R,Noro A,Yoshita Y,Ameyama K(2008) Enhanced Mechanical Properties of Nano/Meso Hybrid Structure Materials Produced by Hot Roll Sintering Process. Mater Trans 49: 90-96.
- Sekiguchi T,Ono K,Fujiwara H,Ameyama K (2010) New Microstructure Design for Commercially Pure Titanium with Outstanding Mechanical Properties by Mechanical Milling and Hot Roll Sintering. Mater Trans 51:39-45.
- Orlov D, Fujiwara H, Ameyama K (2013) Obtaining Copper with Harmonic Structure for the Optimal Balance of Structure-Performance Relationship. J Materials Transactions 54: 1549-1553.
- Ciuca OP, Ota M, Deng S, Ameyama K (2013) Harmonic structure design of a SUS329J1. J Materials Transactions 54: 1629-1633.
- Fujiwara H, Kawabata T, Miyamoto H, Ameyama K (2013) Mechanical Properties of Harmonic Structured Composite with Pure Titanium and Ti-48 at %Al alloy by MM/SPS Process. J Materials Transactions 54: 1619-1623.
- Sawangrat C, Yamaguchi O, Vajpai SK, Ameyama K (2014) Application of Harmonic structure Design to Biomedical Co-Cr-Mo alloy for Improved Mechanical Properties. J Materials Transactions55:99-105.
- Zhang Z, Vajpai SK, Orlov D, Ameyama K (2014) Improvement of Mechanical Properties in SUS304L steel through the control of bimodal microstructure characteristics.Materials Science & Engineering: A 598: 106-113.
- Sawangrat C, Yamaguchi O, VajpaiSK, Ameyama K (2014) Harmonic Structure Design of Co-Cr-Mo Alloy with Outstanding Mechanical Properties.Advanced Materials Research 939: 60-37.
- DirrasG, GubiczaJ, RamtaniS, Bui QH,SzilagyiT (2010) Microstructure and mechanical characteristics of bulk polycrystalline Ni consolidated from blends of powders with different particle size. Mater Sci Eng:A 527: 1206-1214.
- Dirras G,Tingaud D,Csiszar G, Gubicza J, CouqueH,Mompiou F (2014) Characterization of bulk bimodal polycrystalline nickel deformed by direct impact loadings. Mater Sci Eng A 601: 48-57.
Relevant Topics
- Additive Manufacturing
- Coal Mining
- Colloid Chemistry
- Composite Materials Fabrication
- Compressive Strength
- Extractive Metallurgy
- Fracture Toughness
- Geological Materials
- Hydrometallurgy
- Industrial Engineering
- Materials Chemistry
- Materials Processing and Manufacturing
- Metal Casting Technology
- Metallic Materials
- Metallurgical Engineering
- Metallurgy
- Mineral Processing
- Nanomaterial
- Resource Extraction
- Rock Mechanics
- Surface Mining
Recommended Journals
Article Tools
Article Usage
- Total views: 15851
- [From(publication date):
October-2014 - Nov 30, 2024] - Breakdown by view type
- HTML page views : 11369
- PDF downloads : 4482
