Research Article Open Access
Effects of Electrode Deformation on Carbon Steel Weld Geometry of Resistance Spot Welding
Nachimani Charde*Department of Mechanical, Material and Manufacturing Engineering, University of Nottingham, Malaysia Campus
- *Corresponding Author:
- Nachimani Charde
Department of Mechanical
Material and Manufacturing Engineering
University of Nottingham, Malaysia Campus
E-mail: nachi.charde@nottingham.edu.my
Visit for more related articles at International Journal of Advance Innovations, Thoughts & Ideas
Abstract
The growth of the weld nugget is determined by the welding current, weld time, electrode force; and the electrode tip in resistance spot welding process. The welding current and weld time lead the heat development between base metals while the electrode pressing force and electrode tips’ ensures the molten areas are kept enclosed. As such these four process parameters are the main parameters that ensure a sound weld. In this research the electrode alignment during welding process and mushrooming effects of electrode tips are analysed using carbon steels. A pair of truncated-type electrodes was used to weld around 900 pair of test specimen. Some of welded pairs were stainless steel and it was not included here. The electrode deformation effects on the surface of carbon steels are primarily analysed in this research. It shows that the electrodes mushrooming effect are creating spaces for the molten metal to escape from the concerned areas during welding process. So the electrode deformation and alignment have simply created spaces for the expulsion; because of which the inconsistent weld surfaces were noticed. In fact the welding heat is actually affecting the electrode tips and the electrode tips itself are affecting the weld surface as well as weld nugget geometry.
Keywords
Spot Welding, Electrode Deformation, Electrode Mushrooming.
Introduction
The resistance spot welding process is accomplished by allowing huge amount of current flow from upper electrode tip through the base metals to lower electrode tip. By doing so, a weld joint is established between metal sheets through fusion and resulting strong bound between sheets without any additional substances. The growth of the bound (weld nugget) is therefore determined by the welding current density; sufficient time for current delivery; reasonable electrode pressing force; and the area for current delivery (electrode tip) [1]. The welding current and weld time lead the root penetration in the welding process while the electrode pressing force and electrode tips’ accomplish it successfully. Although the welding current and weld time cause the heat generation at the concerned areas (electrode tips’ area); the electrode tips diameter and electrode pressing forces are also directly influencing the welding process. In this research, the truncated electrode deformation and mushrooming effects are analysed using carbon steel sheets.
Experimental
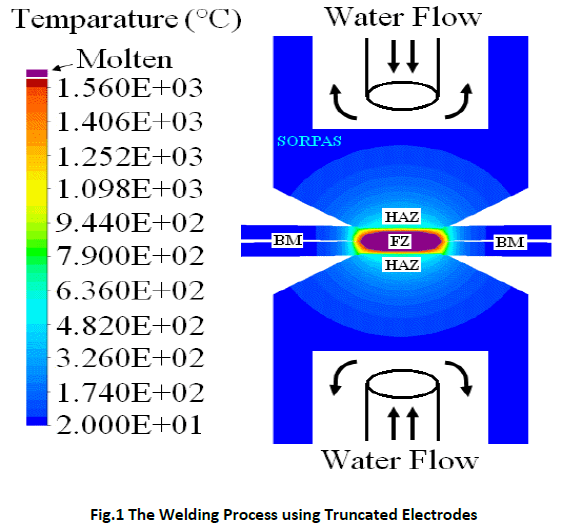
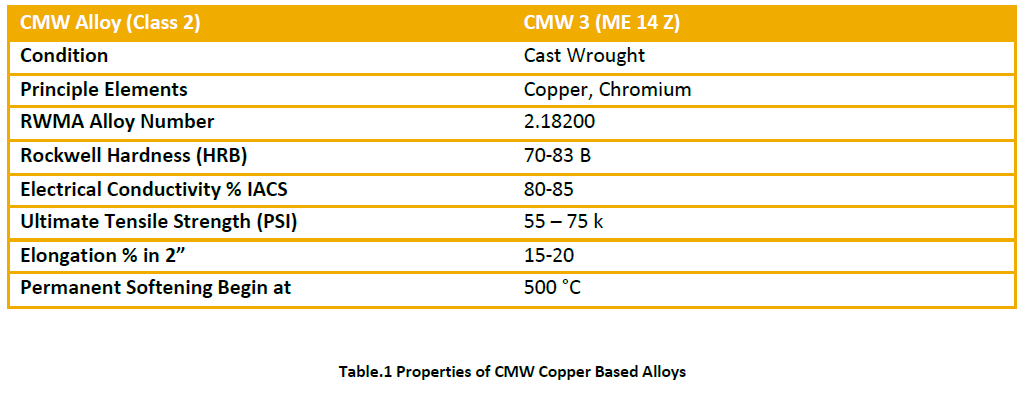
The carbon steel-base metals were prepared in rectangular shape with size of the length (200mm); width (25mm) and thickness (1 and 2 mm). A pair of water cooled (4 litres per minutes) truncated type of electrodes (5 mm of diameter) was used to join these base metals as shown in figure 1[2]. A pair of test sample was initially placed on the top of lower electrode (tip) of the welder as overlaying 60mm on each other (lap joint) and then the initiating pedal was pressed. The heating process was started immediately after the squeezing cycles of pneumatic based electrode actuation is ended. The welding current was released then in accordance with the given preset values. Thereafter the electrode pressing mechanism consumed some time for cold work and eventually returned to the home position of upper electrode. These process controlling parameters (welding current, weld time and electrode pressing force) are set before the welding process starts based on the manufacturers of weld lobe. Table 1 lists the general description of copper based alloy-electrodes that used in this analysis.
The welded samples were underwent macrograph test and later compared with some simulation results that obtained from SORPAS resistance spot welding simulator. The electrode indentation was measured during macrograph analysis. Moreover the electrodes are also underwent macrograph test for the micro structural changes analysis.
Results and Discussion
Micro Indentation of Weld Geometry
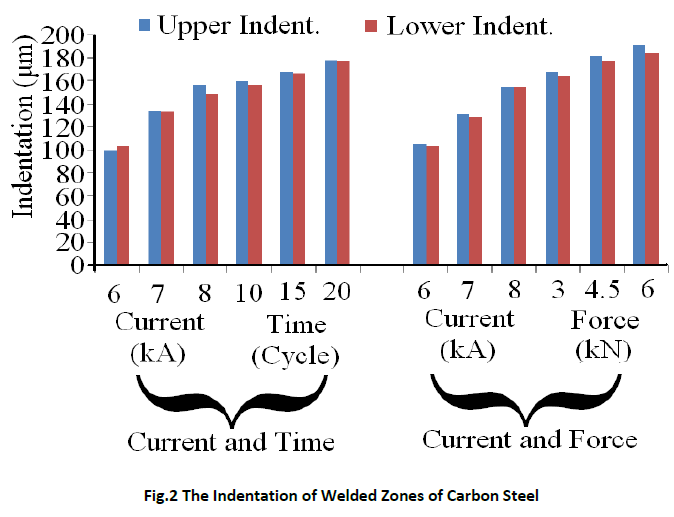
The geometry of the welded areas are firstly analysed for the micro indentation that produced by the electrodes during welding process [3]. It was found that the indentation increases as the process parameters increased. When the welding current, weld time and electrode pressing force were increased from 6kA; 10Cycle; 3kN to 8kA; 20cycle; 6kN, the indentations of the weld zones seemed to be increased proportionally and it has be graphically shown in figure 2.
Macro Views of Selected Weld Zones
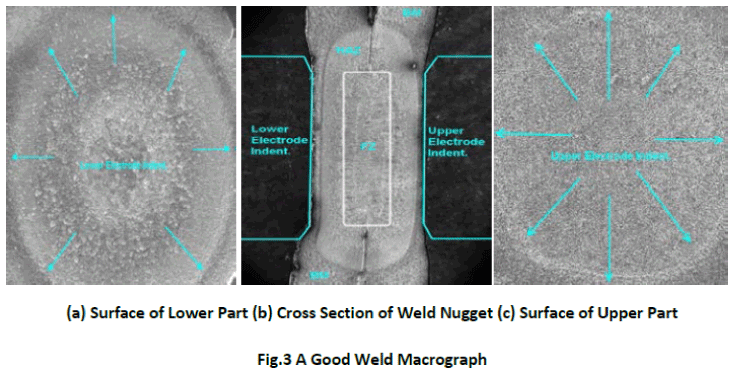
The welded zones were analysed for the electrodes alignment and we found very few good welds using pneumatic based electrode actuation system. One of it is presented in figure 3. The upper and lower electrodes’ surfaces were properly placed during welding process so that a balanced weld nugget was noticed. The welded zone has rectagular-elliptical fusion zone(FZ), rectagular-elliptical heat affected zone (HAZ) and supporting base metals (BM) [4]. There was no side effect on the weld surfaces because the electrodes were very new at the time of welding [5].
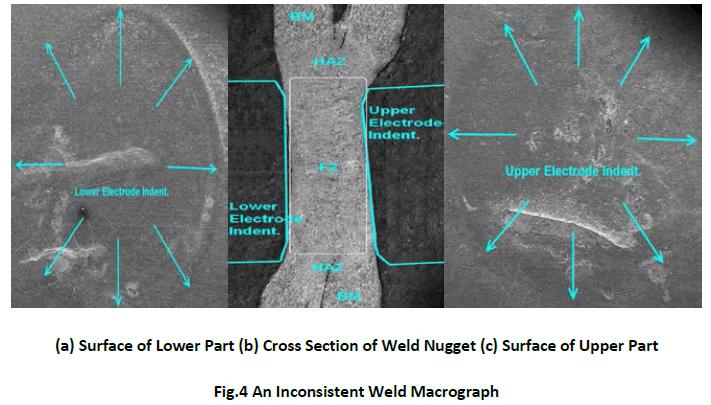
There was another weld nugget which seemed to be a bit deformed due to imbalance of electrode placements. Figure 4 shows misaligned electrode placement after 400 hundreds of weld numbers. A symmetrical weld nugget was not seen as how we noticed in figure 3. This type of weld joint will lead to tear from one during tensile test [6]. Moreover the upper and lower electrode indentation seemed to be inconsistent and caused odd surfaces. These surfaces do exist; not only because of the misalignment but also the wear and tear effects of copper-chromium electrodes.
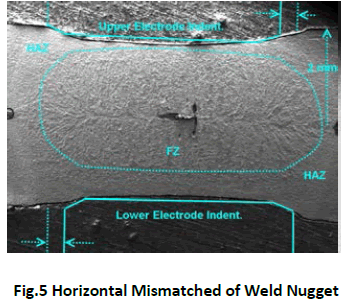
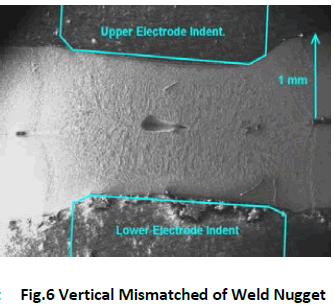
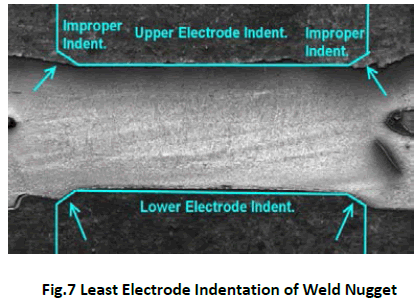
Figure 5 and 6 shows the misalignment of electrodes during welding process which lead to two different scenarios. Figure 5 shows the horizontal mismatch of electrodes so that the weld bead is slightly sloped whereas the figure 6 shows the vertical mismatch of electrodes at which the indentation seemed to be increased. It has to note here that the increase of indentation will affect the strength of weld zones. However poor weld nuggets will have the least indentation which is also not recommended as it affects the strength of weld zones too. Figure 7 shows a poor nugget growth due to lower process parameters set up during welding process. It shows very minimal electrode indentation that can be obtained for mild steels.
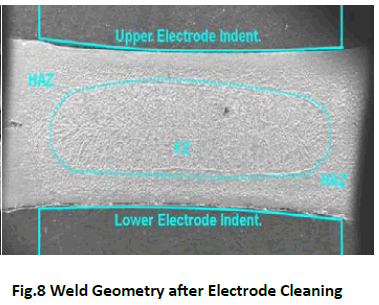
The weld nugget geometry can be varied from numbers of weld repetitions as the electrode tip surface and electrode alignment changes as process as it goes on. This can also be minimized by cleaning the surfaces of electrodes using electrode dresserer. Figure 8 shows a weld nugget that was developed after the cleaning of electrode surfaces. However the weld nugget geometry and its indentations are now looked like different type of electrode tips.
Effect of Electrode Dressing
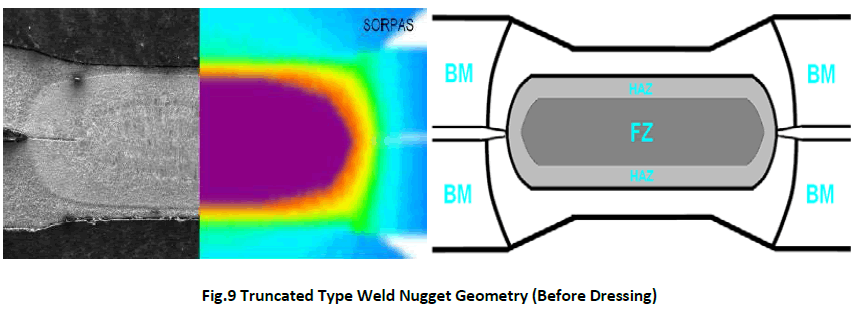
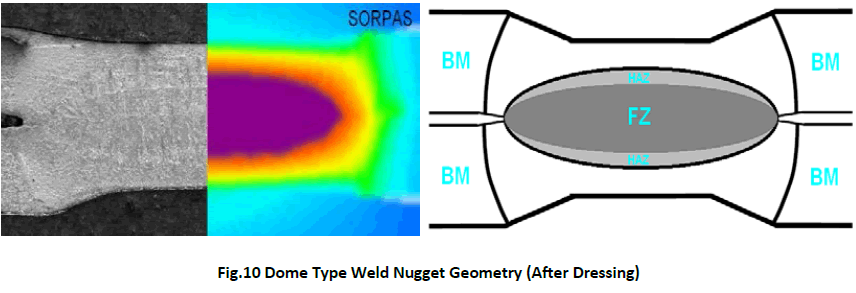
Initally the nugget geometry was formed according to the truncated type electrodes as shown in figure 9. Once it was dressed using electrode dresser after 200 numbers of weld attempts; the weld nuggets geometry became almost same as the dome type of electrodes weld (figure 10). A simulation and experimental results were presented in figure 9 and 10 for the truncated and dome types of electrodes’ welds, respectively.
Electrode Mushrooming Effect
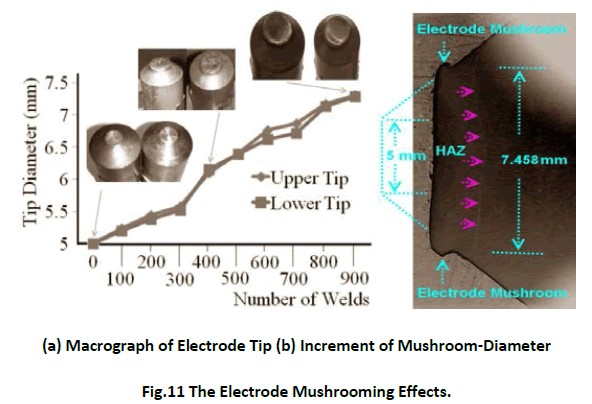
The class two spot welding electrodes are made of copper and chromium according to the RWMA classification. It has two phase mixture of chromium and alpha copper. Basically the changes in properties happen at the rise of temperature due to the precipitation of chromium out of the solid solution [7,8]. This is what we have seen in the micro structural view of electrodes. As the numbers of welds are repeatedly welded,the mushrooming effects are growing due to heat exposure at the electrode tips’ areas (figure 11(b)). In this research the original electrode tip was 5mm of diameter and it was mushroomed to 6.123 mm after 400 weld attempts regardless of base metals. Another reading was taken at around 900 weld attempts and found to be 7.458 mm approximately (figure 11(b)). The musrooming effect was initially about 23% of the original diameter but increased to 49% when it was measured at 900 weld attempts. This is the proof that the mushrooming effects are altering the geometry of weld nugget due to the increase of diameter of electrode tips.
Having considered the mechanical and chemical changes that happened to the electrode after 900 numbers of welds; it was SEM-scanned for structural changes (figure 12). Table 1 list the chemical changes that recorded for three points named as A, B, and C. The point A was the electrode tip at which the base metals’ molten heat (≈1600° C) was directly exposed. The point B and C are the following places lead to the electrode holder which are exposed to the thermal expansions [9]. The EDX result shows that the carbon content is very high at the electrode tip as compared to other two regions. Moreover the chromium to copper ratio is also affected due to heat exposure as shown in table 1. The micro structural views show that the chromium precipitation is higher at the tip (point 1) resulting balanced dual phase alpha copper structure [10]. The fast cooling rate at point C due to water coolant inside the electrode prevents chromium precipitation and resulting imbalance dual phase alpha copper structure. The point B has balanced itself between point A and C.
Optical Views of Selected Weld Zones
The optical camera was used capture some of the weld surfaces that developed before and after the electrode mushrooming effects. Figure 13(a) shows the weld surface that been developed when the electrode was new; while figure 13(b) represents the weld surfaces which was developed after 900 number of welds without dressing. A good weld nugget’s surface has contour rainbow colours due to the heat expansion and almost circle type of indentation. However the electrode mushrooming effects have resulted inconsistent weld surfaces due to improper contact between electrode-to-sheet and also caused partial expulsion.
Conclusions
This paper looks into the weld zone geometry using carbon steel base metals for the electrode alignment and its mushrooming effects. The research has concluded that:
• The electrode indentation increases as the process parameters (current, time and force) are increased.
• The electrode alignment plays important role on the weld geometry regardless of thicknesses.
• A proper weld zone has elliptical weld nugget consists of elliptical fusion and heat affected zones.
• Misalignments of electrode causes expulsion which lead to poor weld zones.
• Electrode dressing changes the weld pattern nuggets. In this experiment; it changes from truncated to dome type of weld zones.
• The initial weld processes up to 400 times increases the electrode tip diameter about 23%.
• The further weld processes up to 900 times increases the electrode tip diameter about 49%.
• The chemical and mechanical imbalances were noticed at the electrode after 900 numbers of welds.
Acknowledgements
I would like to thank Ministry of Science, Technology and Innovation, Malaysia (MOSTI) for their financial support during the experiment. This research is extension of my PhD research work at Nottingham University Malaysia Campus.
References
- Aravinthan, A. and Nachimani, C. 2011. Analysis of Spot Weld Growth on Mild and Stainless Steel. Welding Journal August 2011: 143-147.
- Aravinthan, A and Nachimani, C. 2011. A Metallurgical Study of Spot Weld Growth on Mild Steel with 1mm and 2mm Thicknesses, Journal - The Institution of Engineers, Malaysia, Vol. 72, No. 4: 32-36.
- Nachimani. C 2012. Spot Weld Growth on Medium Carbon Steel (Part 1), International Journal of Mechanical and Materials Engineering (IJMME), Vol. 7, No. 1: 36–40.
- Fatih Hayat. 2011. The effects of the welding current on heat input, nugget geometry, and the mechanical and fractural properties of resistance spot welding on Mg/Al dissimilar materials. Materials and Design 32:2476–2484.
- Yeung, K.S and Thornton, P., H. 1999. Transient Thermal Analysis of Spot Welding Electrodes. Welding Journal January 1999: 1-6.
- Mehdi, M., M., Abadi, Majid, P. 2008. Correlation between Macro/Micro Structure and Mechanical Properties of Dissimilar RSW of AISI 304 Austenitic Stainless Steel and AISI 1008 Low Carbon Steel. Scientific paper, Association of Metallurgical Engineers of Serbia: 1-10.
- Chang, B., H., and Zhou, Y. 2003. Numerical study on the effect of electrode force in small-scale resistance spot welding. Journal of Materials Processing Technology, 139: 635–641.
- Chen, Z., Zhou, Y., and Scotchmer, N. 2005. Coatings on Resistance Welding Electrodes to extend life. SAE International: 1-4.
- Rao, Z., H., Liao, S., M., Tsai, H., L., Wang, P.,C., and Stevenson, R. 2009. Mathematical Modeling of Electrode Cooling in Resistance Spot Welding. Welding Journal May 2009: 111-119.
- Bower, R., J., Sorensen, C., D., and Eager T., W. 1990. Electrode Geometry in Resistance Spot Welding. Welding Journal February 1990: 45-51.
Relevant Topics
- Advance Techniques in cancer treatments
- Advanced Techniques in Rehabilitation
- Artificial Intelligence
- Blockchain Technology
- Diabetes care
- Digital Transformation
- Innovations & Tends in Pharma
- Innovations in Diagnosis & Treatment
- Innovations in Immunology
- Innovations in Neuroscience
- Innovations in ophthalmology
- Life Science and Brain research
- Machine Learning
- New inventions & Patents
- Quantum Computing
Recommended Journals
Article Tools
Article Usage
- Total views: 17848
- [From(publication date):
September-2012 - Apr 01, 2025] - Breakdown by view type
- HTML page views : 13008
- PDF downloads : 4840

