Case Report Open Access
Comparison of Two Techniques of Rehabilitating Ocular Defect with Custom Made Ocular Prosthesis
Rohit Raghavan1, Niveditha Varamudy2, Regish KM2*, Deeksha Sharma3, D.R. Prithviraj4 and Divakar KP5
1Department of Prosthodontics, Royal Dental College, Iron Hills, Chalissery, Palakkad District, Kerala
2Department of Prosthodontics, Coorg Institute of Dental Sciences, Virajpet, S-Coorg, Karnataka, India
3Consultant Prosthdontist And Implantologist, Delhi, India
4Department of Prosthodontics, Govt. Dental College And Research Institute, Bangalore, Victoria Hospital Campus, Bangalore
5Department Of Conservative Dentistry And Endodontics, R.V.Dental College, Karnataka India
- Corresponding Author:
- Regish KM
Department of Prosthodontics
Coorg Institute of Dental Sciences
Virajpet, Karnataka, India
Tel: 9886058536
E-mail: regish2085@gmail.com
Received date: April 20, 2014; Accepted date: July 11, 2014; Published date: July 18, 2014
Citation: Raghavan R, Varamudy N, Regish KM, Sharma D, Prithviraj D, et al. (2014) Comparison of Two Techniques of Rehabilitating Ocular Defect with Custom Made Ocular Prosthesis. J Interdiscipl Med Dent Sci 2:135. doi:10.4172/2376-032X.1000135
Copyright: © 2014 Raghavan R, et al. This is an open-access article distributed under the terms of the Creative Commons Attribution License, which permits unrestricted use, distribution, and reproduction in any medium, provided the original author and source are credited.
Visit for more related articles at JBR Journal of Interdisciplinary Medicine and Dental Science
Abstract
Ocular prostheses have a long history of successful use, and variations in the techniques and materials used have been introduced through the years. Advantages such as reduced treatment time and increased simplicity make this method a good alternative to conventional tedious methods of fabricating ocular prostheses. This case report outlines a sequence of steps for construction of cost effective custom made ocular prostheses by a simple method.
Keywords
Anophthalmic socket; Prosthetic replacement; Stock eye prostheses; Custom made ocular prosthesis; Psychologic effects
Introduction
The art of making artificial eyes has been known to man from the days of early Egyptian and the pernvian Indian, but it was not until the time of World War II that the development of refined plastics came into picture and resulted in satisfactory esthetic ocular prosthesis [1]. The loss or absence of an eye may be caused by a congenital defect, irreparable trauma, tumour, a painful blind eye, sympathetic ophthalmia, or the need for histologic confirmation of a suspected diagnosis leading to esthetic and psychologic effects [2,3]. Depending on the severity of the situation, the surgical management may include one of the three approaches: evisceration, enucleation, or exenteration. The minimal surgical procedure is evisceration--removal of the contents of the globe, leaving the sclera (and at times the cornea) intact. Enucleation is the surgical removal of the globe and a portion of the optic nerve from the orbit. Exenteration, the most radical, is removal of the entire contents of the orbit [4]. A prosthetic replacement is the treatment of choice to return the individual to his normal vocation by producing an acceptable and lifelike appearance. This kind of treatment demands complete understanding and devotion on the part of the Prosthodontist.
Ocular prostheses are either readymade (stock) or custom made. The use of a stock prosthesis is usually advocated when time is limited and cost is a consideration. However, a large and expensive inventory of readymade prostheses is required if an adequate iris selection is desired. The prosthesis must then be fitted to the socket. The custom built hand painted and individually constructed acrylic resin artificial eye has proved to be the most satisfactory ocular replacement. Custom building however necessitates the services of a skilled artist for duplication of the iris and sclera and is an involved and time consuming process [1]. The need for an artificial eye can sometimes be satisfied by stock prostheses that are available in standard sizes, shapes, and colours [5-7]. These prostheses can be used for interim or postoperative purposes. No special skills or materials are required for fabrication. Stock prostheses are relatively inexpensive and can be delivered quickly [5,8]. The required clinical and laboratory time is not significantly less than the time required to make a custom ocular prosthesis, but the result is rarely equal. Fabrication of a custom ocular prosthesis allows infinite variations during construction. The close adaptation to the tissue bed uses the full potential of the implant to produce movement. Implants here refer to a solid sphere used to restore the loss of volume of eye sockets to enhance the prognosis of the subsequent prosthesis. However the use of these implants may be restricted only to cases that have involved surgical excision of substantial volume of underlying tissue. Voids that collect mucus and debris, which can irritate mucosa and act as a potential source of infection, are minimized. The optimum cosmetic and functional results of a custom ocular prosthesis enhance the patient’s rehabilitation to a normal life-style. Nevertheless, a custom prosthesis is more expensive than a stock prosthesis, and several steps are required for its fabrication [5,8]. The ocular prosthesis may be made of either glass or methyl methacrylate resin. Glass is not the material of choice because it is subject to breakage and surface deterioration from contact with orbital fluids that results in a usable life expectancy of only 18 to 24 months. Methyl methacrylate resin is superior to other ocular prosthetic materials in tissue compatibility, esthetic capabilities, durability, color permanence, adaptability of form, cost, and availability. There are various techniques described in literature that details the art of custom making eye prosthesis.
This report describes the two most frequently employed techniques of fabricating custom ocular prosthesis and discusses the advantages and disadvantages of each of these two techniques. While one technique emphasizes on the simplicity of the procedure by using readymade accessories for fabrication the other technique stresses on the need for handmade accessories making the procedure very affordable to the patient.
Technique I
Technique 1 was employed for a male patient aged 61yrs who had an eviscerated eye. The sclera of the patient was removed because of an accidental prick he had on his eye.
Impression technique
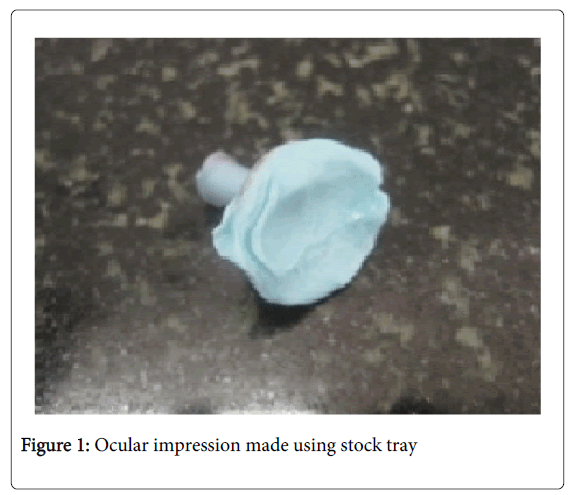
An impression of the anophthalmic socket is made using the method suggested by Allen and Webster [9]. Using a 10 ml disposable syringe the irreversible hydrocolloid in thin consistency is injected into the socket through the hollow stem of the stock tray. The excess material comes out through the perforations in the tray and only the critically needed volume should be allowed to remain (Figure 1).
Globe formation
Gently the impression is removed and washed. Using this impression and a small plastic tumbler, irreversible hydrocolloid mould is prepared by “double alginate technique” (Figure 2). After the irreversible hydrocolloid in tumbler is set, it should be cut using sharp blade to remove the impression, leaving the mould space behind. The mould space should subsequently be filled with mix of molten inlay wax and carving wax. Once the wax is hard, it should be removed from the mould, and only the external surface is smoothened and polished for try-in.
Completing the wax form
The wax form is placed into the clinical defect by introducing it first under the upper lid and then over the retracted lower lid. With the wax form in place, and with the patient’s eyes closed, both socket areas should be palpated simultaneously to compare the globe sizes. The wax form and its corneal prominence are modified where necessary to duplicate the shape of the natural eye. To correlate and match the movements of both the eyes, such that final prosthesis is oriented according to other eye, an aluminium button (to simulate movement of iris) with an outward projection or stent should be used (it helps to easily assess the movement and moreover aluminium button can be heated to change its position for orientation). It is secured on to the centre of the external surface of the wax template. Patient is then instructed to make different gazes and then the movement of the aluminium button is matched with the iris of the other eye.
Iris characterization
At the first clinical appointment itself, an iris button is selected according to the size of iris of other eye. Under natural light, size of the pupil is determined to an average-size of about 3 mm in diameter to satisfy esthetics.
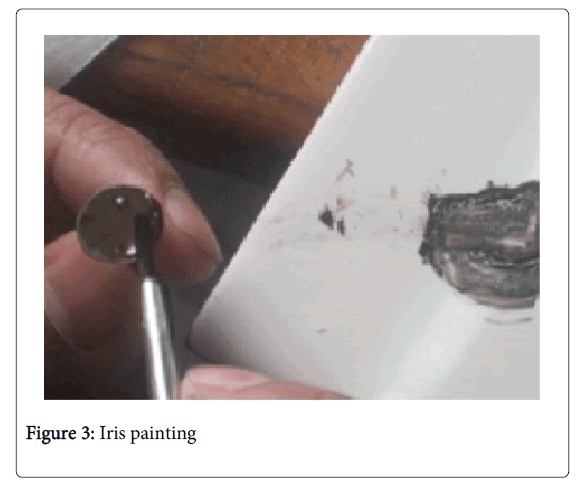
The selected iris button is preliminary painted with acrylic based pigments to match the basic color and tint of the other eye. It is checked for color accuracy against the natural eye by placing a drop of water on the painted surface (Figure 3).Following this, investing of the whole assembly, that is wax template with attached aluminium button, is done in a mix of plaster of paris and dental stone. Following dewaxing, aluminium button is carefully replaced with characterized iris button in the mould space. Acrylization is completed with white acrylic.
Globe completion
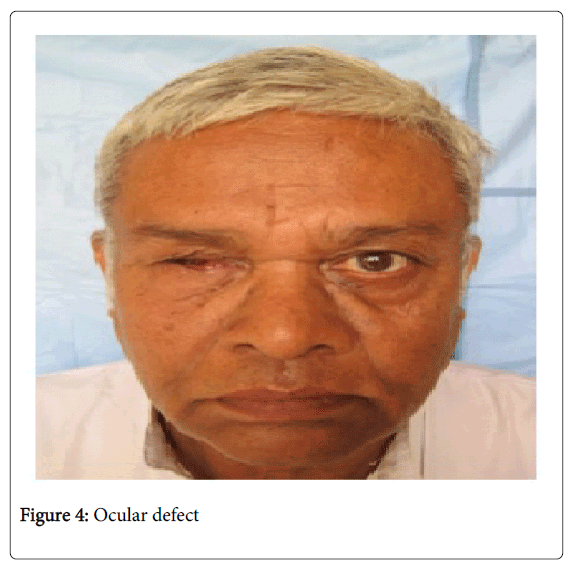
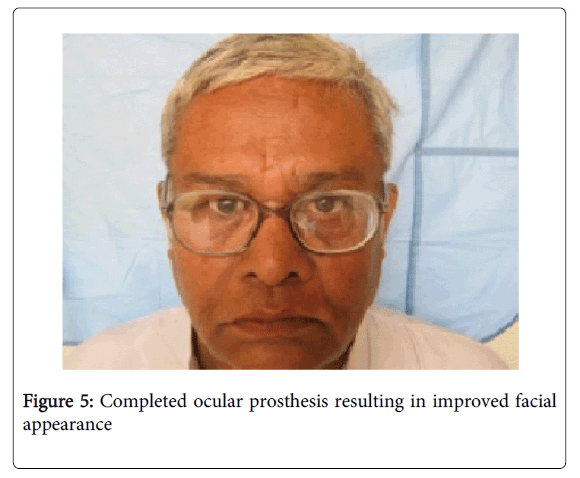
The remaining outer corneal surface is characterized by removing 1mm layer of acrylic resin and painting the reduced scleral surface. Blood capillaries may be imitated by painting or placing thin strands of red nylon fibers along the outer periphery. During the painting patient should be asked to remain calm and relaxed to keep down the sympathetic reflex so that there is no redness of the other eye. Subsequently using the same plaster mould eye shell is packed with transparent acrylic to give natural appearance. Later it is removed from the mould, trimmed, finished and polished. The final prosthesis is then placed into the ocular defect and critically evaluated for eyelid drape, contour, iris color, and dimension (Figure 4, 5).
Technique II
Technique 1 was employed for a female patient aged 27 yrs who had an eviscerated eye. The sclera of the patient was removed because of a persistent infective patch that caused permanent blindness.
Occular impression and cast preparation
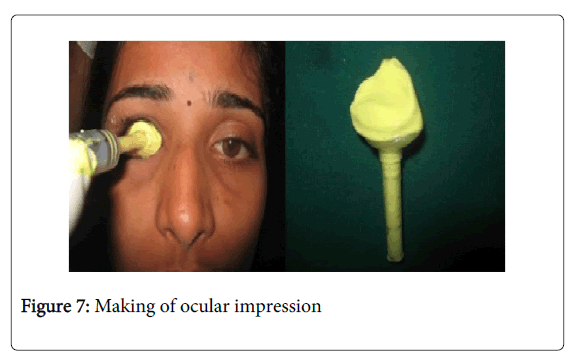
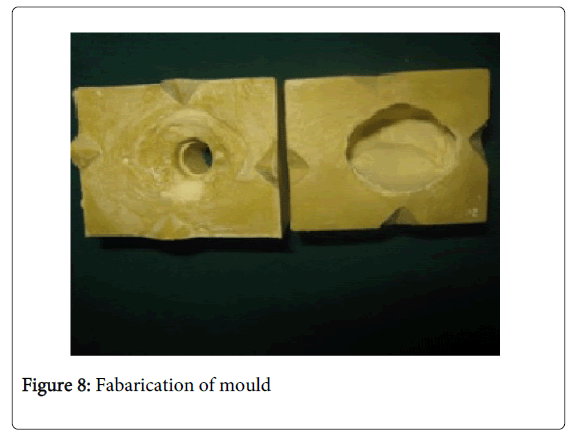
A custom impression tray is made with clear acrylic on to which a syringe is attached to form a stem and a channel for injecting alginate and making the impression of the eye socket (Figure 6). The impression tray is then placed within the socket to support the eyelids and provide a more normal contour. The irreversible hydrocolloid is then made as in technique I. (Figure 7) A two-piece dental stone mold is then made around the impression. The top half of the mold around the stem should be thin and shaped so that the impression tray can be removed when the stone is hard. This mold will be used in the construction of a wax conformer. (Figure 8)
Wax conformer
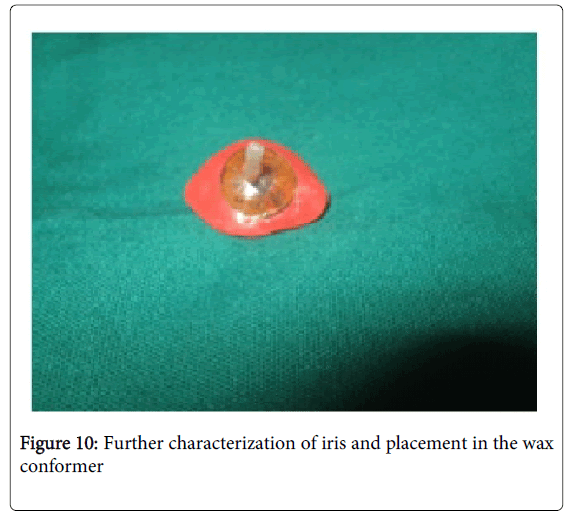
The two-piece mold made from the ocular impression is separated, and the impression material and tray are removed. The mold is coated with a separating medium, modelling wax melted and poured into the cavity through the opening left by the stem of the impression tray. Once the wax has cooled, the mold is opened and the wax conformer removed. Sharp ridges and undesirable irregularities are eliminated, and the surfaces of the wax conformer are made smooth. When the soft tissue contours provided by the wax conformer is found satisfactory, a dot of red ink is placed in the location corresponding to the center of the pupil. A space is made in the wax conformer for the placement of the completed iris-cornea piece, the pupil of which will coincide with the location of the red ink spot. The positioning of corneal/iris buttons is assessed using a graph paper so that its location would exactly simulate the other eye. The iris cornea piece has a stem that indicated the direction of gaze to orient the iris in co ordination with the other eye. The surface of the wax is smoothed and the wax pattern is placed in the socket. The wax pattern is evaluated by comparison with the natural eye. Support of the eyelids, anterior and posterior position of the corneal button, and palpebral fissures are observed and necessary detailing done.
Corneal buttons and iris painting
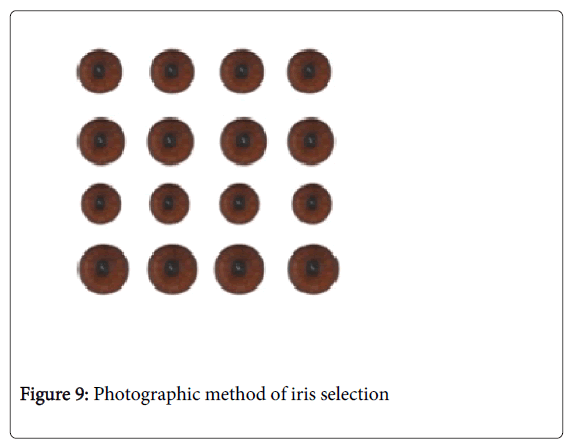
After obtaining wax patterns, they are flasked, dewaxed and packed with heat cure clear acrylic resin which are thoroughly finished and polished to obtain a transparent clear corneal buttons. A digital photograph of the patient’s iris using a digital camera (Nikon COOLPIX P90, New York, U.S.A., 12.1 Megapixel, 24 × optical zoom) is made (Figure 9) and the photograph is compared with the patient’s natural iris. Adjustment of the color, brightness, contrast and hue of the image is done by using graphics software (Photoshop 7.0; Adobe system Inc, San Jose, California). The final image is printed on photo-paper in different sizes and shades to match the patient natural iris. Further color modifications are done on the photographic image by using professional quality color pencils to match and blend with the color of patient’s natural iris. (Figure 10)
Scleral characterization and finishing
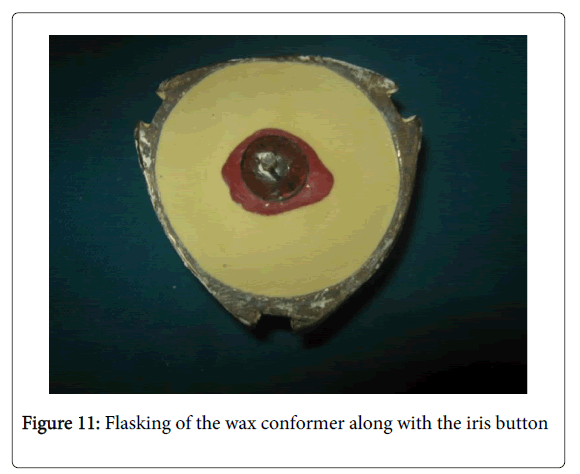
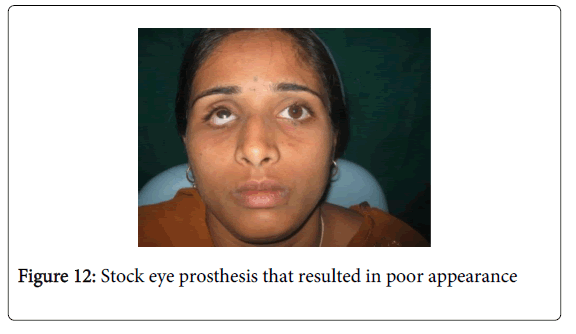
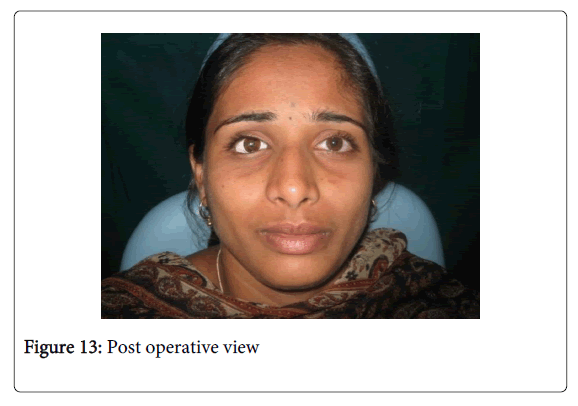
Following this scleral shade matching is done using different shades of acrylic colours. After the final contouring and positioning of the wax pattern and corneal button, the corneal button is sealed to the wax pattern and flasking procedures are carried out (Figure 11). Packing is done using heat cure clear acrylic mixed with selected shade of color. The cured ocular prosthesis is trimmed and thin red nylon threads are incorporated on the sclera to simulate the blood vessels and the final finishing and polishing is done to obtain the final prosthesis. (Figure 12, 13)
Discussion
The goal of palliative care is the achievement of the best quality of life for patients and their families. Eyes are generally the first features of the face to be noticed. Loss of an eye is a traumatic event which has a crippling effect on the psychology of the patient. Several ocular and orbital disorders require surgical intervention that may result in ocular defects [10]. These defects constitute an important maxillofacial deficiency, which requires prosthetic replacement. An ocular prosthesis which gives attention to the accurate duplication of natural color, contour, size, and ocular orientation will provide realism and symmetry for patients who need it [11]. Ocular prosthesis can be fabricated using various methods which includes placing stock ocular prosthesis, custom ocular prosthesis and using ocular implants. Goel and Kumar [12] demonstrated the use of stock prosthesis. Stock prosthesis comes in standard sizes shapes and colors but a custom-made ocular prosthesis replicates the orientation, colour, contour of iris and sclera, and size of the pupil and iris, providing realism and symmetry to the patient’s face. In addition it improves fit of the prosthesis by gaining intimate tissue adaptation thereby reducing chances of ulceration and better mobility. The above two techniques demonstrate simple ways of fabricating custom ocular prosthesis for patient who couldn’t afford implants. The custom made prosthesis retains itself due to sufficient undercuts present in the eye socket. A properly fitted and acceptable custom ocular prosthesis has the following characteristics,
1. Retains the shape of the defect socket.
2. Prevents collapse or loss of shape of the lids
3. Provides proper muscular action of the lids
4. Prevents accumulation of fluid in the cavity.
5. Maintains palpebral opening similar to the natural eye.
6. Mimics the coloration and proportions of the natural eye.
7. Has a gaze similar to the natural eye [13].
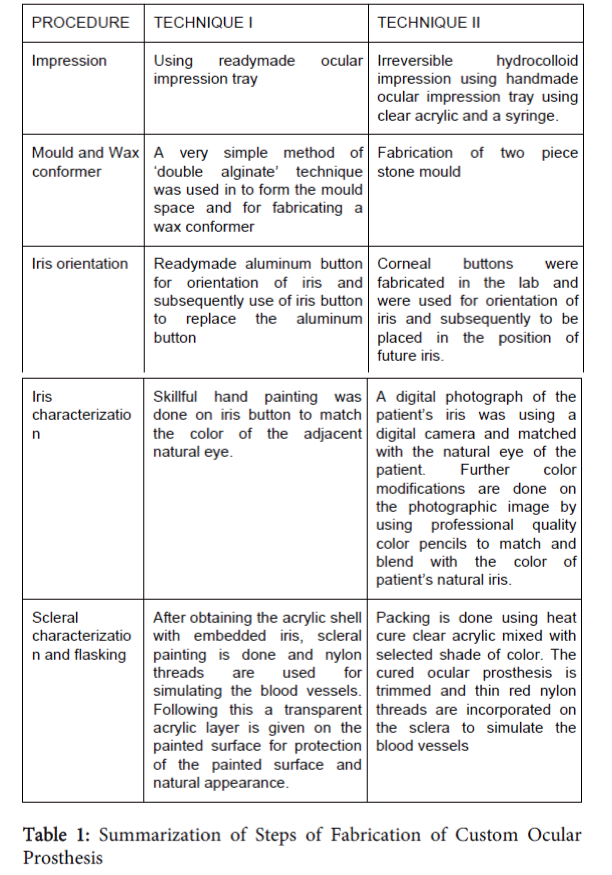
These above mentioned techniques sequentially demonstrate important steps in the fabrication of the prosthesis. Both the techniques have their own advantages and disadvantages and have been sequentially summarized in Table 1.
Taking into account all the steps in fabrication of custom ocular prosthesis in the above mentioned two techniques, it may be concluded that, Technique I is very precise and less time consuming while technique II is more time consuming and cost effective.
Conclusion
Art and science have their meeting point in method. Rehabilitation of a patient who has suffered the psychologic trauma of an ocular loss requires a prosthesis that will provide an accurate duplication of the natural color, contour, size, and ocular orientation. Sequences of steps for construction of custom made ocular prostheses by a simple method are outlined. The patients were rehabilitated and were satisfied both aesthetically and psychologically. These procedures describe the treatment of patients with both esthetic and functional concerns. Every patient has to be individually evaluated and the treatment plan should be devised by weighing the advantages over the disadvantages of each technique. However, long-term studies are needed to confirm the clinical safety of these technologies. The best way to predict the future is to invent it.
References
- Welden RB, Nnranen JV (1956) Ocular prosthesis. J Prosthet Dent6: 272-8
- Raflo GT (1995) Enucleation and evisceration. In: Tasmun W, Jaeger E (editor) Duane’s clinical ophthalmology. Vol. 5 (Revised edn.) Philadelphia: Lippincott- Raven; 1995. pp. 1-25.
- Lubkin V, Sloan S (1990) Enucleation and psychic trauma. Adv Ophthalmic PlastReconstrSurg 8: 259-262.
- Perman KI, Baylis HI (1988) Evisceration, enucleation, and exenteration. OtolaryngolClin North Am 21: 171-182.
- Rahn AO, Boucher LJ (1970) Maxillofacial Prosthetics: Principles and Concepts. Philadelphia, PA, Saunders.
- Chalian VA (1979) Treating the patient with facial defects. Maxillofacial Prosthetics.
- Sykes LM (1996) Custom made ocular prostheses: A clinical report. J Prosthet Dent 75: 1-3.
- Cain JR(1982) Custom Ocular Prosthesis. J Prosthet Dent 48: 690-694.
- Mathews MF, Smith RK, Sutton AJ, Hudson R (2000) The Ocular Impression: A Review of the Literature and Presentation of an Alternate Technique.J Prosthodont 9: 210-216.
- Thakkar P, Patel JR, Sethuraman R, Nirmal N (2012) Custom Ocular Prosthesis: A Palliative Approach. Indian J Palliat Care 18: 78–83.
- Brown KE (1970) Fabrication of an ocular prosthesis. J Prosthet Dent 24: 225-235.
- Goel BS, Kumar D (1969) Evaluation of Ocular prosthesis. J All India OphthalmolSoc 17:266-269.
- Thomas DT (1948) Clinical maxillofacial prosthesis. Quintessence Publishing, London.
Relevant Topics
- Cementogenesis
- Coronal Fractures
- Dental Debonding
- Dental Fear
- Dental Implant
- Dental Malocclusion
- Dental Pulp Capping
- Dental Radiography
- Dental Science
- Dental Surgery
- Dental Trauma
- Dentistry
- Emergency Dental Care
- Forensic Dentistry
- Laser Dentistry
- Leukoplakia
- Occlusion
- Oral Cancer
- Oral Precancer
- Osseointegration
- Pulpotomy
- Tooth Replantation
Recommended Journals
Article Tools
Article Usage
- Total views: 15868
- [From(publication date):
August-2014 - Jul 04, 2025] - Breakdown by view type
- HTML page views : 11207
- PDF downloads : 4661

