Research Article Open Access
A Structure Property Processing Comparison of Cold rolled PM Copper and Cold Gas Dynamically Sprayed Copper
Paul D. Eason1*, Timothy J. Eden2, Shane C. Kennett3 and Michael J. Kaufman3
1School of Engineering, University of North Florida, USA
2Applied Research Laboratory, State College, Pennsylvania State University, PA 16801, USA
3Department of Metallurgical and Materials Engineering, Colorado School of Mines, Golden, CO 80401, USA
- *Corresponding Author:
- Paul D. Eason
School of Engineering, University of North Florida
1 UNF Drive, Jacksonville, FL 32224
Tel: +1-904-620-1875
Fax: +1-904-620-1391
E-mail: paul.eason@unf.edu
Received Date: March 20, 2012; Accepted Date: April 20, 2012; Published Date: April 23, 2012
Citation: Eason PD, Eden TJ, Kennett SC, Kaufman MJ (2012) A Structure Property Processing Comparison of Cold rolled PM Copper and Cold Gas Dynamically Sprayed Copper. J Powder Metall Min 1:101. doi: 10.4172/2168-9806.1000101
Copyright: © 2012 Eason PD, et al. This is an open-access article distributed under the terms of the Creative Commons Attribution License, which permits unrestricted use, distribution, and reproduction in any medium, provided the original author and source are credited.
Visit for more related articles at Journal of Powder Metallurgy & Mining
Abstract
Cold gas dynamic spray processing (cold spray) is a solid-state material deposition process used for coating and repair processes in many alloy systems. Cold spray has long been proposed as a potential method for freeform fabrication. The cold spray process imparts great deformation to the impacting particles, affecting the final properties of the deposit through work hardening, grain refinement and inter-particle bonding. For the purpose of demonstrating the feasibility of cold spray as a viable freeform fabrication method, the microstructure and hardness of bulk cold sprayed samples were characterized in as received and annealed condition, then compared to cold rolled material, which was previously vacuum hot pressed from the same powder stock used in spraying. Microstructure was analyzed via scanning electron microscopy and electron channeling contrast imaging to assess grain refinement and thermal annealing response in the cold sprayed and cold rolled materials. Vickers micro hardness was measured to assess the effects of cold spray impact on the properties of bulk, as-sprayed copper relative to cold rolled copper. In postannealed materials, greater hardness is achieved with the cold spray process through the suspected mechanism of grain refinement unachievable in the rolling process.
Keywords
Annealing; Solid freeform processes; Hardness; Highspeed deformation; Cold spray processing
Introduction
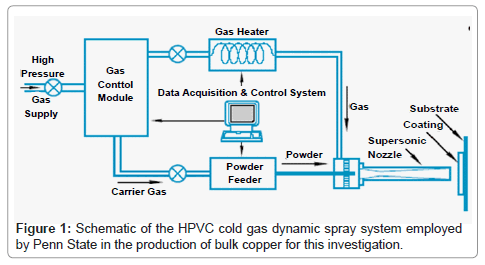
Cold spray (Cold-Gas-Dynamic Spray Processing,or CGDS) was developed in the 1980’s as a means of producing dense metal coatings for materials that could not tolerate the oxidation and thermal effects of traditional thermal spray processing [1]. In cold spray, metallic powder particles are entrained into flowing inert gas upstream from a DeLaval type nozzle, resulting in supersonic particle velocities. The stream of gas and metallic powders is directed at a substrate upon which the particles impinge, resulting in plastic deformation of both the powder particles and the substrate and potential bonding of the particles at their prior surfaces. The particles adhere to the substrate, and each other by means of several proposed mechanisms including mechanical interlocking and fusion through cooperative shear flow at the particle interfaces [2,3]. Once an initial interface with the substrate is established, continued spraying of particles results in coatings of increasing thickness [1,4]. Many investigators have long made reference to the notion that this technique could be employed as a freeform fabrication method, however, there is little demonstration of cold spray in production of bulk material beyond the ongoing efforts of the authors of this study [5,6]. In theory, by continually spraying, thick parts can be built up, similar to many currently available rapid prototyping techniques [7-9].
Considerable success has been achieved creating dense, adherent coatings using cold spray with soft, low strain-rate-sensitivity Face Centered Cubic (FCC) metals [10]. While FCC alloys based on aluminum, copper, and nickel have been the mainstay of cold spray processing, some work has focused on Hexagonal Close Packed (HCP) systems such as titanium and zinc [11-13]. In addition, some investigations have explored admixtures of metal powders and reinforcing phases to produce metal matrix composites [14-19]. Given the ability to use at least one sufficiently ductile precursor powder, composites, in-situ reacting layers and functionally graded materials are all candidates for processing by cold spray. While a few investigators have attempted to assess the role that surface oxides play in the resulting mechanical properties, almost all acknowledge that minimization or elimination of an oxide layer should logically improve the bonding at the inter particle interfaces [1,20]. The myriad of process parameters involved in successful deposition of a dense monolithic deposit indicates that optimization studies will continue for many years.
Despite the growing body of knowledge regarding cold spray and its many process parameters, the mechanisms of particle/substrate and particle/particle adherence remain the subject of much interest. There is a general understanding among researchers that metallic bonding between particles is only achieved in the plastic flow zones near the particle interfaces [1,21,22]. Proposed mechanisms for the adherence of the sprayed particles range from mechanical interlocking to fusion of particles through micro-welding [2,3]. These regions exhibit high strain rates in the form of shear flow roughly tangential to the impact interface [23]. The irregular impacting surface morphology for all but the first impacting particles make this process difficult to model effectively in predicting deformation response for particles following the first layer of impact. The mechanisms of bonding for these particles upon impinging previous particles can be quite different than those bonded directly to the substrate [24-27]. The plastic flow regions are of great interest for they contain the potential fusion zone between powder particles, and because they can exhibit extreme degrees of cold work, residual stress and strain and grain refinement through dynamic recrystallization, all of which are critical to the resulting mechanical properties of the material [28-30].
This study presents an ongoing effort to characterize the microstructure and properties of bulk cold sprayed materials, as opposed to coating. By examining the properties of extremely thick cold sprayed layers, the authors hope to shed light on the potential for cold spray in the production of near net shape parts and rapid prototyping. As this is an extension of previous work, a small portion of the data presented in this article was published in a previous conference proceeding [5]. By assessing the bulk properties of cold sprayed materials and comparing them to the same alloy produced by other production methods, the authors hope to identify unique capabilities in cold sprayed materials, thus extending the cold spray process beyond coating and repair applications.
Materials and Methods
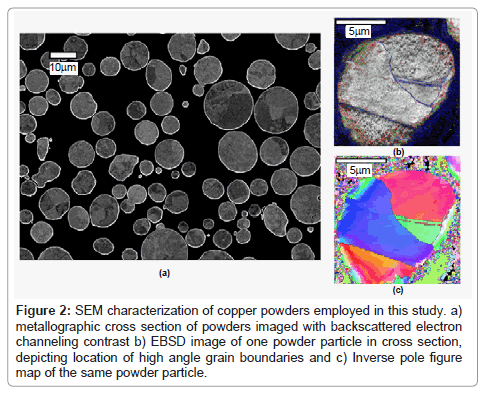
Micro structural characterization and mechanical testing were performed on commercially copper samples produced by cold rolling and cold spraying processes. Powder, identified as Praxair Cu-159, lot #18 was used to fabricate all samples for this study. This material exhibits typical purity of 99.5 wt% and a predominantly spherical morphology with an average particle diameter of 13.2 μm. Powder particles were confirmed by metallography and Electron Backscattered Diffraction (EBSD) to exhibit large grains on the order of roughly 5 μm in diameter or less. To create the substrate for spraying and the samples for cold rolling, powder was hot pressed into a 52 mm x 52 mm x 13 mm plate. When used in reference to the cold sprayed samples, the plate is referred to as the substrate, or P/M substrate. The substrate was grit blasted to remove remnant Grafoil and machined flat/parallel before sectioning into two individual pieces with dimensions 26 mm x 52 mm x 13 mm. One plate was set aside to be cold rolled. The surface that was to be used as the substrate/coating interface on the remaining plate was mechanically blasted to enhance bonding during the spray process. Cold rolled samples were produced using a traditional laboratory-scale cold-rolling mill. The pressed P/M copper plate was fed through the mill in four passes, resulting in a 90% reduction in the thickness, with no heat treatment or recovery process between passes. A sample of unrolled P/M copper was retained as a control for comparison of micro hardness values before and after annealing.
Cold sprayed samples were fabricated at Penn State Applied Research Laboratory. Prior to spraying, bulk metallic powders were dried in a Fisher Isotemp 500 Series oven at 150°F for 24 hours. The powders were then placed into a Praxair 1264 High Pressure/High Volume Powder Feeder mounted on a Praxair 1280 Scale interfaced to a Praxair Jaguar Model 1280 Feed-Rate Control. The powder feed line is routed to the ABB, IRB2400 inverted Robot inside an acoustic booth. Powder feed rate was 8 g/min. Attached to the robot are the pre-chamber, converging/diverging (DeLaval) nozzle, and heater box. A Miller Gold Star 652 CC·DC Welding Power Source provides voltage and current managed by an Omega Temperature Controller. Helium was used as the main process gas at 2.1 MPa and 90°C, with calculated impact velocities of 731 m/s. Samples were continually sprayed for 6 hours, maintaining a constant standoff distance from the part by retracting the robotic spray arm throughout the process, with parameters chosen to optimize deposition efficiency. The resulting bulk sprayed materials were 25 mm thick spray deposits, forming a monolith of bulk copper.
Samples for metallographic and micro structural analysis of the cold sprayed and cold rolled materials were sectioned from the bulk material with a low speed saw. Samples were epoxy mounted and prepared by standard metallographic techniques including abrasive and vibratory polishing. Vibratory polishing was performed in a 0.2 μm colloidal silica suspension on a Buehler Vibromet 2. The resulting mounted samples were also subjected to micro hardness testing with a Qualitest QV-1000AT Micro hardness Tester using a Vickers indenter with a 25gf load and 10 s dwell time. Micro hardness measurements were taken in five linear profiles, parallel to the spray direction. Starting at a distance of 30 μm from the interface, indents were placed at 20 μm intervals, to produce profiles across the interface and through the deposit. Micro hardness measurements from the cold rolled copper were taken on the long transverse face to the rolling direction and in linear profiles parallel to the rolling direction.
Prior to mounting and metallographic preparation, some of the samples were heat treated, to assess their annealing response. Samples were heated in air for one hour in alumina crucibles at 400°C using a digitally controlled Thermolyne tube furnace. After heat treatment, samples were allowed to air cool before being sectioned again to avoid regions affected by heat treatment atmosphere.
Scanning Electron Microscopy (SEM) of the microstructure was performed was performed on a JEOL JSM 6400 tungsten source SEM. Further SEM analysis and EBSD was performed on a higher resolution JEOL JSM 7000F Field Emission SEM.
Figure 2: SEM characterization of copper powders employed in this study. a) metallographic cross section of powders imaged with backscattered electron channeling contrast b) EBSD image of one powder particle in cross section, depicting location of high angle grain boundaries and c) Inverse pole figure map of the same powder particle.
Results
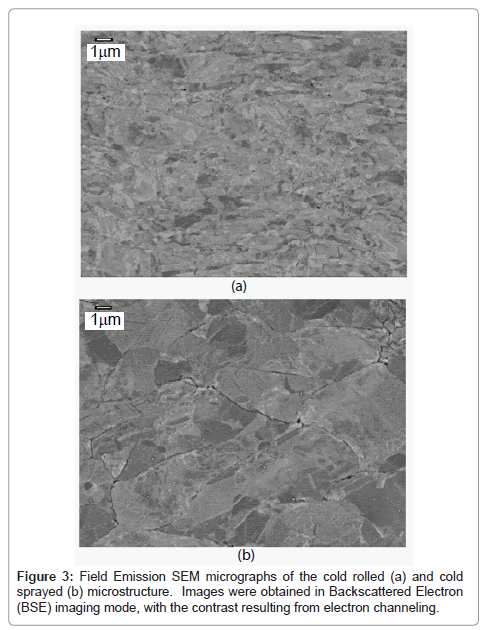
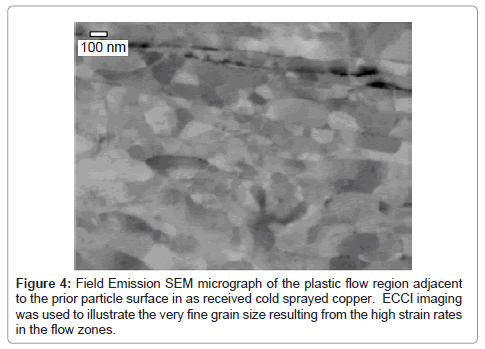
Figure 3 demonstrates the obvious differences between the cold rolled and cold sprayed copper in their respective, as-received states. The cold rolled material is comprised of a very homogeneous microstructure, with grain size considerably finer that that observed in the starting powders, while the cold sprayed material exhibits readily visible discontinuous boundaries between misshapen or splatted powder particles. The rolled material consists of uniform grain sizes on the order of roughly 0.5 microns, the likely result of recrystallization from the high degree of cold work. Further analysis of the as-cold-sprayed samples revealed regions close to the prior powder particle interfaces consisting of small contrasting areas defined by sharp geometric boundaries. These areas, which appear to have experienced recrystallization, were located closest to the prior powder particle surfaces and exhibit regions much finer than 100 nm in diameter, Figure 4. The presence of this recrystallization indicates that the high strain within the shear flow zone was sufficient to induce recrystallization at lower temperature or to sufficiently raise the local temperature to recrystallize the shear zone. Toward the center of the prior powder particles, regions of diffuse contrast with poorly defined boundaries are observed. While the boundaries of these overall regions are defined by sharp lines, finer regions within the shape exhibit a more ‘blurry’ field of contrasting areas. Preliminary EBSD data suggest that these regions are large single crystals, which have experienced elastic and plastic strain during the cold spray process [31].
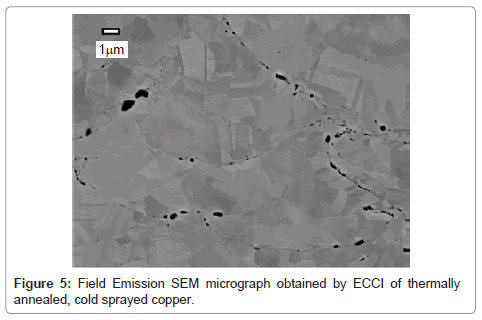
The microstructural images obtained through Electron Channeling Contrast Imaging (ECCI) yield insight into an inhomogeneous distribution of deformation in the as-cold-sprayed structures. It appears that extensive plastic deformation in the regions closest to the prior particle surfaces results in grain refinement due to either dynamic recrystallization or cold work sufficient to reduce the recrystallization temperature of the copper below the temperature of the CGDS process, or some combination of both. The less heavily deformed regions in the middle of the particle exhibit no recrystallization prior to annealing, yet exhibit sufficient residual strain to result in channeling contrast. The majority of these regions possessed sufficient strain energy to drive recrystallization in the thermal annealing process resulting in fully recrystallized grains that were devoid of the channeling contrast (Figure 5). The differential temperature dependence in recrystallization between these regions strongly suggests vastly different degrees of cold work between the plastic flow zones and the regions closer to the center of the powder particles.
Microhardness values are presented in Table 1 for hot-pressed, as-sprayed and cold rolled samples, in the as received and annealed conditions. The values show the average of 20indents taken from a cross section of each material. The micro hardness of the hot-pressed copper appears statistically invariant in its as-received and annealed conditions, as expected. The micro hardness of the cold rolled samples, on the other hand, exhibit elevated values prior to annealing, consistent with the extreme degree of cold work imparted to the samples whereas, after annealing, the micro hardness drops to levels slightly above that of the P/M samples, indicating only a minor degree of grain refinement from recrystallization. The as-sprayed deposit exhibits micro hardness similar to that of the 90% cold worked sample, yet retains a significant fraction of this hardness after annealing. The data presented is averaged from over 100 indents, taken from five linear profiles in the spray direction, far from the spray interface. These numbers are presented as a value for the micro hardness of the bulk material, and are not dependent on location within the bulk. The micro hardness of the annealed spray deposit is lower than the as-sprayed deposit, while remaining significantly higher compared to the hot pressed and annealed cold-rolled sample. The increased micro hardness of the annealed spray deposit relative to the other annealed materials is the likely result of the grain refinement observed in both the plastic flow zone and the large deformed crystals toward the center of the prior powder particles. Figure 6 illustrates the size of the micro hardness indent relative to the microstructure of the cold sprayed sample, which suggests that the indent dimensions and resulting micro hardness values are the result of an aggregate sampling of many of the two distinct regions observed in the cold sprayed microstructure.
| Sample | HV (kg/cm2) | |
|---|---|---|
| As-Rec’d | 400°C1 hr | |
| Hot Pressed | 58.1 | 56.9 |
| Cold Sprayed | 126.4 | 80.9 |
| Cold Rolled | 132.5 | 62.6 |
Table 1: Vickers microhardness data from copper samples.
Conclusion
Elevated micro hardness values in the as-sprayed deposits were observed consistent with the significant cold work imparted by the spray process. The values of micro hardness obtained are likely aggregate values of hardness from two distinct regions in the inhomogeneous structures that are characteristic of the as-sprayed material. The coldsprayed deposits displayed micro hardness values exceeding those of traditional powder metallurgical compacts, and on par with P/M compacts that had been cold rolled to 90% reduction. Post-annealed micro hardness values indicate the potential for strengthened bulk materials through cold spray processing exceeding the performance of cold worked material properties due to the extreme grain refinement imparted by the spray process. While these efforts have not resulted in a complete characterization of the bulk properties, a far better understanding of the effects of impact velocity, hardening response and subsequent annealing response has been established. Experiments employing nano-indentation are planned to further explore the hardness of the two regions, and to quantify their respective role in the aggregate micro hardness.
Acknowledgements
The authors wish to acknowledge their use of Major Analytical Instrumentation Center at the University of Florida and the Electron Microscopy Laboratory at Colorado School of Mines. In addition, John Potter at Penn State ARL was most helpful in production of the cold sprayed materials examined in this study.
References
- Papyrin A, Kosarev V, Sergey K, Alkhimov A, Fomin V (2007) Cold Spray Technology. First Edition, Eslevier, UK
- Borchers C, Gartner F, Stoltenhoff T, Kreye H (2004) Microstructural bonding features of cold sprayed face centered cubic metals. J Appl Phys 96: 4288-4292.
- Assadi H, Frank G, Stoltenhoff T, Kreye H (2003) Bonding mechanism in cold gas spraying. Acta Mater 51: 4379-4394
- Stoltenhoff T, Kreye H, Richter HJ (2002) An analysis of the cold spray process and its coatings. Journal of Thermal Spray Technology 11: 542-550.
- Eason PD, J.A.F, Kennett SC, Eden TJ, Tello K, et al. (2010) Structure processing property relationships in bulk copper produced by cold gas dynamic spray processing. Proceedings of the 2010 International Conference on Powder Metallurgy & Particulate Materials. Hollywood, FL.
- Eason PD, Jason AF, Kennett SC, Eden TJ, Tello K, et al. (2011) On the characterization of bulk copper produced by cold gas dynamic spray processing in as fabricated and annealed conditions. Materials Science & Engineering A 528: 8174-8178.
- Pattison J, Celotto S, Morgan R, Bray M, O'Neill W (2007) Cold gas dynamic manufacturing: A non-thermal approach to freeform fabrication. International Journal of Machine Tools & Manufacture 47: 627-634.
- Cadney S, Brochu M, Ricerh P, Jodoin B ( 2007) Cold gas dynamic spraying as a method for freeforming and joining materials. Surface Coatings and Technology 202: 2801-2806.
- Borchers C, Gartner F, Stoltenhoff T, Assadi H, Kreye H (2003) Microstructural and macroscopic properties of cold sprayed copper coatings. J Appl Phys 93: 10064-10070.
- Vlcek J, Gimeno L, Huber H, Lugscheider E (2005) A systematic approach to material eligibility for the cold-spray process. Journal of Thermal Spray Technology 14: 125-133.
- Novoselova T, Fox P, Morgan R, O'Neill W (2006) Experimental study of titanium/aluminum deposits produced by cold gas dynamic spray. Surface Coatings and Technology 200: 2775-2783.
- Li CJ, Wen-Ya L, Wang YY (2005) Formation of metastable phases in cold-sprayed soft metallic deposit. Surface Coatings and Technology 198: 469-473.
- Lima RS, Kucuk A, Berndt CC, Karthikeyan J, Kay CM, et al. (2002) Deposition efficiency, mechanical properties and coating roughness in cold-sprayed titanium. J Mater Sci Lett 21: 1687-1689.
- Novoselova T, Celotto S, Fox P, Morgan R, O'Neill W ( 2007) Formation of TiAl intermetallics by heat treatment of cold-sprayed precursor deposits. J Alloys Compd 436: 69-77.
- Bolesta AV, Fomin VM, Sharafutdinov MR, Tolochko BP (2001) Investigation of interface boundary occurring during cold gas-dynamic spraying of metallic particles. Nucl Instrum Methods Phys Res 470: 249-252.
- Price TS, Shipway PH, McCartney DG, Calla E, Zhang D (2007) A method for characterizing the degree of inter-particle bond formation in cold sprayed coatings. Journal of Thermal Spray Technology 16: 566-570.
- Li WY, Zhang G, Guo X, Liao H, Coddet C (2007) Characterizations of cold-sprayed TiN particle-reinforced Al alloy-based composites - From structures to tribological behaviour. Adv Eng Mater 9: 577-583.
- Yandouzi M, Sansoucy E, Ajdelsztajn L, Jodoin B (2007) WC-based cermet coatings produced by cold gas dynamic and pulsed gas dynamic spraying processes. Surface Coatings and Technology202: 382-390.
- Sansoucy E, Marcoux P, Ajdelsztajn L, Jodoin B (2008) Properties of SiC-reinforced aluminum alloy coatings produced by the cold gas dynamic spraying process. Surface Coatings and Technology, 202: 3988-3996.
- Li WY, Zhang C, Wang HT, Guo XP, Liao HL, et al. (2007) Significant influences of metal reactivity and oxide films at particle surfaces on coating microsctructure in cold spraying. Appl Surf Sci 253: 3557-3562.
- Wang Q, Birbilis N, Zhang MX (2011) Interfacial structure between particles in an aluminum deposit produced by cold spray. Mater Lett 65: 1576-1578.
- Hussain T, McCartney DG, Shipway PH, Zhang D (2009) Bonding mechanisms in cold spraying:the contributions of metallurgical and mechanical components. Journal of Thermal Spray Technology18: 364-379.
- Dykhuizen RC, Smith MF, Gilmore DL, Neiser RA, Jiang X, et al. (1999) Impact of high velocity cold spray particles. Journal of Thermal Spray Technology 8: 559-564.
- Morgan R, Fox P, Pattison J, Suttcliffe C, O'Neill W (2004) Analysis of cold gas dynamically sprayed aluminum deposits. Mater Lett 58: 1317-1320.
- McCune RC, Donlon WT, Popoola OO, Cartwright EL (2000) Characterization of copper layers produced by cold gas-dynamic spraying. Journal of Thermal Spray Technology 9: 73-82.
- Zahiri SH, Fraser D, Gulizia S, Jahedi M (2006) Effect of processing conditions on porosity formation in cold gas dynamic spraying of copper. Journal of Thermal Spray Technology15: 422-430.
- Li W, Guo X, Yu M, Liao H, Coddet C (2011) Investigation of impact behavior of cold-sprayed large annealed copper particles and characterization of coatings. Journal of Thermal Spray Technology 20: 252-259.
- King PC, Zahiri SH, Jahedi M (2009) Microstructural refinement within a cold-sprayed copper particle. Metallurgical and Materials Transactions A 40: 2115-2123.
- Zou Y, Qin W, Irissou E, Legoux JG, Yue S, et al. (2009) Dynamic recrystallization in the particle/particle interfacial region of cold-sprayed nickel coating: Electron backscatter diffraction characterization. Scr Mater 61: 899-902.
- Luzin V, Spencer K, Zhang MX (2011) Residual stress and thermo-mechanical properties of cold spray metal coatings. Acta Mater 59:1259-1270.
- Eason P, MK, Preliminary Research Results. 2012.
Relevant Topics
- Additive Manufacturing
- Coal Mining
- Colloid Chemistry
- Composite Materials Fabrication
- Compressive Strength
- Extractive Metallurgy
- Fracture Toughness
- Geological Materials
- Hydrometallurgy
- Industrial Engineering
- Materials Chemistry
- Materials Processing and Manufacturing
- Metal Casting Technology
- Metallic Materials
- Metallurgical Engineering
- Metallurgy
- Mineral Processing
- Nanomaterial
- Resource Extraction
- Rock Mechanics
- Surface Mining
Recommended Journals
Article Tools
Article Usage
- Total views: 8819
- [From(publication date):
September-2012 - Apr 21, 2025] - Breakdown by view type
- HTML page views : 4197
- PDF downloads : 4622
