Research Article Open Access
Characterization of Ti and Ti6Al4V Surfaces After Mechanical and Chemical Treatments: A Rational Approach to the Design of Biomedical Devices
Andrea Bagno1*, Monica Dettin1 and Giuseppe Santoro21Department of Industrial Engineering, University of Padova, via Marzolo 9, 35131 Padova, Italy
2Department of Biomorphology and Biotechnologies, University of Messina, viale Gazzi, 98125 Messina, Italy
- Corresponding Author:
- Andrea Bagno
Department of Industrial Engineering, University of Padova
via Marzolo 9, 35131 Padova, Italy
Tel: 39-049-8275004
Fax: 39-049-8275555
E-mail: andrea.bagno@unipd.it
Received date: September 10, 2012; Accepted date: October 18, 2012; Published date: October 21, 2012
Citation: Bagno A, Dettin M, Santoro G (2012) Characterization of Ti and Ti6Al4V Surfaces After Mechanical and Chemical Treatments: A Rational Approach to the Design of Biomedical Devices. J Biotechnol Biomater 2:151. doi:10.4172/2155-952X.1000151
Copyright: © 2012 Bagno A, et al. This is an open-access article distributed under the terms of the Creative Commons Attribution License, which permits unrestricted use, distribution, and reproduction in any medium, provided the original author and source are credited.
Visit for more related articles at Journal of Biotechnology & Biomaterials
Abstract
At present, titanium-based biomaterials for the production of prosthetic devices have achieved a satisfactory quality level; current research aims at improving their surgical dependability and biomechanical performances. In this contest, a crucial aspect is represented by the osseointegration process, which implies the secure association of endosseous devices with the surrounding biological tissue. Osseointegration is largely controlled by surface characteristics with regard to both chemical composition and morphological properties. Therefore, the design of such devices might be guided by the characterization of surface morphology produced by mechanical and chemical treatments. This paper illustrates the results obtained by the application of a set of treatments on titanium (Ti2) and Ti6Al4V alloy (Ti5) samples. Mechanical treatments mainly affect the dimension of larger defects, acting on a macrometric scale and inducing specific patterns; chemical treatments (i.e., acid attack at room or higher temperature) can dissolve surface material altering defect dimensions on a micrometric scale. This study may represent a useful tool for the rational design of implant surface characteristics.
Keywords
Surface analysis; Surface modification; Surface morphology; Titanium; Endosseous devices
Introduction
Endosseous implants are widely used for dental applications since they provide good results in oral implantology [1]; at present, the restoration of one or more teeth is commonly performed by means of titanium screws, which allow successful rehabilitation of edentulous patients [2]. On the other hand, orthopedic devices have to support rapid, stable and durable fixation to bone tissue [3].
In order to improve both surgical dependability and biomechanical performances of dental implants and endosseous prosthetic devices, many efforts have been aimed at promoting secure and congruent association of the metallic surface with the surrounding biological tissue (osseointegration) [1,4]. The formation of newly-grown bone tissue on implant surface highly depends on the characteristics of the surface itself, in terms of both chemical composition and morphological properties; these features are critical in controlling interactions at metal/tissue interface [5-7].
From a general point of view, surface treatments are known to induce modifications in both chemical composition and morphology [8]; they are expressly produced to achieve greater bone-to-implant contact [9,10]. A higher level of biomechanical and functional performances of prosthetic devices can be obtained taking into consideration that surface morphology has to be shaped in order to improve cell adhesion [11,12].
As to the purpose of the present study, a large number of scientific contributions [13] investigates the effects of treatments applied on different surfaces (i.e., titanium and titanium alloy), focusing the influence of abrasive particles size, pollution phenomena, thermal/ mechanical effects, and roughness [9,14-18]. Many other papers concern blasting techniques, addressing different abrasive particle (i.e., rutile, hydroxyapatite, corundum, and alumina), particles size, surface composition and native topography [19-27]. All these studies analyze roughness characteristics measured by profilometry and most of them try to correlate the optimized roughness distribution [28] and the amount of cell adhesion in vitro: indeed, successful osteoblast adhesion allows foreseeing excellent clinical outcomes when increasing the surface area available for bone-to-implant contact, thus improving bone-to-implant interactions [12,29-32].
In the wake of previous investigations [33], the present paper illustrates how and how much mechanical and chemical treatments applied on titanium-based samples can modify surface morphology. Different treatments have been applied on the surface of Ti (Ti2) and Ti6Al4V (Ti5) samples; in particular, acid attack conditions have been adjusted varying both composition and temperature of acidic mixture.
Resulting surface morphology and defect dimensions have been measured by means of optical microscopy and profilometry. In particular, surface defects width (μm) and depth (μm) were estimated. A third adimensional parameter was calculated: the so called “shape ratio”, representing how much the length of the real surface profile increases compared with the geometrically projected one; this parameter allows a preliminary estimation of surface roughness.
The results obtained show that mechanical treatments mainly affect the dimension of larger defects, acting on a macrometric scale and inducing specific patterns, which are likely to be identified on sample surface; on the other hand, chemical treatments (i.e. acid attack at room or higher temperature), can dissolve surface material deeply altering defect dimensions on a micrometric scale.
Taken together, experimental results indicate that: i) defect depth is an amplitude parameter able to properly describe surface characteristics; ii) linear relationships between the amount of defect alteration due to chemical treatment and the duration of the process do exist; iii) the velocity of the attack is temperature dependent.
Materials and Methods
Samples treatments
Commercially pure titanium (Ti2, grade 2) and Ti6Al4V (Ti5, grade 5) disks (Ø 15 mm; height 2.5 mm) were obtained from cylindrical bars by turning. First, they were smoothed (80, 180 or 220 Grit Paper), then sand-blasted (corundum 350 μm for 10 s), passivated with HNO3 (30% (w/w) solution) or attacked with acidic solution (7% HCl/H2O (w/w) and 27% H2SO4/H2O (w/w)) for 1 up to 60 min at room temperature and mixture boiling point. Few samples were also treated by adding few drops of HF solution. Afterwards, the samples were sand-blasted and thoroughly degreased, washed and sonicated in a sequence of solvents: ethanol (Carlo Erba, Milan, Italy), acetone (Janssen, Geel, Belgium), chloroform (LabScan, Dublin, Ireland).
In the following part of the text, sand-blasted surfaces are indicated as SL; sand-blasted and acid-attacked surfaces as SLA. Ti2 identifies commercially pure titanium, while Ti5 indicates titanium alloy (Ti6Al4V). Tables 1 and 2 summarize the sequence of mechanical and chemical treatments performed on Ti2 and Ti5 samples, respectively.
| Sample # | Mechanical treatments | Chemical treatment | |
|---|---|---|---|
| smoothing | blasting | ||
| T1 | No | No | 15 min (BP) in HCl (9%): H2SO4 (35%) |
| T2 | 80 Grit-paper | No | 15 min (BP) in HCl (9%): H2SO4 (35%) |
| T3 | 180 Grit-paper | No | No |
| T4 | 180 Grit-paper | No | 15 min (BP) in HCl (9%): H2SO4 (35%) |
| T5 | No | 350 μm-10 s | 7 min (BP) in HCl (7%): H2SO4 (30%) |
| T6 | No | 350 μm-10 s | 15 min (BP) in HCl (7%): H2SO4 (30%) |
| T7 | No | 350 μm-10 s | 6 min (BP) in HCl (7%): H2SO4 (30%) |
| T8 | No | 350 μm-10 s | 15 min (RT) in HCl (7%): H2SO4 (30%) |
| T9 | No | 350 μm-10 s | 60 min (RT) in HNO3 (29%) |
| T10 | No | 350 μm-10 s | 60 min (RT) in HNO3 (42%) |
| T11 | No | 350 μm-10 s | 120 min (RT) in HNO3 (29%) |
| T12 | No | 350 μm-10 s | 120 min (RT) in HNO3 (42%) |
| T13 | No | 350 μm-10 s | No |
| T14 | No | No | No |
| T15 | No | 350 μm-10 s | 3 min (BP) in HCl (7%): H2SO4 (30%) |
| T16 | No | 350 μm-10 s | 10 min (RT) in HCl (7%): H2SO4 (30%) |
| T17 | No | 350 μm-10 s | No |
| T18 | No | 350 μm-10 s | 1 min (BP) in HCl (7%): H2SO4 (30%) |
RT and BP indicate the room temperature and the boiling point of the mixture used for the attack, respectively.
Table 1: Sequence of mechanical and chemical treatments applied on Ti2 samples.
| Sample # | Mechanical treatments | Chemical treatment | |
|---|---|---|---|
| Smoothing | Blasting | ||
| A1 | 220 Grit-paper | No | No |
| A2 | 220 Grit-paper | No | 15 min (RT) in HCl (9%): H2SO4 (35%) |
| A3 | 220 Grit-paper | No | 60 min (RT) in HCl (9%): H2SO4 (35%) |
| A4 | 220 Grit-paper | No | 45 min (RT) in HCl (9%): H2SO4 (35%) |
| A5 | 220 Grit-paper | No | 30 min (RT) in HCl (9%): H2SO4 (35%) |
| A6 | 80 Grit-paper | No | No |
| A7 | 80 Grit-paper | No | 7 min (BP) in HCl (9%): H2SO4 (35%) |
| A8 | 80 Grit-paper | No | 15 min (BP) in HCl (9%): H2SO4 (35%) |
| A9 | No | 350 μm-10 s | 20 min (RT) in HCl (9%): H2SO4 (35%) |
| A10 | No | 25 μm-10 s | 20 min (RT) in HCl (9%): H2SO4 (35%) |
| A11 | No | 350 μm-10 s | No |
| A12 | No | 350 μm-10 s | 7 min (RT) in HCl (7%): H2SO4 (30%) |
| A13 | No | 350 μm-10 s | 15 min (RT) in HCl (7%): H2SO4 (30%) |
| A14 | No | 350 μm-5 s | 10 min (RT) in HCl (9%): H2SO4 (35%) |
| A15 | No | 350 μm-5 s | No |
| A16 | 80 Grit-paper | No | 7 min (RT) in HCl (9%): H2SO4 (35%) |
| A17 | 80 Grit-paper | No | 15 min (RT) in HCl (9%): H2SO4 (35%) |
| A18 | No | 350 μm-10 s | 10 min (RT) in HCl (9%): H2SO4 (35%) |
| A19 | 220 Grit-paper | No | 20 min (RT) in HCl (9%): H2SO4 (35%) |
| A20 | 220 Grit-paper | No | 23 min (RT) in HCl (14%): H2SO4 (29%):HF(0.5%) |
| A21 | 80 Grit-paper | No | 8 min (RT) in HCl (14%): H2SO4 (29%):HF(0.5%) |
| A22 | 80 Grit-paper | No | 17 min (RT) in HCl (14%): H2SO4 (29%):HF(0.5%) |
| A23 | No | 350 μm-5 s | 1 min (RT) in HCl (9%): H2SO4 (35%) |
| A24 | No | 350 μm-10 s | 10 min (RT) in HCl (9%): H2SO4 (35%) |
| A25 | 220 Grit-paper | No | 120 min (RT) in HNO3 (29%) |
| A26 | 80 Grit-paper | No | 120 min (RT) in HNO3 (29%) |
| A27 | No | 350 μm-10 s | 120 min (RT) in HNO3 (29%) |
| A28 | 80 Grit-paper | No | 15 min (RT) in HCl (9%): H2SO4 (35%):HF(0.5%) |
| A29 | 80 Grit-paper | No | 29 min (RT) in HCl (9%): H2SO4 (35%):HF(0.5%) |
| A30 | No | 350 μm-5 s | 10 min (RT) in HCl (9%): H2SO4 (35%):HF(0.5%) |
| A31 | 220 Grit-paper | No | 60 min (RT) in HNO3 (29%) |
| A32 | 80 Grit-paper | No | 60 min (RT) in HNO3 (29%) |
| A33 | No | 350 μm-10 s | 60 min (RT) in HNO3 (29%) |
| A34 | 220 Grit-paper | No | 60 min (RT) in HNO3 (42%) |
| A35 | 80 Grit-paper | No | 60 min (RT) in HNO3 (42%) |
| A36 | No | 350 μm-10 s | 60 min (RT) in HNO3 (42%) |
| A37 | No | 350 μm-10 s | No |
| A38 | No | 350 μm-10 s | 20 min (RT) in HCl(7%): H2SO4 (30%) |
| A39 | No | 350 μm-10 s | 40 min (RT) in HCl(7%): H2SO4 (30%) |
| A40 | No | 350 μm-10 s | 60 min (RT) in HCl(7%): H2SO4 (30%) |
| A41 | No | No | No |
| A42 | 220 Grit-paper | No | 120 min (RT) in HNO3 (42%) |
| A43 | 80 Grit-paper | No | 120 min (RT) in HNO3 (42%) |
| A44 | No | 350 μm-10 s | 120 min (RT) in HNO3 (42%) |
RT and BP indicate the room temperature and the boiling point of the mixture used for the attack, respectively.
Table 2: Sequence of mechanical and chemical treatments applied on Ti5 samples.
Morphological characterization
In order to characterize Ti2-SL, Ti5-SL, Ti2-SLA and Ti5-SLA surfaces, pictures were acquired with an optical microscope (Leica DMRM) at different magnification (from 50X up to 1000X) to focus both single defects and their local organization. Surface defects width (μm) and depth (μm) were measured by image analysis (Casti Micro Image 3.4 software). Values are averaged on 10 to 20 measurements on each surface. A third dimensional parameter was calculated: the “shape ratio” represents how much the area of real surface profile increases compared with the geometrically projected one. Shape ratio allowed a preliminary description of the amount and relevance of surface defects. A fourth parameter (“bending diameter”) was also calculated assuming surface defects as circular grooves.
Profilometer analysis
600x600 μm2 surface areas on samples were examined under KLA-Tencor P10 Surface Profiler operated at 100 Hz sampling frequency and 50 m/s scanning rate. Seven roughness parameters were determined: Sa, average roughness (μm); Sq, root mean square roughness (Å); Sz, ten-points mean roughness (Å); Sds, peak density (Δ/Å2); Ssk, profile asymmetry; Sku, profile kurtosis; Sq, root mean square profile slope (°).
Results and Discussion
Mechanical and chemical treatments
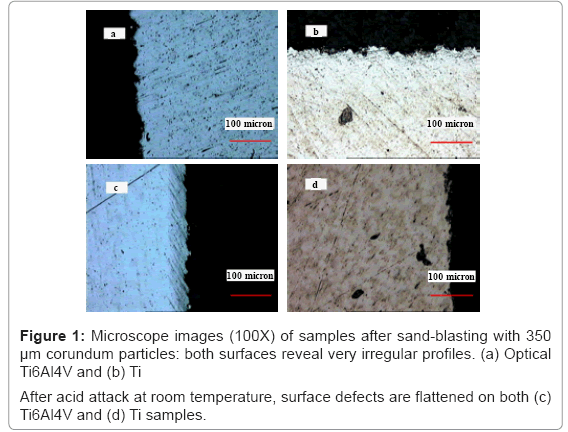
Mechanical treatment (sand-blasting with 350 μm corundum particles) results in very rough surfaces: highly irregular profiles are revealed by optical microscope on Ti2 and Ti5 samples (Figures 1a and 1b); in particular, defects produced by blasting are bigger on Ti2 disks than on Ti5.
The effects of acid attack at room temperature on Ti2 and Ti5 surfaces are depicted in Figures 1c and 1d. Generally speaking, experimental evidences suggest that nitric passivation preserves the surface configuration previously induced by blasting on Ti2 and Ti5 samples (data not shown), while acid attacks makes surface defects flattening. During chemical treatments with acidic mixture, it has been observed that higher amounts of hydrogen bubbles are usually developed on blasted surfaces than on the others and that Ti5 reacts more readily than Ti2. Furthermore, it is worthwhile mentioning that mild attack conditions reduce defects on blasted surfaces; severe conditions (boiling acid mixture or HF addition) result in immediate and strong reaction, thus dissolving great defects and deeply modifying surface aspect.
Amplitude parameters
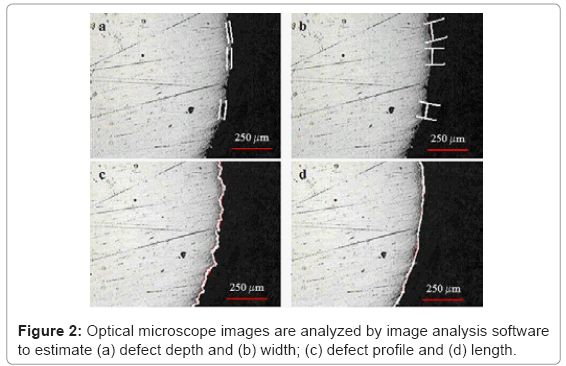
Defect depth and width can be measured on sample surface by image analysis software (Figure 2): they are “amplitude parameters” since they describe morphological characteristics not dependent on the extension of the investigated area. Furthermore, another dimensional parameter termed “shape ratio” has been calculated as the ratio between the length of profile roughness and the length of profile waviness: it does not depend on the extension of the sampled area. Greater the value of this parameter, greater is the area of the real surface.
A forth parameter can be calculated assuming that surface defects are circular grooves i.e. the “bending diameter”, resembling the mean size of the defects given by:

Tables 3 and 4 summarize values of the above mentioned parameters measured on Ti2 and Ti5 samples, respectively.
| Disk # | Depth [m] | Width [m] | Shape ratio [-] | Bending Diameter [m] |
|---|---|---|---|---|
| Ti2-1 | 11.8 | 72.2 | - - | 122.2 |
| Ti2-2 | 12.4 | 125.5 | - - | 330.0 |
| Ti2-3 | 5.5 | 111.9 | - - | 574.7 |
| Ti2-4 | 13.6 | 127.2 | - - | 311.0 |
| Ti2-5 | 17.9 | 129.6 | 2.26 | 252.5 |
| Ti2-6 | 20.7 | 175.3 | 1.81 | 391.8 |
| Ti2-7 | 15.6 | 116.4 | 1.46 | 232.7 |
| Ti2-8 | 18.2 | 97.1 | 1.98 | 147.7 |
| Ti2-9 | 25.2 | 134.1 | 2.50 | 203.6 |
| Ti2-10 | 18.9 | 132.6 | 1.94 | 251.5 |
| Ti2-11 | 22.2 | 120.9 | 2.47 | 186.8 |
| Ti2-12 | 21.7 | 82.1 | 2.45 | 99.4 |
| Ti2-13 | 19.8 | 120.1 | 1.97 | 201.9 |
| Ti2-14 | 17.3 | 159.6 | 1.90 | 385.4 |
| Ti2-15 | 20.2 | 118.3 | 2.95 | 193.4 |
| Ti2-16 | 22.2 | 103.3 | 2.02 | 142.4 |
Table 3: Mean values of defect dimensions on Ti2 samples after mechanical and chemical treatments.
| Disk # | Depth [m] | Width [m] | Shape ratio [-] | Bending Diameter [m] |
|---|---|---|---|---|
| Ti5-1 | 5.1 | 50.7 | - - | 131.8 |
| Ti5-2 | 5.8 | 64.4 | - - | 186.1 |
| Ti5-3 | 6.0 | 51.5 | - - | 116.2 |
| Ti5-4 | 9.4 | 83.5 | - - | 195.6 |
| Ti5-5 | 6.7 | 55.6 | - - | 122.1 |
| Ti5-6 | 12.2 | 106.1 | - - | 240.7 |
| Ti5-7 | 13.4 | 108.9 | - - | 233.6 |
| Ti5-8 | 12.3 | 104.9 | - - | 226.1 |
| Ti5-9 | 16.1 | 96.4 | 1.67 | 160.3 |
| Ti5-10 | 15.6 | 84.3 | 1.45 | 129.8 |
| Ti5-11 | 15.4 | 94.0 | 1.52 | 158.8 |
| Ti5-12 | 10.2 | 116.4 | - - | 341.0 |
| Ti5-13 | 6.7 | 73.0 | - - | 206.4 |
| Ti5-14 | 16.3 | 102.7 | 1.64 | 178.2 |
| Ti5-15 | 7.2 | 63.3 | - - | 146.9 |
| Ti5-16 | 9.7 | 100.4 | - - | 269.0 |
| Ti5-17 | 13.2 | 126.2 | - - | 315.5 |
| Ti5-18 | 7.2 | 61.1 | - - | 137.6 |
| Ti5-19 | 16.4 | 108.5 | 1.82 | 196.4 |
| Ti5-20 | 6.6 | 27.5 | - - | 35.1 |
| Ti5-21 | 7.2 | 69.0 | - - | 172.1 |
| Ti5-22 | 20.3 | 140.0 | 1.94 | 261.6 |
| Ti5-23 | 9.5 | 147.4 | - - | 581.3 |
| Ti5-24 | 13.5 | 111.5 | - - | 243.9 |
| Ti5-25 | 11.4 | 145.0 | - - | 472.5 |
| Ti5-26 | 12.2 | 130.8 | 1.50 | 362.0 |
| Ti5-27 | 5.8 | 68.3 | - - | 208.7 |
| Ti5-28 | 7.0 | 95.5 | - - | 333.0 |
| Ti5-29 | 15.3 | 107.1 | 1.82 | 203.3 |
| Ti5-30 | 5.8 | 56.6 | - - | 145.0 |
| Ti5-31 | 9.3 | 65.6 | - - | 124.6 |
| Ti5-32 | 20.0 | 87.6 | 2.19 | 113.8 |
| Ti5-33 | 19.0 | 75.8 | 1.91 | 94.6 |
| Ti5-34 | 19.7 | 111.5 | 1.96 | 177.8 |
| Ti5-35 | 17.3 | 91.3 | 1.65 | 137.5 |
| Ti5-36 | 14.3 | 75.6 | 1.38 | 114.2 |
| Ti5-37 | 6.4 | 75.6 | - - | 229.9 |
| Ti5-38 | 5.4 | 45.8 | - - | 102.6 |
| Ti5-39 | 6.0 | 47.4 | - - | 99.4 |
| Ti5-40 | 19.5 | 87.1 | 2.10 | 116.8 |
Table 4: Mean values of defect dimensions on Ti5 samples after mechanical and chemical treatments.
Data analysis results
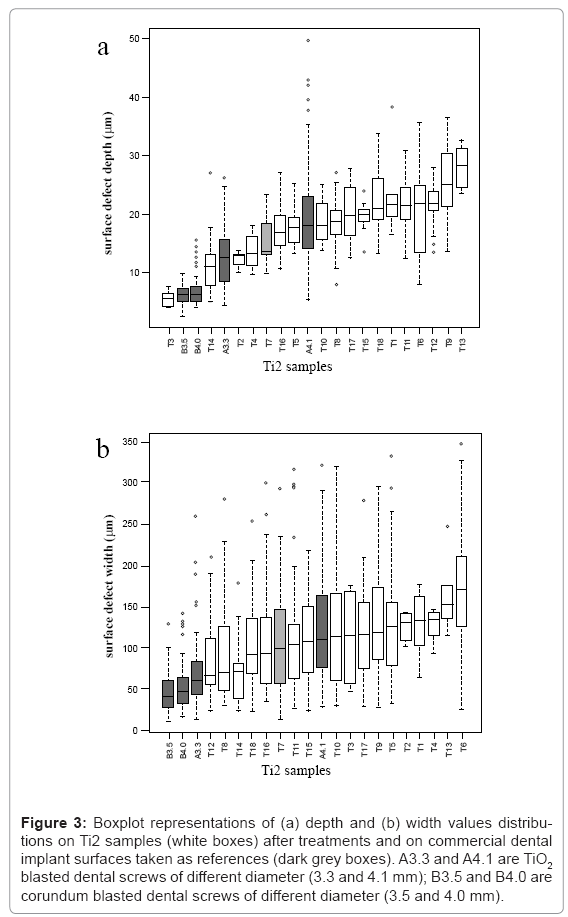
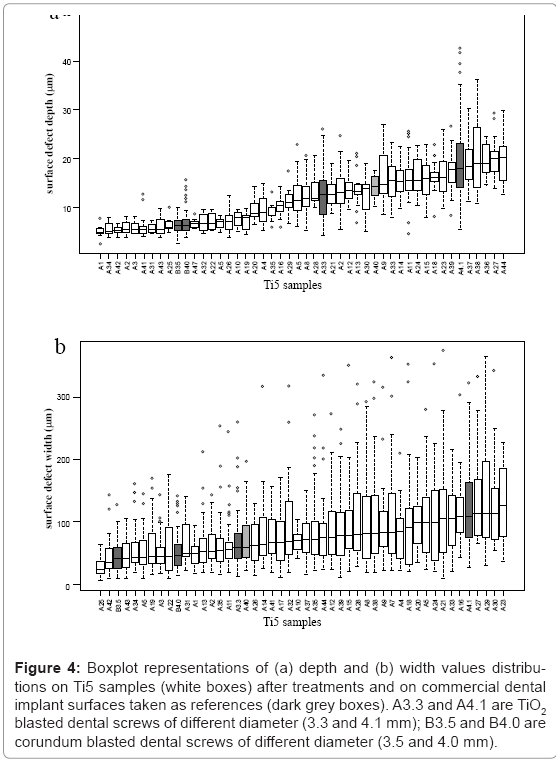
Characteristic dimensions of defects on sample surfaces were evaluated by explorative analysis (boxplot). This method allows summarizing information belonging to a group of homogeneous experimental data in terms of distribution, mean value and variability. A graphical representation is obtained by associating each sample with a box; the box is divided by a horizontal line, representing median value, while its higher and lower edges correspond to the first and the third quartile, identifying the inter-quartile range. Other two lines extend the box below and above, and indicate 1.5 inter-quartile ranges from lower and higher quartile. If experimental points lie outside these lines, they are simply considered outliers.
By means of boxplot representation, depth and width values distributions are considered for Ti2 and Ti5 samples, respectively (Figures 3 and 4). By comparing these distributions, it is worthy to note that depth values are significant, but width vales are not. Therefore, only depth values of surface defects can be used for discriminating different surface configurations.
Figure 3: Boxplot representations of (a) depth and (b) width values distributions on Ti2 samples (white boxes) after treatments and on commercial dental implant surfaces taken as references (dark grey boxes). A3.3 and A4.1 are TiO2 blasted dental screws of different diameter (3.3 and 4.1 mm); B3.5 and B4.0 are corundum blasted dental screws of different diameter (3.5 and 4.0 mm).
Figure 4: Boxplot representations of (a) depth and (b) width values distributions on Ti5 samples (white boxes) after treatments and on commercial dental implant surfaces taken as references (dark grey boxes). A3.3 and A4.1 are TiO2 blasted dental screws of different diameter (3.3 and 4.1 mm); B3.5 and B4.0 are corundum blasted dental screws of different diameter (3.5 and 4.0 mm).
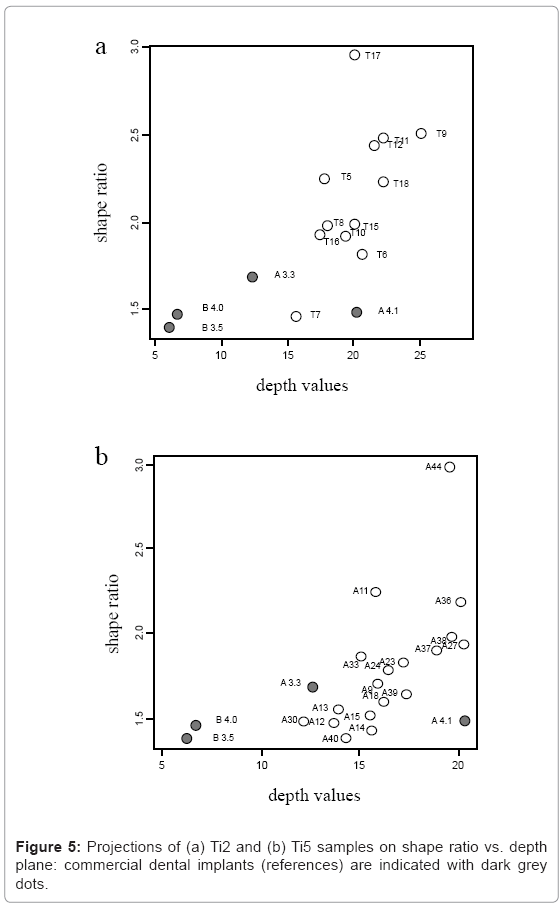
Ti2 and Ti5 samples have been projected as points into planes whose coordinates are represented by shape-ratio vs. depth values: these graphs allow clustering together samples that share similar surface characteristics. With respect to Ti2 samples, it is possible to identify the combination of treatments (T7) responsible for the production of morphological characteristics very similar to those measured on reference surfaces (commercial implants): the corresponding points on the plane are clustered together (Figure 5a). On the other hand, clustering is not unambiguous for T5 samples (Figure 5b): this hampers the identification of a single treated surface similar to references.
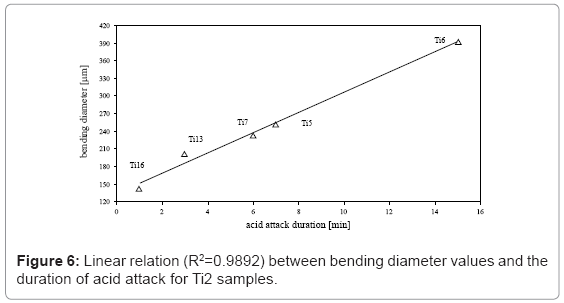
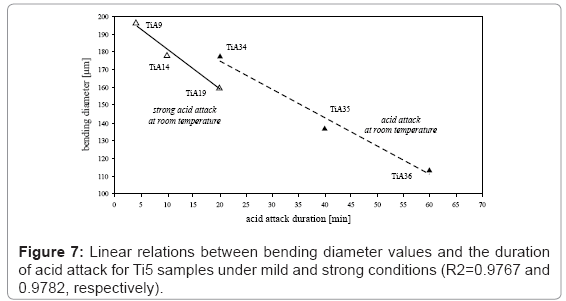
It is worthwhile mentioning a further result concerning the relation between bending diameter and conditions of acid attack; a linear behavior correlates bending diameter values and the duration of the attack but with opposite trends on Ti2 and Ti5 surfaces (Figures 6 and 7). In particular, on Ti2 surface at acidic mixture boiling point, longer the duration of the attack, higher is the bending diameter values (R2=0.98). The amount of the attack is quantified in 17 μm/min. With regard to the Ti5 samples treated at room temperature, bending diameter values decrease while increasing the duration of the attack (R2=0.97); using stronger acidic conditions, the rate of the attack increases from 1.6 up to 2.2 μm/min.
Profilometry data
Roughness properties have been estimated by contact profilometry. Figure 8 shows Ti2 and Ti5 surfaces before (SL) and after acid-attack (SLA); Table 5 summarizes roughness parameters values averaged over three measurements on each sample. An overview of roughness parameters suggests that their mean values increase on Ti2 surfaces due to acid-attack, and decrease on Ti5 surfaces. Consequently, acid-attack produces different effects due to the different conditions of the attack and the different composition of the substrate.
| Surface | Sa [μm] | Sq [μm] | Sz [μm] | Sds [1/cm2] | Ssk [-] | Sku [-] | SΔq [°] |
|---|---|---|---|---|---|---|---|
| Ti -SL | 3.11 ± 0.16 | 3.03 ± 0.20 | 15.31 ± 2.71 | 4.6 E+05 ± 0.305 | -0.19 ± 0.13 | 3.14 ± 0.17 | 4.45 ± 0.16 |
| Ti -SLA | 4.09 ± 0.25 | 5.40 ± 0.28 | 26.45 ± 1.05 | 4.5 E+05 ± 0.173 | -0.31 ± 0.10 | 3.12 ± 0.14 | 6.89 ± 0.18 |
| Ti6Al4V-SL | 3.14 ± 0.37 | 3.97 ± 0.45 | 22.51 ± 2.60 | 4.03 E+05 ± 0.115 | -0.53 ± 0.62 | 3.02 ± 0.28 | 5.48 ± 0.15 |
| Ti6Al4V-SLA | 2.56 ± 0.14 | 3.26 ± 0.20 | 19.01 ± 3.13 | 4.83 E+05 ± 0.208 | -0.22 ± 0.09 | 3.67 ± 0.77 | 4.73 ± 0.20 |
Each value is averaged over three measures (± SD)
Table 5: Roughness parameters values measured on SL and SLA Ti2 and Ti5 sample surfaces.
Conclusions
At present, endosseous implants and prosthetic devices are commonly applied in the field of implantology, providing stable and durable fixation with the surrounding bone tissue.
This study illustrates combinations of mechanical and chemical treatments used to modify the morphology of titanium-based samples; resulting defect dimensions were analysed and characterized by means of optical microscopy and profilometry.
The results obtained can be summarized as: i) defect depth is an amplitude parameter suitable for significantly describing and discriminating different surface characteristics; ii) the amount of defect alteration due to chemical treatment is linearly dependent on the duration of the process; iii) the rate of the chemical attack is temperature dependent.
In conclusion, the present study allows identifying a methodology to address efforts for the rational design of implant surfaces in order to promote implant reliability.
Acknowledgements
Authors would like to acknowledge Prof. Franco Bonollo (Department of Management and Engineering, University of Padova) for optical microscope images; Dr. Stefania Turato (Italian National Council of Research, Padova) for contact profilometry analysis. This work has been in part supported by grant of the University of Padova (University Research Project No. 60A10-1194).
References
- Gotfredsen K, Wennerberg A, Johansson C, Skovgaard LT, Hjørting-Hansen E (1995) Anchorage of TiO2-blasted, HA-coated, and machined implants: an experimental study with rabbits. J Biomed Mater Res 29: 1223-1231.
- Buser D, Mericske-Stern R, Bernard JP, Behneke A, Behneke N, et al. (1997) Long-term evaluation of non-submerged ITI implants. Part 1: 8-year life table analysis of a prospective multi-center study with 2359 implants. Clin Oral Implants Res 8: 161-172.
- Wong M, Eulenberger J, Schenk R, Hunziker E (1995) Effect of surface topology on the osseointegration of implant materials in trabecular bone. J Biomed Mater Res 29: 1567-1575.
- Brånemark PI, Hansson BO, Adell R, Breine U, Lindström J, et al. (1977) Osseointegrated implants in the treatment of the edentulous jaw. Experience from a 10-year period. Scand J Plast Reconstr Surg Suppl 16: 1-132.
- Anselme K (2000) Osteoblast adhesion on biomaterials. Biomaterials 21: 667-681.
- Anselme K, Linez P, Bigerelle M, Le Maguer D, Le Maguer A, et al. (2000) The relative influence of the topography and chemistry of TiAl6V4 surfaces on osteoblastic cell behaviour. Biomaterials 21: 1567-1577.
- Kasemo B, Gold J (1999) Implant surfaces and interface processes. Adv Dent Res 13: 8-20.
- Larsson C, Thomsen P, Aronsson BO, Rodhal M, Lausmaa J, et al. (1996) Bone response to surface-modified titanium implants: studies on the early tissue response to machined and electropolished implants with different oxide thicknesses. Biomaterials 17: 605-616.
- Bigerelle M, Anselme K, Noel B, Ruderman I, Hardouin P, et al. (2002) Improvement in the morphology of Ti-based surfaces: a new process to increase in vitro human osteoblast response. Biomaterials 23: 1563-1577.
- Cochran DL, Schenk RK, Lussi A, Higginbottom FL, Buser D (1998) Bone response to unloaded and loaded titanium implants with a sandblasted and acid-etched surface: a histometric study in the canine mandible. J Biomed Mater Res 40: 1-11.
- Ramires PA, Giuffrida A, Milella E (2002) Three-dimensional reconstruction of confocal laser microscopy images to study the behaviour of osteoblastic cells grown on biomaterials. Biomaterials 23: 397-406.
- Buser D, Schenk RK, Steinemann S, Fiorellini JP, Fox CH, et al. (1991) Influence of surface characteristics on bone integration of titanium implants. A histomorphometric study in miniature pigs. J Biomed Mater Res 25: 889-902.
- Bagno A, Di Bello C (2004) Surface treatments and roughness properties of Ti-based biomaterials. J Mater Sci Mater Med 15: 935-949.
- Taborelli M, Jobin M, François P, Vaudaux P, Tonetti M, et al. (1997) Influence of surface treatments developed for oral implants on the physical and biological properties of titanium. (I) Surface characterization. Clin Oral Implants Res 8: 208-216.
- François P, Vaudaux P, Taborelli M, Tonetti M, Lew DP, et al. (1997) Influence of surface treatments developed for oral implants on the physical and biological properties of titanium. (II) Adsorption isotherms and biological activity of immobilized fibronectin. Clin Oral Implants Res 8: 217-225.
- Lincks J, Boyan BD, Blanchard CR, Lohmann CH, Liu Y, et al. (1998) Response of MG63 osteoblast-like cells to titanium and titanium alloy is dependent on surface roughness and composition. Biomaterials 19: 2219-2232.
- Castellani R, de Ruijter A, Renggli H, Jansen J (1999) Response of rat bone marrow cells to differently roughened titanium discs. Clin Oral Implants Res 10: 369-378.
- Kapanen A, Danilov A, Lehenkari P, Ryhänen J, Jämsä T, et al. (2002) Effect of metal alloy surface stresses on the viability of ROS-17/2.8 osteoblastic cells. Biomaterials 23: 3733-3740.
- Mustafa K, Silva Lopez B, Hultenby K, Wennerberg A, Arvidson K (1998) Attachment and proliferation of human oral fibroblasts to titanium surfaces blasted with TiO2 particles. A scanning electron microscopic and histomorphometric analysis. Clin Oral Implants Res 9: 195-207.
- Mustafa K, Wroblewski J, Hultenby K, Lopez BS, Arvidson K (2000) Effects of titanium surfaces blasted with TiO2 particles on the initial attachment of cells derived from human mandibular bone. A scanning electron microscopic and histomorphometric analysis. Clin Oral Implants Res 11: 116-128.
- Mustafa K, Wennerberg A, Wroblewski J, Hultenby K, Lopez BS, et al. (2001) Determining optimal surface roughness of TiO(2) blasted titanium implant material for attachment, proliferation and differentiation of cells derived from human mandibular alveolar bone. Clin Oral Implants Res 12: 515-525.
- Aparicio C, Gil FJ, Fonseca C, Barbosa M, Planell JA (2003) Corrosion behaviour of commercially pure titanium shot blasted with different materials and sizes of shot particles for dental implant applications. Biomaterials 24: 263-273.
- Li D, Ferguson SJ, Beutler T, Cochran DL, Sittig C, et al. (2002) Biomechanical comparison of the sandblasted and acid-etched and the machined and acid-etched titanium surface for dental implants. J Biomed Mater Res 60: 325-332.
- Adell R, Eriksson B, Lekholm U, Brånemark PI, Jemt T (1990) Long-term follow-up study of osseointegrated implants in the treatment of totally edentulous jaws. Int J Oral Maxillofac Implants 5: 347-359.
- Browne M, Gregson PJ (1994) Surface modification of titanium alloy implants. Biomaterials 15: 894-898.
- Martin JY, Schwartz Z, Hummert TW, Schraub DM, Simpson J, et al. (1995) Effect of titanium surface roughness on proliferation, differentiation, and protein synthesis of human osteoblast-like cells (MG63). J Biomed Mater Res 29: 389-401.
- Wennerberg A, Albrektsson T (2000) Suggested guidelines for the topographic evaluation of implant surfaces. Int J Oral Maxillofac Implants 15: 331-344.
- Klokkevold PR, Johnson P, Dadgostari S, Caputo A, Davies JE, et al. (2001) Early endosseous integration enhanced by dual acid etching of titanium: a torque removal study in the rabbit. Clin Oral Implants Res 12: 350-357.
- Ku CH, Pioletti DP, Browne M, Gregson PJ (2002) Effect of different Ti-6Al-4V surface treatments on osteoblasts behaviour. Biomaterials 23: 1447-1454.
- Perrin D, Szmukler-Moncler S, Echikou C, Pointaire P, Bernard JP (2002) Bone response to alteration of surface topography and surface composition of sandblasted and acid etched (SLA) implants. Clin Oral Implants Res 13: 465-469.
- Abrahamsson I, Zitzmann NU, Berglundh T, Linder E, Wennerberg A, et al. (2002) The mucosal attachment to titanium implants with different surface characteristics: an experimental study in dogs. J Clin Periodontol 29: 448-455.
- Göransson A, Jansson E, Tengvall P, Wennerberg A (2003) Bone formation after 4 weeks around blood-plasma-modified titanium implants with varying surface topographies: an in vivo study. Biomaterials 24: 197-205.
- Bagno A, Genovese M, Luchini A, Dettin M, Conconi MT, et al. (2004) Contact profilometry and correspondence analysis to correlate surface properties and cell adhesion in vitro of uncoated and coated Ti and Ti6Al4V disks. Biomaterials 25: 2437-2445.
Relevant Topics
- Agricultural biotechnology
- Animal biotechnology
- Applied Biotechnology
- Biocatalysis
- Biofabrication
- Biomaterial implants
- Biomaterial-Based Drug Delivery Systems
- Bioprinting of Tissue Constructs
- Biotechnology applications
- Cardiovascular biomaterials
- CRISPR-Cas9 in Biotechnology
- Nano biotechnology
- Smart Biomaterials
- White/industrial biotechnology
Recommended Journals
Article Tools
Article Usage
- Total views: 14665
- [From(publication date):
December-2012 - Mar 31, 2025] - Breakdown by view type
- HTML page views : 10030
- PDF downloads : 4635
